Indications for removal
The dentist decides whether or not to remove a tooth, adequately assessing the situation in the mouth.
Direct indications are:
- advanced caries that cannot be treated;
- lack of a crown, with roots not suitable for implantation;
- crown fracture exposing the pulp;
- the dental unit is a source of infection, as a result of which complications develop (tonsillitis, periostitis, sinusitis, osteomyelitis of the jaw, abscess and phlegmon of the cheek);
- unsuccessful treatment of periodontitis;
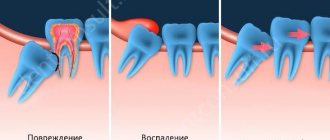
- unerupted or incompletely erupted teeth are the cause of frequent inflammation, damage to nearby tissues and teeth;
- severe mobility with an extreme degree of periodontal damage that cannot be treated;
- purulent periodontitis, which is not relieved by conservative methods;
- crowding of teeth.
Timofeev volume 1-3 / volume 1 / 03. TEETH REMOVAL / 3.3. FEATURES OF REMOVAL OF SEPARATE GROUPS OF TEETH
3.3. FEATURES OF REMOVAL OF SEPARATE GROUPS OF TEETH
♦ Removal of individual teeth and roots in the upper jaw
Removing individual incisors has its own characteristics, which depend on the shape, location and number of roots, on the thickness and density of the bone tissue around the tooth, as well as on the type of instrument used for this intervention.
When removing the upper teeth, the patient lies in a chair in a semi-recumbent position, i.e. with a slightly reclined backrest and headrest. The chair is raised to such a height that the tooth being removed is at the level of the doctor’s shoulder girdle. The doctor is located to the right and in front of the patient.
Removal of upper incisors.
The central incisor has a single cone-shaped root, with a rounded outline in the cross section. In some cases, the top of the root may be slightly curved.
The lateral incisor has a slightly laterally flattened root, oval in cross section. Its upper part can be bent towards the palatine side.
The outer wall of the sockets of the upper incisors is much thinner than the palatal wall.
P
When removing the upper incisors, the doctor uses the index finger of his left hand to move the patient’s upper lip and fix it on the outer side of the alveolar process in the area of the tooth being removed, and the thumb on the palatal side (Fig. 3.3.1).
The upper incisors are removed using straight forceps.
One cheek of the forceps is placed on the vestibule side of the tooth, and the other on the lingual side (grabs the tubercle of the incisor crown and passes higher under the gum). We make rotational and less often swinging movements (Fig. 3.3.1).
Rice. 3.3.1.
Removal of the upper incisors with forceps.
Removal of the roots of the upper incisors is carried out using a straight elevator
or
straight forceps,
as well as forceps for removing small molars -
bayonet-shaped (bayonet) forceps.
The forceps are advanced deep under the gum and grasp the protruding part of the root or a section of bone along with the root. We carry out rotational movements (less commonly, rocking movements), removing the incisor root.
Removal of
the upper canine.
The upper canine has a single, long, massive root, somewhat compressed from the sides. Often the upper part of the root is curved. The walls of the alveoli are much thicker than those of the upper incisors. The bone on the outside of the canine is thinner than on the palate.
When removing the right canine, the patient’s head is turned slightly to the left,
and the left fang
to the right.
The position of the fingers of the doctor's left hand is the same as when removing the upper incisors.
In some cases, when removing the upper left canine, the doctor stands to the right and slightly behind the patient, clasping his head with his left hand from behind on the left. With the index finger of the left hand, the doctor lifts the upper lip, and with the middle finger pulls the corner of the mouth outward and backward. Tooth extraction is carried out using straight forceps.
The first dislocation movement is made
outward, and
then we dislocate the fang with rotational movements, applying significant effort.
Removing the canine root with a straight elevator
With small rotational movements we introduce the working part of it into the area between the alveolus and the root on the palatal side. In this case, the fang moves to the opposite (outer) wall of the socket. By increasing the amplitude of rotational movements, we break the periodontal fibers and dislocate the tooth.
When removing an upper canine with a destroyed crown, we apply straight
or
bayonet-shaped (with wide cheeks)
forceps on the protruding part of the root or a section of bone along with the root. Using a combination of rocking and rotational movements, we remove the fang.
Removal of upper small molars.
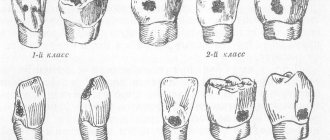
The first upper premolar in almost half of the cases has two roots (buccal and palatal), much less often - three (two buccal and one palatal). If the first upper premolar has one root, then it is flattened laterally, and if there are two or three, then it is round (cone-shaped), often curved. In the case of bifurcation of the roots, the palatal root is located deeper in the bone tissue.
IN
The second upper small molar has one root, which is flattened laterally with longitudinal grooves on the medial and distal sides. It is extremely rare that the root in the upper section is split or bent. The outer wall of the sockets of these teeth is thinner than the inner (palatal) wall.
When removing right premolars, the patient’s head is turned slightly to the left,
and when removing left premolars - slightly
to the right.
The doctor is positioned to the right and in front of the patient. When removing right teeth, you can pull the upper lip and the corner of the mouth outward with the thumb of your left hand, and place your index finger on the alveolar area from the side of the palate (Fig. 3.3.2).
Rice. 3.3.2.
Removal of upper premolars with forceps.
When removing left premolars, we pull back the upper lip with the index finger of the left hand, and the thumb is located on the palatal side of the alveolar process. The latter method can also be used when removing right premolars.
U
The removal of the upper small molars is carried out S -shaped forceps.
One of the cheeks of the forceps is applied on the buccal side, and the other on the palatal side.
The first dislocation movement is made on the buccal
side, and then on
the palatal side.
Rocking movements should be smooth, since sudden movements can break one of the roots of the first premolar.
Rice. 3.3.3.
Removal of the upper premolar root with a direct elevator.
The roots of small molars can be removed with bayonet forceps.
by carrying out rocking movements in the buccal and palatal side. When dividing the roots of the first premolar, they are removed individually using rotating movements.
When removing roots with a straight elevator
we insert the tip of its working part between the destroyed root and the wall of the alveolus from the canine side (when removing the first upper premolar), between the premolars, or between the root of the second premolar and the first molar (when removing the second small molar). The concave part of the elevator tip is directed to the root to be removed, the convex part is directed to the wall of the alveolus (Fig. 3.3.3).
Removal of upper molars.
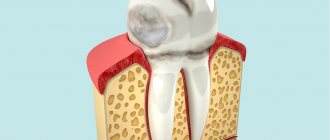
The first and second molars each have three roots (two buccal and one palatal). In the second molar, all roots may be fused. The buccal roots of the first and second upper molars are compressed laterally, shorter and thinner than the palatine
- cone-shaped, massive. The buccal roots may be curved. The roots of the first upper molar often diverge significantly to the sides, the interradicular septa are dense and massive. The third molar (wisdom tooth) has one, two, three or more roots, which often grow together, less often diverge to the sides, and can be curved. The crown of wisdom teeth is usually less developed than that of other molars and is often displaced to the buccal side.
The outer wall of the alveolar process in the area of the second and third molars is thinner than the palatal wall. In the area of the first molar, the outer wall is thickened due to the zygomatic-alveolar ridge of the maxillary bone.
The position of the doctor is the same as when removing the upper small molars. The first and second molars are removed using coronal S -shaped spiked forceps.
A cheek with a spike is placed on the outside of the tooth, with the spike entering the space between the buccal roots, and the other cheek covering the area of the palatine root.
When removing the first upper molar, the first dislocation (swinging) movement should be made in the palatal
side, when removing the second and third
- in the buccal
side.
When removing the upper wisdom tooth, you must use S -shaped forceps for the upper wisdom teeth.
If the coronal part of the first molar is destroyed, with a strong interradicular septum it is necessary to divide the latter using a direct elevator
or
boron.
Then the roots are removed
using a straight elevator
or
bayonet-shaped forceps
(with rotating movements, each individually). Sometimes you have to separate the roots with a chisel and hammer, which in our opinion should be used extremely rarely.
Using a direct elevator,
By introducing the cheek of its working part with the concave side towards the root being removed, and the convex side towards the adjacent tooth, the destroyed second or third large molar is removed.
♦ Removal of individual teeth and roots on the lower jaw
Removal of lower incisors
The lower incisors have one root each. The latter is thin, flattened laterally, and has an oval shape in cross section. The thickness of the outer wall of the alveoli in the area of these teeth is thinner than that of the lingual.
When removing the lower incisors, the doctor stands in front of the patient on the right side of the chair. The patient's lower jaw is located at the level of the elbow joint of the doctor's lowered arm. The thumb is placed on the alveolar process in the area of the tooth to be removed from the outside, while simultaneously pushing back the lower lip, with the remaining fingers and palm they clasp the chin and hold the lower jaw. When removing lower incisors, some doctors place the thumb of the left hand on the outer wall of the alveolar process and pull back the lower lip, the index finger on the lingual side in the area of the tooth being removed, and the middle finger on the chin, holding the lower jaw.
For removal, beak-shaped forceps with narrow (thin) cheeks are used,
which have the shape of a groove with a semicircular end. Forceps are applied to the vestibule and lingual surfaces of the incisor or root. The use of beak-shaped forceps with wide cheeks can damage adjacent teeth. By applying pressure with the thumb of your left hand, you can advance the cheeks of the forceps.
Dislocation (swaying) of an incisor or root is carried out first to the outside,
and then to the inside.
Rotational movements can only be made small, since the roots of the incisors are thin and flattened laterally. Therefore, rotational movements in a larger volume can lead to breakage of the incisor root. The roots of the lateral incisors can be removed using a direct elevator,
introducing the working part between the root and the socket from the canine side.
Removal of the lower canine.
The root of this tooth has a cone-shaped, rounded outline, wider and longer than that of the incisors. The root may be compressed from the sides or sometimes split in its lower part. The root tip may be curved. The canine is located closer to the outer wall of the alveolar process than to the inner (lingual).
When removing a fang, the doctor positions himself in the same way as when removing incisors; he places the fingers of his left hand in the same way. When removing the left canine, the patient turns his head slightly to the right,
and when removing the right -
to the left.
When removing the lower canine and its root, use beak-shaped forceps,
but having
wider cheeks
compared to forceps for removing lower incisors.
The fang is swung outward
and then inward. Rotational movements can also be carried out. The tooth or root is removed from the hole upwards and outwards.
Removing the root of a fang using a direct elevator is dangerous due to its large length and massive size.
U
removal of lower molars
Premolars have one root, which is thinner than that of the lower canine, and the cross section has a rounded outline. Sometimes the root of the lower premolars is flattened or split into two roots (buccal and lingual). The alveolar process of the sockets on the buccal and lingual sides is almost the same thickness.
Rice. 3.3.4.
Removal of right lower premolars with forceps.
When removing the right lower small molars, the doctor is on the right and slightly behind the patient. With his left hand, the doctor clasps the patient’s head, inserts the thumb of his right hand into the oral cavity from the lingual side of the alveolar process and moves the tongue in the area of the tooth being removed, and the index finger from the vestibular side pulls back the corner of the mouth, with the remaining fingers he clasps the body of the lower jaw, its mental part with outside (Fig. 3.3.4).
When removing the left lower small molars, the doctor is to the right and slightly in front of the patient and turns his head towards himself. With the index finger of the right hand, the doctor moves away the cheek, with the middle finger - the tongue, with the thumb they hold the lower jaw by the chin on the side of the tooth being removed, and with the ring finger and little finger - the lower jaw in the area of the incisors and premolars on the opposite side.
ABOUT
The relative thickness of the alveolar process on both sides of the premolar makes it much more difficult to remove teeth with completely destroyed coronal parts using forceps. For these purposes , a direct elevator is used,
inserting the working part of the elevator into the area between the destroyed and adjacent teeth (Fig. 3.3.5).
Rice. 3.3.5.
Removal of lower premolars using a direct elevator.
D
To remove the lower small molars and their roots, beak-shaped root and crown (without spines) forceps with wide cheeks are used.
One cheek of the forceps is applied on the vestibular side, and the other on the lingual side of the tooth being removed. Dislocation movements are made in the buccal and lingual side, carefully increasing their scope. At the end of the dislocation, movements can be made to rotate the tooth.
Rice. 3.3.6.
Removal of the left lower wisdom tooth using forceps curved along a plane.
Removal of lower molars.
The first and second molars each have two roots: mesial (more powerful) and distal. The third molar (wisdom tooth) often has roots fused together, however, the roots of this tooth may not be fused, curved, or with hypercementosis.
The walls of the sockets of these teeth are thick and dense. The first molar has outer and inner sockets of the same thickness, the second and third molar have a thicker outer wall due to the thickening of the jaw in the oblique line area, and the lingual wall is thinner.
When removing the lower right molars, the doctor stands to the right and behind the patient. The doctor clasps the patient's head with his left hand. The thumb of the left hand clasps the alveolar process with
the lingual side and moves the tongue, the index finger - the alveolar process from the side of the cheek and move the cheek, with the remaining fingers we clasp the jaw from the outside.
When removing the left lower large molars, the doctor is to the left of the patient and in front of him. When using forceps curved along a plane to remove the left wisdom tooth, the doctor can be to the right and in front of the patient (Fig. 3.3.6). The fingers can be positioned in the same way as when removing the left lower molars. Some doctors have
the index finger of the left hand is inserted from the lingual side of the alveolar process, the thumb - from the buccal side (pushing the cheek away with it), and the remaining fingers should be grasped around the body of the lower jaw (Fig. 3.3.7).
Rice. 3.3.7.
Removal of the left lower molar using forceps.
To remove large molars, beak-shaped forceps with wide cheeks and spikes are used.
which enter between the roots.
When removing wisdom teeth, especially with insufficient mouth opening, forceps curved along a plane
or
straight elevators are used.
R
The sweeping movements are carried out depending on the thickness of the walls of the socket of the tooth being removed. When removing the sixth tooth, the first movements are made to the cheek
side, and then to the lingual. When removing the seventh and eighth teeth, first in the lingual and then in the buccal direction. We carry out the loosening movements smoothly, without jerking, so as not to break the tooth root. Rotational movements are not used.
Rice. 3.3.8.
Removal of the lower molar using a straight elevator.
When removing the roots of lower molars, it can be used as beak-shaped closing forceps,
and
direct elevators
(Fig. 3.3.8).
If one of the roots is removed, then a lateral elevator is inserted into its hole, the concave
After removing the interroot septum, it is possible
using a lateral (angular) elevator
.
When the medial root of the left lower molar or the distal root of the right lower molar is removed, a lateral (angular) elevator is used to remove the remaining root, the concave surface of the cheek of the latter is facing to the right (away from you),
and with the removed distal root of the left lower molar or the medial root of the right lower molar -
an elevator, the concave surface of the cheek of which faces to the left (toward oneself).
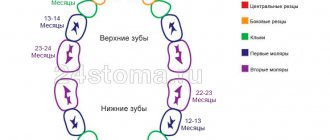
Removal of baby teeth.
The shape of the crowns of baby teeth resembles that of permanent teeth, only the size of the former is much smaller.
The sequence of individual techniques intended for removing permanent teeth is the same as for removing milk teeth. The small size of the crowns of baby teeth should be taken into account, therefore, to remove the latter, special forceps are used, the sizes of which are smaller,
than forceps for removing permanent teeth.
When removing the upper incisors, dislocation movements are performed. The upper canine has a longer root than the incisors. The canine root undergoes resorption later than other primary teeth. The upper incisors and canines are removed using straight, narrow jawed forceps.
or
bayonet-shaped (bayonet) pliers with cheeks of medium width.
The fang can be removed using rotating movements.
When removing upper primary molars, it is necessary to take into account the age of the child and the degree of resorption of the three strongly divergent roots. To dislocate these teeth, forceps for upper primary molars without spines on the cheeks
or
bayonet-shaped forceps with wide cheeks are used.
beak-shaped forceps with narrow cheeks are used for dislocation
The lower canine has a powerful and long root, sitting quite firmly in the bone.
To remove it, in addition to dislocation movements, rotating movements are also used. When removing lower primary molars, non-closing beak-shaped forceps with cheeks without spines are used.
When removing primary molars, it should be taken into account that between its diverging roots there are the rudiments of permanent teeth. Therefore, deep (high) application of the jaws of the forceps should be avoided so as not to damage (remove) the rudiments of permanent teeth
It is recommended to remove the roots of baby teeth using root forceps.
or
elevators
according to generally accepted rules, always remembering that rough manipulations can damage the rudiments of permanent teeth.
Atypical tooth extraction.
Atypical tooth extraction is a method of removing teeth or roots using
a chisel and bur.
Indicated in cases where it is not possible to remove a tooth or root using forceps and elevators. This most often happens with retention or dystopia of teeth, removal of semi-retained or unfinished teeth.
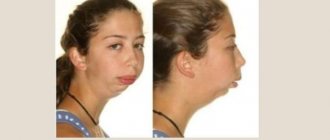
Impacted
are called teeth that are most often normally formed, but did not erupt in the jaw due to one reason or another (inflammatory processes, tumors, tumor-like formations, etc.) at their eruption time.
If the tooth has not completely erupted with its coronal part through the mucous membrane in the dentition, then such a tooth is called semi-impacted.
Some of the impacted teeth may have an incorrect location in the jaw (in the region of the ramus of the lower jaw, in the wall of the maxillary sinus, etc.) - this is called
dystopia
(Fig. 3.3.9, 3.3.10).
Indications for removal of impacted and dystopic teeth are as follows:
• 1) a tooth is removed if its presence is associated with general pathological manifestations (headache, etc.);
• 2) removal of a dystopic or impacted tooth that is located in a tumor or tumor-like formation is indicated;
• 3) removal of these teeth during osteotomies is indicated if these teeth pass through the osteotomy line.
If the tooth does not cause general and local pathological manifestations, then it is not removed.
Atypical tooth extraction is a more labor-intensive surgical procedure than conventional tooth extraction. Therefore, it should be performed with the help of an assistant
(assistant).
The treatment of the surgeon's hands and the surgical field is carried out according to generally accepted methods in surgery. The operation should be performed in a semi-lying or lying position of the patient, the patient's head should be turned towards the surgeon (in case of atypical removal of a wisdom tooth on the left) or in the opposite direction (in case of atypical extraction of teeth on the right). Anesthesia is carried out depending on the location of the tooth being removed. The assistant, using a blunt hook, pulls back the cheek and lip,
thereby creating free access to the surgical field.
Rice. 3.3.9.
Dystopia of the wisdom tooth in the anterosuperior part of the lower jaw branch.
Rice. 3.3.10.
Dystopia of the wisdom tooth in the posterior lower part of the lower jaw branch.
For atypical tooth extraction in the lower jaw, it is recommended to make an angular incision
(if the operation is performed in the area of large molars) or
trapezoid
(in the mental department).
An incision in the mucous membrane is made through the entire thickness of the tissue (to the bone). The horizontal direction of the incision is made along the alveolar ridge (in the absence of a tooth in the dentition) or along the gingival margin. A vertical incision is made from the tooth in front (with a trapezoidal one, also from the tooth behind) to the transitional fold. Using a rasp, the mucoperiosteal flap is peeled off from the alveolar edge towards the transitional fold. Particular care should be taken when detaching the mucoperiosteal flap in the mental section, because here there is a mental foramen of the lower jaw, through which the neurovascular bundle emerges. Injury to the latter causes both bleeding and the development of post-traumatic neuritis. Therefore, the flap must be peeled only to the mental foramen.
A blunt hook is used to hold the detached mucoperiosteal flap.
Using a chisel
The outer wall of the alveolar process is removed in the projection of an unerupted tooth or an unremoved root.
For these purposes, you can use a drill. with a ball-shaped bur
, which are connected to each other with a fissure bur, and the outer bone wall is removed with a chisel or straight elevator.
The roots of the teeth can be sawed with a bur so that they can be removed individually later. Initially, only a small area of the tooth or root is exposed. In the future, it is necessary to free most of the impacted tooth or unremoved root, only after this should attempts be made to remove it using an elevator (the tooth or root is dislocated using lever-like movements). In some cases, it is possible to remove the tip of the tooth root using a trowel
or
a scaling tool.
Using pliers and a sharp bone spoon, we smooth out the sharp bone edges, remove bone fragments and granulation tissue.
If the coronal part of the impacted tooth is turned to the buccal, lingual side or the tooth is located horizontally in a medial-oblique or distal-oblique position, then when the coronal part is exposed from the bone, it can be completely sawed off with a drill or partially removed for unhindered dislocation in the vertical or horizontal direction of the remaining parts of an unerupted tooth. That is, removal of an impacted tooth is possible in parts.
Postoperative bone wound
It is necessary to rinse with hydrogen peroxide to remove small fragments. The mucoperiosteal flap is placed in place. If it is not possible to completely close the bone wound in the area of the alveolar edge, then it is necessary to mobilize a mucoperiosteal flap (i.e., horizontally dissect the periosteum in the area of the transitional fold). The postoperative wound is sutured with catgut or silk. Silk sutures are removed after 4-6 days.
The most common impacted teeth in the upper jaw are canines, wisdom teeth, and central incisors. With the vestibular localization of an unerupted tooth, some swelling of the jaw is noted, and if the tooth is located on the palatal side, then bone changes may not be noted, but more often there will be a protrusion of the bone from the side of the palate. The location of the impacted tooth determines the approach to it when removing it from the vestibular side of the jaw or from the side of the palate.
In some cases, bone protrusion may be absent from both the vestibular and palatal sides; then access to the tooth is made from the vestibule of the oral cavity, because it is the least labor-intensive and traumatic.
On the upper jaw, from the vestibular surface of the alveolar process, we make angular (in the area of molars and premolars), trapezoidal or arcuate incisions (in the frontal region) of the mucous membrane. On the palatal side - arcuate incisions along the alveolar edge or an L-shaped (angular) incision along the alveolar edge and the median palatal suture. There are no fundamental differences in atypical tooth extraction in the upper and lower jaws.
When removing unerupted and dystopic teeth in the upper jaw, special care must be taken to prevent perforation of the mucous membrane, as well as penetration of the tooth or part of it into the maxillary sinus and nasal cavity.
♦ Wound care after tooth extraction
After a tooth extraction, the doctor should check that all parts of the tooth have been removed. It is necessary to remove small bone fragments and overgrown granulations with a sharp surgical spoon (this is evidenced by softened areas), smooth out sharp bone edges and bring the edges of the alveoli closer together (reposition of the fractured edges of the socket). If, upon examination of an extracted tooth or root, an extracted granuloma is discovered at its apex (in the form of a bag ranging in size from several mm to 0.7-1.0 cm), then there is no need to scrape the apical part of the socket. In the case of an acute process, scraping the hole is not indicated.
If accidental damage to the gums (detachments, wounds, etc.) is detected, it is necessary to apply sutures.
After tooth extraction, soft
When this does not happen, you need to bite off the protruding areas of the bone and stitch the wound.
In case of atypical tooth extraction, the postoperative wound must be sutured. Acute purulent inflammatory process in the periodontium and jaw is a contraindication to suturing the socket.
Contraindications
- acute diseases of the cardiovascular system;
- high blood pressure numbers;
- infectious processes in the body;
- menstruation period in women, since blood clotting time is increased, which threatens bleeding after extraction;
- acute, severe diseases of the central nervous system;
- pregnancy, lactation period;
- purulent-septic processes in the oral cavity, which provokes sepsis; mental disorders.
The possibility of extracting a diseased tooth appears after treatment of these pathologies and stabilization of the patient’s condition. In case of an emergency, the doctor performs removal in a patient with concomitant diseases. Severe pain syndrome is the cause of exacerbation of chronic pathology.
Periodontal diseases (gum diseases)
Misaligned wisdom teeth can lead to the development of periodontal disease. If the wisdom tooth is misaligned, the patient is unable to clean out plaque with a toothbrush and floss, which allows bacteria to develop and leads to periodontal disease. If such a disease is neglected, it can cause great harm to the gums and surrounding bone tissue. Periodontal disease does not develop in isolation around a single tooth, so to prevent it, the dentist recommends removing wisdom teeth that are incorrectly positioned.
Removal techniques
The dental surgeon determines the extraction tactics individually for each patient. Takes into account the location of the tooth, the type of pathological process, and the degree of spread. Before extraction, the doctor sends the patient for an x-ray. The goal is to obtain accurate information about the roots and structural features of adjacent teeth and the jaw apparatus in which the pathological unit is located.
Simple operation
In the case of a conventional location, removal occurs in a simple way, which takes no more than 10 minutes, taking into account the effect of anesthesia. The dental surgeon performs the operation according to the following scheme:
- a preliminary survey of the patient about allergies to anesthesia drugs, chronic pathologies and the medications he uses;
- administration of a drug for superficial sedation in order to normalize the mental state and ensure a comfortable extraction process (at the request of the patient or according to indications);
- injection of a local anesthetic into nearby tooth tissues (gums, cheek), usually using ultracaine, which is considered hypoallergenic;
- after 4-5 minutes, the surgeon begins the removal process by loosening the tooth in the surrounding tissues;
- after ensuring mobility, the specialist separates the tooth from the gum and with a sharp movement turns it out of the alveolar socket;
- the wound is treated with an antiseptic solution;
- a tampon with a medicinal substance is applied to the wound, after which the bleeding stops for several minutes;
- if after tooth extraction the wound surface is too large, the doctor will apply several stitches, which will prevent the possibility of postoperative infection and bleeding in the future;
- the patient receives recommendations and goes home after stabilizing his physical and emotional condition.
After removal using a simple method, the patient feels well. If the wound bothers you after the anesthesia wears off, it can be easily eliminated by following your doctor's recommendations.
The hard way
When the doctor sees abnormalities on the x-ray, removal will be carried out in a complex way. The experience and skill of the doctor matters.
Stages in complex removal:
- taking anamnesis;
- choice of anesthesia;
- mandatory administration of sedatives to relieve tension in the patient;
- injection of local anesthesia into 5-6 areas surrounding the tooth to be removed;
- the doctor makes an incision in the gum to access the tooth and roots;
- drilling into several parts using a drill for easy removal and prevention of injury;
- the tooth is separated from the gum in parts and removed;
- a mandatory revision of the resulting hole is performed;
- the wound is treated with an antiseptic and sutured;
- To prevent infection and bleeding, the doctor places a drug or PRP membrane in the wound. They dissolve along with the sutures.
Extraction during the normal course of the process takes 20-30 minutes. If the operation is complicated, the procedure may take up to 2 hours. After a complex removal, the wound is wider, the tissue is more traumatized, the pain is more pronounced and lasts longer.
It is important that removal is carried out carefully, taking into account future implantation. Therefore, it is better to entrust the operation to an experienced doctor who will not damage the alveolar ridge. In this case, you will not have to build up bone tissue before installing the implant.
How is atypical wisdom tooth extraction performed?
Dental operations require proper preparation and consideration of circumstances that influence the result. Let's take a closer look at the stages of atypical wisdom tooth removal.
- Stage 1
- Stage 2
- Stage 3
- Stage 4
- Stage 5
- Stage 6
- Stage 7
Diagnostics. The doctor carefully examines the patient’s oral cavity and conducts a survey. An X-ray examination is performed to assess the position of the wisdom tooth in the jaw. It is important to understand the placement of the tooth in three projections, which can be determined by computed tomography (three-dimensional radiography).
Preparing for surgery . The day before the operation, the patient undergoes professional teeth cleaning and tartar is removed. In some cases, to provide access to the figure eight, it is necessary to remove the tops of nearby teeth. Therefore, before surgery, it is important to properly prepare the dentition, and the canals of nearby teeth should be filled with cement.
Anesthesia . The patient is given local anesthesia before the operation. If we are talking about removing a wisdom tooth in the upper jaw, then in such cases infiltration anesthesia is often sufficient, which numbs the nearby tissues.
Removal of a wisdom tooth in the lower jaw, in addition to infiltration, also requires conduction anesthesia. This is a type of local anesthesia in which an anesthetic is applied to the nerve fibers. With the help of conduction anesthesia, it is possible to numb not only the operated area, but also other parts of the face.
Gum incision . An incision is made to gain access to the atypical wisdom tooth. Depending on the location of the tooth and a number of other features, this is a trapezoidal, arcuate or angular incision. An incision is made through the thickness of the mucous tissue to the bone. Not only the mucous membrane is opened, but also the periosteum.
Removal of a tooth . Complex wisdom tooth removal is performed in parts. Depending on the situation, the doctor visually divides the tooth into 2 or 3 parts, each of which is removed separately.
Cleaning the tooth socket . After the operation, the doctor cleans the tooth socket of small fragments and other elements. This is done using a curette.
Stitching . The final stage of the operation for atypical wisdom teeth removal is the placement of osteoplastic material (to speed up healing) and suturing.
- Stage 1
- Stage 2
- Stage 3
- Stage 4
- Stage 5
- Stage 6
- Stage 7
Price
The cost depends on the technology used:
| Name of service | Price |
| Easy removal | 13,500 rub. |
| Difficult removal | 23,000 rub. |
The case includes:
- anesthesia;
- operation;
- removal and application of sutures.
Additional services:
| Name of service | Price |
| Sedation (per hour) | 12,000 rub. |
| Consultation with existing x-ray examination | 2,000 rub. |
| Consultation and X-ray diagnostics (CT scan in our Center on disk) | 5,200 rub. |
| Sight shot | 500 rub. |
Make an appointment with a surgeon
Recommendations after surgery
- Do not eat or drink water for 6-7 hours after surgery;
- reduce physical activity, avoid visiting saunas and swimming pools for 4-5 weeks to prevent the development of bleeding;
- take analgesics to relieve pain in the early period;
- regularly take antibiotics prescribed for a course of 7 days;
- rinse your mouth with an antiseptic solution after eating;
- follow a gentle diet, avoid solid and irritating foods;
- stop smoking - nicotine provokes bleeding.
Following the doctor's recommendations reduces wound healing time and prevents the development of complications.
Healing process after surgery
After surgery, the recovery period begins. The duration of its continuation is individual, as a rule, 1-2 days. In particularly advanced clinical situations, negative symptoms may persist for about 5-7 days. After a few hours, the effect of the anesthetic wears off, causing the patient to experience severe discomfort. If the pain is pronounced and does not go away on its own, experts prescribe non-steroidal anti-inflammatory drugs and analgesics.
The day after the operation, redness and slight swelling may occur in the area affected by surgical instruments. It gradually goes away on its own when the blood supply to the area is normalized. Sometimes the patient needs to take antibacterial agents (as prescribed by the attending physician).
Immediately after tooth extraction, bleeding may occur. This is due to the fact that a small bloody clot appears in the formed hole. Most often, it can be stopped in the dental chair, but for some, the hemorrhage continues for another 1-2 days. Prolonged bleeding may be due to a number of factors, such as high blood pressure or a bleeding disorder.
To avoid the appearance of hemorrhagic syndrome, it is important to strictly follow all the instructions of the surgeon. People suffering from hypertension are advised to drink motherwort tincture before tooth extraction. With its help, the functioning of the nervous system is normalized and there will be no surges in blood pressure. To monitor the healing process after surgery, you need to see a dental surgeon on days 5-7. There is usually no need to remove sutures as they dissolve on their own. To avoid complications during the recovery period, the following measures are required:
- During the first days, it is recommended to brush your teeth with a soft brush and be especially careful so as not to touch the soft tissues. This will avoid bleeding;
- You should not eat food for the first 2-4 hours. Throughout the entire recovery period, only soft foods and drinks at room temperature are recommended. Chewing on the operated side is prohibited;
- do not rinse your mouth or take baths for the first 24 hours;
- do not undergo strenuous physical activity. Such actions cause an increase in blood pressure, which can lead to hemorrhage.
How long does it take for a wound to heal?
Normally, the wound surface heals in 4-5 weeks. In older patients, healing is delayed due to decreased tissue repair and reduced blood circulation.
The rate of healing depends on the extent of the procedure and the roots. In the case of complex removal of a molar with 3-4 roots, the process of tissue regeneration is delayed up to 20-25 days.
Restoration of gum tissue goes through the following stages:
- in the first days, the wound is closed by a blood clot (thrombus), formed as a result of stopping the bleeding;
- 3-4 days after removal, the thrombus resolves, and new tissue appears on the surface of the wound in the form of a thin film;
- bone tissue forms on the sides of the socket already at 3 weeks;
- after 3-6 months, the hole heals and has no differences with the jaw bone.
The speed of wound healing after removal depends on the characteristics of the body and the age of the patient. If necessary, the doctor corrects the tissue regeneration process with medications and physiotherapeutic methods.
Atypical position of wisdom tooth
Wisdom teeth cause problems for a person not only due to their late eruption. There are frequent cases of atypical position of the wisdom tooth. Thus, due to lack of space in the jaw, the tooth acquires a non-physiological position. For example, third molars on the upper jaw in some cases erupt towards the buccal mucosa, causing injury.
If the wisdom tooth is located at an angle, then as its crown erupts, it puts pressure on the neighboring teeth. With this option, a space is formed between the second and third molars, where food particles fall. Thus, the atypical position of the tooth is fraught not only with compression and injury to neighboring teeth, but also with caries, which develops due to the impossibility of proper hygienic care of the oral cavity.
If the wisdom tooth takes a physiologically correct position, then it does not need to be removed. In the future, if necessary, third molars are used as supporting teeth for prosthetic structures or clasps. The atypical position of a tooth in the upper or lower jaw is often an indication for tooth extraction surgery, especially if it is a source of pain and discomfort for a person.
Complications after removal
Removing a molar tooth is a minor surgical intervention in the human body. Contributing factors for the development of destructive processes in the maxillofacial apparatus may be:
- wound infection due to non-compliance with asepsis during surgery;
- ignoring doctor's recommendations;
- inflammation of nearby lymph nodes;
- bleeding from a wound or inside tissues, which forms subcutaneous hematomas and suppuration;
- injury to the temporomandibular joint due to incorrect doctor tactics;
- damage to healthy teeth;
- perforation of the maxillary cavity due to an abnormal location, which is rare;
- damage to the alveolar process, which prevents implantation in the future;
- inflammation of the alveolar socket;
- damage to the mandibular nerve, which occurs when wisdom teeth are removed;
- dislocation of the jaw.
Complications appear immediately or gradually. This requires mandatory consultation and assistance from a doctor.
Inflammatory processes are considered dangerous. Their development is determined by bacterial microflora. It can provoke a diffuse purulent-septic process. The developed circulatory system of the maxillofacial apparatus contributes to the spread of infection to the tissues and organs of the whole body. This threatens sepsis.
The first signs of the development of inflammation in the wound tissues:
- persistent swelling;
- severe pain;
- increase in body temperature.
Such symptoms become a good reason to seek help from a medical institution.
Categories of difficulty of tooth extraction
There are two types of tooth extraction in dentistry: simple and complex.
Simple removal is performed when it is necessary to remove a tooth with one root, a mobile tooth, or a tooth with an entire crown part, and does not require the doctor to use additional tools. This procedure is also called tooth extraction of category 1 complexity or degree 1. Complex removal is performed in cases where the tooth has several roots, the crown part of the tooth is destroyed, or the tooth has congenital developmental pathologies. This procedure requires the doctor to use a wider range of instruments. In addition, the following types of manipulations are considered complex:
- The tooth is located in the affected bone;
- The crown has completely fallen out and there is nothing to grab onto with the forceps;
- A weak tooth with a filling that crumbles under the action of forceps;
- The tooth is dystopic or impacted;
- When removing the "eight";
- Complex tooth extraction with separation of roots, which are most often directed in different directions or excessively curved inward.
The above are typical main reasons why you have to resort to complex removal, but there may also be individual factors that are difficult to predict.