Main advantages for you:
COMFORT.
No more impressions needed! Nobody likes this stage. No need to sit with a spoon and silicone mass in your mouth. Now, instead, the doctor scans your mouth using an intraoral scanner—in just a few minutes. And a very accurate virtual “cast” is obtained.
SPEED.
Never before have you been able to get a new tooth so quickly! Previously, you had to wait 2 weeks for a dental technician to make you a crown, veneers or inlay. Now the whole process will take only a few days - for complex, large prosthetics. And 1 day - for a small amount of work (single restorations).
ACCURACY.
Much of the manual labor is replaced by smart digital equipment, meaning distortion is kept to a minimum. You receive exactly the restorations that you originally planned with your doctor.
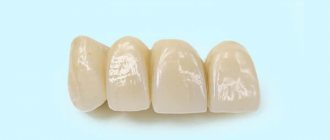
AESTHETICS.
We work with the most modern and aesthetic materials. Our restorations are indistinguishable from your teeth.
PRICE.
We implement a policy of comfortable prices for CAD/CAM dentistry. The cost of digital restorations in our clinic is no higher than the price of conventional (analog) crowns, veneers or inlays.
SPECIAL OPTION!
Test drive a smile. We will print a teeth model (in just 1 day) on a 3D printer. You can see what your smile will look like before treatment begins.
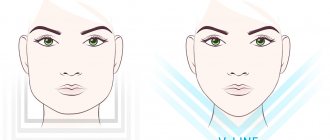
Reasons for changing the arc
Dental defects can be the result of many unfavorable factors. The formation of arches is influenced primarily by heredity. Also, anomalies can result from various formation disorders during embryonic development. Other reasons due to which the upper and lower dentition may be deformed:
- trauma to the maxillofacial area (impact, fall);
- inferiority of the temporomandibular joint;
- presence of bad habits in childhood;
- the presence of some systemic pathologies that affect the condition of the bone tissue in the jaw, etc.
Regardless of what caused the dental anomalies to develop, it is important not to let the disease take its course, but to contact a dental clinic for advice and the development of a treatment plan.
Let's compare traditional and digital dentistry
| Traditional (analog) dentistry | Digital Dentistry CAD/CAM |
| Duration of treatment: from 10 to 14 days | Treatment period: from 1 to 5 days |
| It is impossible to carry out treatment in 1 day | Treatment in 1 day (single crowns, inlays) |
| Need to make impressions | No casts needed |
| Trying on a future smile: wax models need to wait a week or two | Trying on a future smile: 3D model for your next visit |
| Correction of a finished restoration: it must be returned to the laboratory and wait 2-3 weeks | If adjustments need to be made, this happens faster (from 1 to 5 days - depending on the number of restorations). |
Before and after prosthetics
The pictures show the appearance of the finished work. The following photo shows a comparison of BEFORE and AFTER:
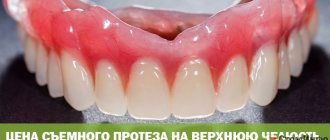
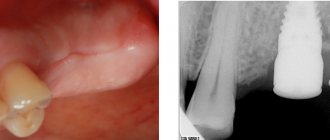
And here is the appearance of the oral cavity after installing permanent metal-ceramic crowns on upper jaw implants:
You see in front of you the so-called. “all-on-6” implantation system, a non-removable version of the all-on-6 design.
Let's summarize our prosthetics using metal-ceramics
From the start of work, from the moment the patient arrived at the clinic to the final installation of permanent metal-ceramic crowns, about 8 months passed: after implantation, we wait 3-4 months, and after installing temporary crowns, the patient walks with them for at least 3-4 months. And only after this, if the patient and the doctors are satisfied with everything externally, then the temporary structures are replaced with permanent ones.
In general, we can say that the patient received exactly THAT quality
and
THAT appearance
after implantation that she wanted, having previously visited quite a lot of clinics.
Even with temporary crowns, the patient was VERY happy
that she got rid of the removable denture that she hated. Well, when we made permanent crowns, which were much better and more beautiful than temporary ones, she was simply happy!
This is exactly the type of prosthetics when the result exceeds all, even the most daring, expectations of the patient!
And here, in the clinics of the German Implantology Center, it doesn’t happen any other way.
Where is CAD/CAM technology used?
In orthopedics:
ceramic crowns, veneers and lumineers, ceramic inlays, implant prosthetics.
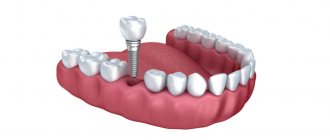
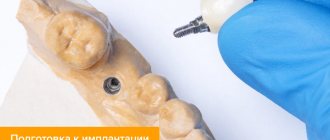
In implantation:
surgical templates. In our digital laboratory we can produce special matrices for precise and atraumatic installation of implants. Implantation becomes completely planned: the position of the implant is determined in advance, taking into account all the characteristics of the patient and the future restoration.
For simultaneous implantation:
immediately after tooth extraction, you can place a high-quality aesthetic and durable temporary “digital” crown on the implant - in 1 visit.
Directions: Digital dentistry (CAD/CAM technology) Surgery and implantation Prosthetics (Orthopedics)
It was: an old removable denture. Now: a beautiful and youthful smile: implantation, prosthetics.
Doctors: Tsarkov Vitaly Ashurov Roman
Directions: Digital dentistry (CAD/CAM technology) Prosthetics (Orthopedics)
Restoration of teeth with crowns.
Doctor: Gikavyi Vladislav
Directions: Digital dentistry (CAD/CAM technology) Prosthetics (Orthopedics)
Dental restoration with crowns and veneers.
Doctor: Gikavyi Vladislav
Directions: Digital dentistry (CAD/CAM technology) Prosthetics (Orthopedics)
Dental restoration with crowns and veneers.
Doctor: Lipets Anna
Directions: Digital dentistry (CAD/CAM technology) Prosthetics (Orthopedics)
Smile restoration with ceramic veneers and crowns.
Doctor: Pashkevich Dmitry
Directions: Digital dentistry (CAD/CAM technology) Prosthetics (Orthopedics)
Smile restoration with ceramic veneers and crowns.
Doctor: Platonov Maxim
Directions: Digital dentistry (CAD/CAM technology) Surgery and implantation Prosthetics (Orthopedics)
Restoring smile aesthetics: implantation, prosthetics.
Doctors: Tikhon Yuri Ivanov Vladimir
Directions: Digital dentistry (CAD/CAM technology) Surgery and implantation Prosthetics (Orthopedics)
Implantation, dental restoration with ceramic crowns.
Doctors: Geeky Vladislav Ashurov Roman
Directions: Digital dentistry (CAD/CAM technology) Prosthetics (Orthopedics)
Conversion of composite restorations to ceramic veneers.
Doctor: Tsarkov Vitaly
Directions: Surgery and implantationProsthetics (Orthopedics)
Complete smile restoration: implantation, prosthetics.
Doctors: Geeky Vladislav Ashurov Roman
Directions: Digital dentistry (CAD/CAM technology) Prosthetics (Orthopedics)
Tooth restoration with a ceramic crown.
Doctor: Lipets Anna
Directions: Digital dentistry (CAD/CAM technology) Prosthetics (Orthopedics)
Restoration with ceramic veneers.
Doctor: Pashkevich Dmitry
Directions: Digital dentistry (CAD/CAM technology) Prosthetics (Orthopedics)
Restoration with ceramic veneers.
Doctor: Gammadaev Murad
Directions: Digital dentistry (CAD/CAM technology) Prosthetics (Orthopedics)
Restoration with ceramic crowns and veneers.
Doctor: Tsarkov Vitaly
Directions: Digital dentistry (CAD/CAM technology) Prosthetics (Orthopedics)
0/0
Restoration with ceramic crowns and veneers (after).
Restoration with ceramic crowns and veneers (before).
Doctor: Lipets Anna
Directions: Digital dentistry (CAD/CAM technology) Prosthetics (Orthopedics)
Restoration with ceramic crowns and veneers.
Doctor: Gikavyi Vladislav
Directions: Digital dentistry (CAD/CAM technology) Prosthetics (Orthopedics)
Restoration with ceramic crowns and veneers.
Doctor: Tsarkov Vitaly
Directions: Digital dentistry (CAD/CAM technology) Prosthetics (Orthopedics)
Restoration with ceramic crowns and veneers.
Doctor: Tikhon Yuri
Directions: Digital dentistry (CAD/CAM technology) Prosthetics (Orthopedics)
Restoration with ceramic crowns and veneers.
Doctor: Pashkevich Dmitry
Directions: Digital dentistry (CAD/CAM technology) Prosthetics (Orthopedics)
Restoration with ceramic crowns and veneers.
Doctor: Pashkevich Dmitry
Directions: Digital dentistry (CAD/CAM technology) Prosthetics (Orthopedics)
Restoration with ceramic crowns and veneers.
Doctor: Gikavyi Vladislav
Directions: Digital dentistry (CAD/CAM technology) Prosthetics (Orthopedics)
Restoration of anterior tooth with a ceramic crown.
Doctor: Koba Svyatoslav
Directions: Digital dentistry (CAD/CAM technology) Prosthetics (Orthopedics)
Smile restoration with ceramic veneers.
Doctor: Chelakhsaeva Alana
Directions: Digital dentistry (CAD/CAM technology) Prosthetics (Orthopedics)
Smile restoration with ceramic veneers.
Doctor: Chelakhsaeva Alana
Directions: Digital dentistry (CAD/CAM technology) Therapeutic dentistry Prosthetics (Orthopedics)
Replacement of old crowns, retreatment of all teeth (caries developed under the crowns), production and fixation of E-max ceramic crowns using CAD/CAM technology, professional hygiene and ZOOM4 whitening. Thanks to the latest digital technologies, the treatment took only 1 month!
Doctors: Kochergin DmitryKirina YuliaKarimov MaximSklyarov Konstantin
Directions: Digital dentistry (CAD/CAM technology) Therapeutic dentistry Surgery and implantation Prosthetics (Orthopedics)
Treatment of caries, root canals, implantation, digital ceramic crowns and veneers (CAD/CAM technology). Anti-stress treatment in sleep and using nitrous oxide.
Doctors: Koba Svyatoslav Kochergin Dmitry
Directions: Digital dentistry (CAD/CAM technology) Prosthetics (Orthopedics)
Aesthetic rehabilitation with all-ceramic crowns and veneers.
Doctor: Gikavyi Vladislav
Directions: Digital dentistry (CAD/CAM technology) Prosthetics (Orthopedics)
Aesthetic rehabilitation with all-ceramic crowns and veneers.
Doctor: Gikavyi Vladislav
Directions: Digital dentistry (CAD/CAM technology) Prosthetics (Orthopedics)
Aesthetic rehabilitation with all-ceramic crowns and veneers.
Doctor: Tsarkov Vitaly
Directions: Digital dentistry (CAD/CAM technology) Prosthetics (Orthopedics)
Aesthetic rehabilitation with all-ceramic crowns and veneers.
Doctor: Lipets Anna
Directions: Digital dentistry (CAD/CAM technology) Prosthetics (Orthopedics)
Aesthetic rehabilitation with all-ceramic crowns and veneers.
Doctor: Gikavyi Vladislav
Directions: Digital dentistry (CAD/CAM technology) Prosthetics (Orthopedics)
Aesthetic rehabilitation with all-ceramic crowns and veneers.
Doctor: Lipets Anna
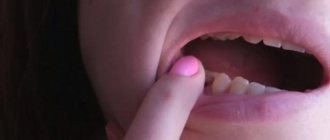
Malocclusion
The position of the dental arches relative to the central occlusion in dental practice is called occlusion. In medical practice, there are two types of occlusions – physiological and abnormal. The first type is characterized by the fact that the upper row of teeth covers the lower one. In the presence of an abnormal bite, the relationship between the upper and lower arches is disrupted. In total, there are 4 malocclusions:
- open;
- cross;
- distal;
- mesial;
- deep bite
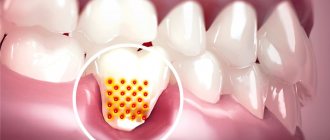
Improving the aesthetics of the dentition in the frontal region of the lower jaw
Diagnosis:
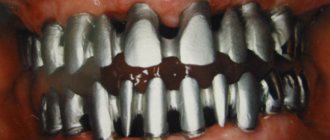
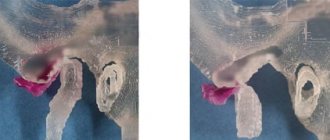
A metal bridge in the anterior part of the lower jaw violates the aesthetics of the dentition
After removing the bridge, the stages of manufacturing the restoration are planned, which includes choosing the design of an adhesive prosthesis that restores the lost 41 teeth (Ribbond tape and photopolymer - Admira Ormorker will be used), as well as imitation of the gingival margin with pink shades of photopolymer.
The selection of composite syringes is preceded by mechanical cleansing of the vestibular surface of the tooth, symmetrical to the one being restored, and adjacent teeth using a brush and Klint fluoride-free paste (VOCO). All surfaces included in the structure are thoroughly cleaned. The tooth is washed with a stream of water.
Determination of the color shades of the incisors is carried out on intact teeth 43 and 32, since 41 is missing, and 42 and 31 were previously prepared for crowns.
Separate opaque shades of the composite are selected for restoration 41 (one darker - OA3, the other lighter - OA2) and enamel shades for modeling the vestibular surface 41, 42 and 31 (primary color A3, in the area of the incisal edge - A2 and transparent - I).
Planning of sizes and shapes involves odontoscopy and odontometry of teeth using a micrometer. Measuring parameters is necessary to ensure an accurate fit of the design.
Crown height is assessed in the proximal region from the gingiva to the incisal edge. This size serves as a guide for choosing the width of the tape. It should be about 1/2 of the resulting size - the height of the proximal wall. This ratio will allow you to subsequently create a bed for the Ribbond without destroying the angle or ridge of the intact crown.
The height and width of the intact and prepared incisors are assessed, and the level of the cutting edge is selected in accordance with the position of the transversal plane. Odontoscopy indicates that there are no signs of belonging to the side, the shape of the teeth is rectangular, the cutting edge is smooth. The planned restoration is being constructed on the computer screen.
Next, the working field is isolated using a rubber dam and pieces of rubber cord.
Preparation involves the formation of indentations on the teeth that close the defect and serve as support for the adhesive prosthesis. In this case, on the 42nd tooth, the area is localized on the mesial surface, occupying the entire width of the crown, moving to the lingual surface.
On the left central incisor, the groove goes around the crown of the tooth, extending along the vestibular, distal, and lingual surfaces. The height of the prepared areas corresponds to the width of the reinforcing tape - 2.0 mm; depth – 1.0 mm (slightly deepens into dentin). Sharp corners and protruding edges of the enamel are smoothed with a fine-grained bur. The vestibular surfaces of teeth 31 and 42 are prepared for veneers, thinning by 0.3-0.5 mm.
Next, the length of the piece of tape required to form the structure in the area of the missing tooth is determined. A strip of the required width (1/2 the height of the proximal part of the teeth) and approximate length (twice the size of the defect in the dentition plus 6.0-8.0 mm) is cut out of foil.
Ribbond is being prepared to create the structure. The Ribbond is held with cotton gloves, and the tape is cut as long as a strip of foil using special scissors. A piece of tape that is too short will not strengthen the structure; if it is too long, it will require correction in the oral cavity. Place the Ribbond on a clean plate, preferably under the cover, for later use.
The teeth and Ribbond are prepared for work. The prepared areas and vestibular surfaces of the supporting teeth are etched with an acid gel, washed with a stream of water and dried with degreased air.
A thin layer of adhesive bond is applied and exposed. A thin layer of flowable composite is applied to the sulcus area of the 31 tooth covered with adhesive. (Does not illuminate!) The lamp light is directed away from the dentition.
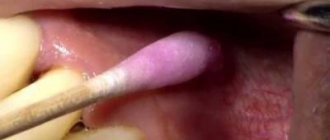
The prepared strip of Ribbond is impregnated with adhesive from the center to the length of the perimeter of 31 teeth. Then the middle of the tape, moistened with adhesive, is pressed tightly with tweezers onto the prepared circular area of the 31st tooth so that both ends are directed towards the 42nd tooth, stretching through the defect.
The excess vestibular section of the tape is trimmed. The prepared groove on the 42nd tooth is covered with a thin layer of flowable composite. The remaining part of the Ribbond is treated with adhesive, folded inward, and the outer side is pressed against the proximal site.
The orally located section of the tape is also impregnated with bond and pressed against the reinforced section of the tape, and then to the lingual surface of the 42 tooth. Each section of the tape is cured separately by exposure to light from a halogen lamp. The pontic is now ready to be used to recreate the missing tooth.
Subsequent work resembles the formation of a veneer, and therefore requires compliance with the basic stages of working with the composite. In the area of the 31st tooth on the tape, the darkest opaque layer is located deepest (closest to the cervical area). The next dentin layer is lighter, occupies a larger area and replenishes the volume of dentin present in the tooth. The restoration is completed with enamel colors, recreating the optimal size, shape and relief of 41 teeth, in accordance with the parameters of 31.
The teeth filling the defect are covered with enamel shades of photopolymer. In the cervical region - A3, the main region - A2. A uniform thin layer of transparent enamel is applied to the entire surface.
To recreate the natural gum margin, a pink photopolymer material (Comp Natur, VOCO) is used. Opaque shades imitate gingival papillae.
A thin layer of gingival light-transmitting material is applied to the opaque layer and cured with a halogen lamp for 40 seconds. When modeling the contours of the gums, the location of the interdental papillae on the symmetrical side is taken into account.
Processing of the finished structure is carried out in the usual way: contouring the macro- and microrelief with fine-grained diamond burs, followed by polishing with heads and disks. The teeth are coated with fluoride varnish.
Authors:
Lutskaya Irina Konstantinovna, Doctor of Medical Sciences, Professor, Head. Department of Therapeutic Dentistry BelMAPO
Novak Natalya Vladimirovna, Candidate of Medical Sciences, Assistant at the Department of Therapeutic Dentistry of BelMAPO