Dental tissue is one of the most durable types of tissue in the human body. In theory, teeth should last a lifetime, but this is not always the case. Many people already have teeth that need treatment from a young age. One of the innovative ways to correct damaged teeth is a stump inlay. This method of prosthetics allows you to save even “worn-out” teeth and make them outwardly indistinguishable from natural ones.
What is a stump tab
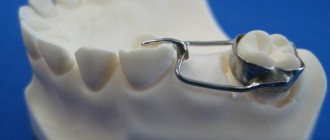
A stump inlay in dentistry is a pin structure used for prosthetics when it is impossible to restore the natural tissues of the coronal part of the tooth. The inlay is attached to the root part, protruding onto the visible surface of the tooth, forming a support for the artificial crown. The main condition for its use is the health of the tissues and roots surrounding the unit. The stump tab, in contrast to the anchor pin, intended only to strengthen the tooth, consists of two parts: the lower one, installed in the canal, and the upper one, which gives the tooth its shape. The system rests on the surface of the tooth being restored, evenly distributing the load on the root.
What is the difference between a pin and a stump inlay?
The fundamental difference between a pin and a stump inlay is that it is placed under a filling. Previously, a similar technique was used to treat severely damaged teeth when it was not possible to install a crown. Subsequently, this method discredited itself with a large number of complications in the form of secondary caries. Moreover, detecting a carious process under an extensive filling on a pin was quite problematic. Often, such treatment led to severe damage to the tooth by caries and, as a consequence, to its removal.
Let's compare the disadvantages and advantages of the pin stump insert and the pin presented below:
Pros and cons of the stump Pros and cons of the pin
tabs
- a tight fit protects the tooth from pathogenic bacteria and the development of secondary caries;
- withstands significant chewing loads;
- has a long service life;
- does not require replacement in case of wear of the artificial crown.
- established in two visits to the doctor;
- involves significant grinding of living tooth tissue;
- costs more than a regular pin.
- costs less than stump inlays;
- installed in one visit;
- involves a smaller volume of preparation of living tooth tissue;
- unable to withstand the usual chewing load, over time the seal on the pin begins to collapse;
- the pin can be installed in only one dental canal;
- a loose fit allows bacteria access into the dental cavity, which provokes the appearance of secondary caries;
- lasts no more than 2-3 years.
Answering the question “Which is better - a stump inlay or a fiberglass pin,” most experts are inclined to favor dental inlays. Considering the unreliability of installing a filling on a pin, such a service can be found extremely rarely in modern dentistry. The most correct option would be to use a stump tab and then install a crown on it. The choice is due to the fact that this microprosthesis not only strengthens the crown, but also protects the tooth from further destruction throughout life.
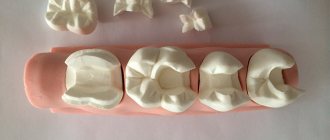
Manufacturing technology
- The method of layering ceramics. After receiving the impressions, a refractory model is made, a ceramic pin is tightly installed in the channel, ceramic is applied to it, and firing is performed. In the process of applying ceramic layers, it is possible to use different shades of material, dyes and modifiers.
- Production of ceramics from tablet molds by pressing. An inlay is modeled from wax, and sprues are installed in the direction of the ceramic flow. Using a silicone ring, investment material is introduced and a limiter is placed. Pressing is carried out in an oven equipped with a microprocessor control system. The resulting product after pressing and casting is a solid single crystal, the abrasion of which is comparable to the natural abrasion of hard dental tissues.
- Manufacturing using CAD/CAM method. Allows you to form prostheses and parts that match the implant, abutment, and the shape of the tooth stump. The unit is scanned in the mouth or on a model, 3D modeling is carried out using a special program, the information received is transferred to a milling machine, which mills the product under computer control. The precise method requires a high cost to train personnel to operate the equipment.
- Injection molding manufacturing method. Casting a working model from plaster/polyurethane, selecting an ashless pin similar to the root canal, applying silicone varnish to the root. The pin is inserted into the canal and modeling is carried out with ashless plastic/wax. After a control check, the cast stump insert is removed and transferred to a metal casting. The method is technologically easy, requires a minimum of material costs, but is very sensitive to the quality of casting. With strict adherence to all norms and rules, reliable and high-quality microprostheses are obtained.
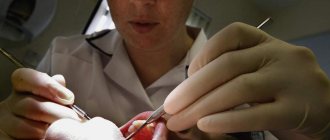
Clinical and laboratory stages of manufacturing pin teeth.
For all designs of pinned teeth, it is necessary to prepare the supragingival part of the tooth and expand the root canal. The preparation of the tooth stump should begin with excision of softened dentin, thin walls and protrusions of the tooth crown using spherical, fissure, flame-shaped burs, shaped heads and separation discs. In order to prevent the development of secondary caries and a strong connection between the surface of the tooth stump and the pin structure, it is necessary to grind off the affected hard tissues of the tooth to healthy tissues.
Using an endodontic set, burs, root drills, and reamers, a bed for the pin is formed so that the pin is immersed in the canal by 2/3 - 1/2 of the length of the root, while the intraradicular part of the pin tooth should be slightly longer than or equal to the supraroot part.
Currently, a number of known pin structures are not used in the clinic. We offer our classification of modern pin structures.
Classification of modern pin structures
1. Pin structures used for urgent assistance, both for temporary and permanent restoration of the coronal part of the tooth (plastic pin tooth, pin tooth according to Shirak, etc.).
2. Universal, individually manufactured solid-cast pin structures (stump pin crown according to Kopeikin, stump pin tooth, composite stump pin inlays).
3. Industrially manufactured pins and core inlays (RADIX-ANKER, CYTCO, MOOSER, IKADENT, C-POST, etc.).
4. Composite stump inlays reinforced with polymer fibers (“Ribbond”, etc.).
5. Pin structures for the treatment of root fractures (cast stump pin inlay with an intra-stump canal and a threaded pin by Bragina E.A. et al., intraradicular pins and an apical titanium inlay by Griban A.M. et al.).
6. Transdental pins (endodontic-endosseous implants) and parapulpal pins.
Canal preparation should begin with opening the mouth with a spherical bur No. 1. Then you can begin to expand with a fissure-end bur, reamer, and fissure burs of the appropriate diameter. It is advisable to create a bed for the pin with a gradual increase in the diameter of the cutting tool, directing the tool according to the location of the channel. Expansion of the root canal must be carried out under radiograph control. During the development of the root canal, its walls must have a thickness of at least 1-1.5 mm.
The thickness of the pin depends on the strength properties of the alloy used (750 gold, stainless steel, cobalt-chromium, silver-palladium alloys, etc.) usually at least 1-1.3 mm. The optimal thickness can be considered 1/3 of the diameter of the tooth root.
The plastic pin tooth (simple pin tooth) is the simplest design. A pin made of clasp or orthodontic wire with a diameter of 1-1.8 mm (the diameter depends on the functionality of the tooth and the size of the root canal), with a protruding extra-root part of various configurations, usually in the form of a loop, is fitted into the prepared root canal. After this, an impression and a model with a pin that has passed into it are obtained. The tooth is modeled from wax and, according to generally accepted rules, the wax is replaced with plastic, processed, fitted and fixed to the tooth with cement.
The use of fast-hardening plastics simplifies and speeds up the production of a pin tooth. The prosthesis is made in one session. Having installed the pin in the root canal, a quick-acting plastic is prepared and applied to the pin, modeling the shape of the crown. For convenience, you can use a pre-prepared celluloid cap. After the plastic has hardened, the pin tooth is removed from the root, grinded and polished outside the oral cavity, and then strengthened in the root with cement.
The advantages of a plastic pin tooth are simplicity, low cost of manufacture, and aesthetics; however, resorption of cement between the crown and pin or pin and root, breakage of the pin or supragingival plastic part, and discoloration of the plastic are possible.
Pin tooth with ring according to Richmond. Currently used extremely rarely. This design consists of a ring, a supra-root protective plate and a pin. It can be made if the crown part protrudes above the gum by 2-3 mm. Measure the root circumference with a thin wire or dentimeter. According to this length, a ring is made from 900 gold alloy, 0.25-0.28 mm thick, 4-4.5 mm high, to which a plate is soldered to form a cap. After fitting the cap on the root, a hole is made in the plate (to avoid mistakes, you can fill the resulting cap with softened wax, place it on the stump, and the entrance to the root canal will be imprinted on the wax, which will be a guide for drilling the hole), through which a gold-platinum alloy pin is fitted , an impression is taken, a model is obtained in which the pin is connected to the cap with gold solder, and it is again placed on the stump. Complete casts of the dentition of both jaws are obtained, and the models are plastered in an occluder. The future metal bed for the facet is modeled from wax, cast and soldered to the cap. Then a porcelain facet is ground and attached to the cap and metal stock or a plastic lining is made. After this, the pin tooth is adjusted and strengthened with cement.
Due to the complexity of manufacturing a soldered cap, a design with a stamped steel cap has become widespread - the Richmond pin tooth in the MMSI modification. The protective cap is the main advantage of the Richmond pin tooth design: the ring provides reliable protection of the part of the root protruding above the gum from saliva, the development of caries and decementation.
Pin tooth according to Akhmedov. The root of the tooth is prepared in compliance with the rules for preparing the tooth for a full metal crown. The tooth stump serves as a support for a tight fit of the edge of the crown and must protrude above the level of the gum. After fitting the metal crown, the oral wall of the crown is perforated with a bur in accordance with the projection of the root canal, and a previously fitted stainless wire pin is inserted through the hole into the root canal. An impression with a pin is obtained and the color of the plastic is determined. In the laboratory, a model is obtained, a pin is soldered to the crown and a window is cut out on its vestibular surface. After veneering, a crown is fitted with a pin in the mouth.
A pin tooth according to Ilina-Markosyan consists of a wire pin and a cubic molded inlay, which prevents rotation of the pin and hermetically closes the root canal, preventing saliva from entering it. Clinical stages of tooth manufacturing: preparing the surface of the root and its mouth for the inlay, expanding the root canal, fitting the pin, taking an impression, modeling the inlay, installing the pin, fitting the cast inlay with a protective plate and pin, taking a plaster cast, applying and fixing the finished pin tooth . The protruding part of the root is ground down to the level of the gums, then a cubic-shaped cavity is formed at the mouth of the canal for an inlay, which is modeled using the direct method by pressing softened wax into the prepared tooth. Then a heated wire pin is inserted into the root canal. The free end of the pin is first flattened and bent at a right angle. After determining the quality of the fit of the wax insert to the tooth, it is removed along with the pin, cleaned of excess wax and transferred to the foundry. The cross section of the cast insert is 2-3 mm.
Many clinicians rightly note the difficulty of making this pinned tooth, as well as the fact that this weakens the root walls even more, increasing the possibility of their breakage, especially the lateral ones.
Pin tooth according to Citrine. Citrin D.N. Instead of a cubic shape, he proposed an inlay in the form of two opposing triangles connected by vertices. He considers them to be more stable in the anteroposterior direction and require less preparation of the lateral walls of the canal. In addition, it is additionally proposed to solder 2-3 pins into the root cap, and make channels corresponding to them in the oral and vestibular walls of the root.
Stump pin crown according to Kopeikin (stump pin inlay). A stump pin crown is a one-piece structure consisting of an artificial stump of the coronal part of the tooth, an intra-root pin or pins, covered with a crown (stamped, cast, etc.).
The size and shape of the stump should correspond as closely as possible to the stump of a natural tooth after its preparation for the crown of the chosen design. Stump crowns have a number of advantages compared to pinned teeth of other designs:
1) can serve as supporting elements of fixed and removable dentures;
2) allow the restoration of most tooth roots, both single-rooted and multi-rooted;
3) the possibility of repeated replacement without removing the stump;
4) the possibility of restoring teeth destroyed below the gum level;
5) the possibility of restoring multi-rooted teeth with severed roots;
6) prosthetics with bridges supported on the roots of the teeth is facilitated, since the stumps compensate for the non-parallelism of the root canals;
7) restoration of the coronal part of pathologically worn teeth.
Root preparation depends on the degree of destruction of the tooth crown. When preserving part of the natural tooth crown, two options for root preparation are possible. The first involves complete grinding of the destroyed crown, the second is more gentle, designed to preserve the strong walls of the destroyed crown. In this case, the fragile, thinned and softened walls of the tooth crown are excised into durable structures.
The expansion of the canal is carried out taking into account the anatomical structure of the root and the thickness of its walls. To prevent rotation of the pin, the mouth of the canal should be formed into an oval shape. In the anterior teeth, it is necessary to avoid thinning of the labial wall in the gingival third of the root, and in the lower teeth, on the contrary, the lingual wall, which is under significant pressure when the teeth are closed.
The thicker and longer the pin, the greater its surface area, and therefore the greater the adhesion between the pin and the root, carried out through cement. When expanding the canal, it is not recommended to thin the root wall to less than 1.5 mm; an exception is allowed for the lower incisors and second premolars, in which the chewing pressure, due to their position, almost coincides with the longitudinal axis of the tooth. To increase the thickness of the pin and to prevent its rotation, the mouth of the canal is expanded, taking into account both the shape of the canal itself and the direction of the forces that act on the tooth during central and other occlusions. For flattened roots, the mouth can be expanded in the vestibular direction to form an additional cavity at the mouth of the canal, but not more than 2 mm deep.
The angle of toe (convergence) also matters for the stability of the pin. Cylindrical pins have the best properties in this regard, however, despite the convenience of the described shape, conical pins continue to be widely used, since they correspond to the shape of the root canals and are easily inserted into it. Pao YC, Reinhardt RA, Krejci RF (1987) studied the manifestation of loads in teeth restored using pin inlays with analysis of mechanical loads, photoelastic models, and mathematical modeling methods. It was found that cylindrical pins of large diameter and length in teeth with normal periodontium reduce the load on dentin compared to pins of small diameter. When there are periodontal diseases, the main load falls on the end of the pin, so it is advisable to manufacture cylindrical pins with a conical end to reduce the risk of root fracture. The convergence angle should not exceed 3 degrees (Kalamkarov Kh.A., 1984).
After preparing the root, they begin to manufacture an artificial stump with a pin. The most widely used method is the direct method. It consists of the following: the root prepared under the stump is isolated from saliva with a cotton swab. The cavity for the pin is cleared of sawdust with a stream of air, then its walls are moistened with wrung-out cotton wool. A stick of modeling wax (lavax), heated to a plastic state (preferably in hot water), is given a cone-shaped shape and pressed against the surface of the root so that the wax fills the prepared root canal and gives a good imprint on its surface. Through the wax covering the surface of the root, a pre-fitted metal pin with a diameter of 1-1.5 mm made of elastic steel wire, heated over the flame of an alcohol lamp to the melting temperature of the wax, is inserted into the canal. When creating a stump of molars or premolars, as a rule, 2-3 pins are prepared: one (longer) is inserted into a large, well-passable root canal with thicker walls. Other pins are made shorter and inserted into the remaining channels. The axes of the large and small pins must be parallel.
The workpiece, cooled by a stream of cold water, is removed from the channel. The coincidence of the tips of the wire and the wax point means that the root canal is well passable and its entire length is negatively imaged.
With wide, well-traversed canals, you can refuse to insert a metal pin into the wax composition of the inlay if you can obtain an image of its intra-root part of the required length.
Then an artificial stump is modeled, the shape of which depends on the future crown. To do this, using modeling spatulas, create the direction and necessary gap between adjacent teeth and antagonists, round the corners, create some narrowing in the direction of the cutting edge, and also form a ledge according to indications. The simulated stump pin insert is removed from the root canal, placed in a vessel with cold water and transferred to the laboratory for metal casting.
There is a known method for manufacturing a stump pin insert from plastic. For this purpose, self-hardening ashless plastic is used. First, a standard plastic pin is fitted along the diameter and length of the root, which should freely enter the root canal along its entire length. Lubricate the walls of the canal with Vaseline, stir the self-hardening plastic and fill the canal with it using a syringe, insert a plastic pin. The supra-root part of the pin is also covered with plastic, forming it in accordance with the shape of the prepared tooth stump. After the plastic has hardened, the pin with the supra-root part is removed from the root canal. The tooth stump is processed with cutting instruments, observing all the requirements for the prepared tooth, taking into account the chosen design of the artificial crown. The plastic stump pin insert blank is transferred to the laboratory for metal casting. Self-hardening plastic burns out completely in a muffle furnace.
The indirect method of making a stump inlay involves obtaining a two-layer impression from the surface of the root and root canal, while silicone material (Lastic Xtra, exaflex, alphasil) is injected into the root canal from a syringe. Based on the impression obtained, a working model is cast from heavy-duty plaster or a fire-resistant model, on which the wax composition of the stump inlay is modeled, and then it is cast from metal.
When fitting the cast stump pin tab, ensure a tight fit of the entire cast part to the root and coronal surfaces of the tooth, after which it is fixed with cement (zinc phosphate, polycarboxylate, etc.). At the next visit, we begin making an artificial crown.
In recent years, standard stump pins of various sizes and shapes have been produced for the restoration of anterior and lateral teeth.
Solid pin teeth. Solid cast pin teeth are characterized by the connection of individual parts during casting without the use of solder. They can be either all-metal or have a porcelain or plastic lining.
Along with the above indications, prosthetics with solid-cast core pin teeth can give the best results in the absence of the crown part of the lateral teeth, complicated by the Popov-Godon phenomenon, when, due to insufficient distance from the root of the destroyed tooth to the occlusal surface of the antagonist, it is impossible or ineffective to use pin teeth of other designs without prior elimination dental alveolar lengthening (Bragin E.A., Skryl A.V., Stroganov G.N. rationalization proposal No. 964 dated 12/30/98).
Solid pin teeth are cast from cobalt-chrome, chromium-nickel, and gold-platinum alloys. When preparing the root surface, the degree of shrinkage of the alloy is taken into account. Of the listed alloys, the chromium-nickel alloy has the greatest volumetric shrinkage, therefore, in order to compensate for it, the root surface is made straight, concave or beveled to the vestibular and oral sides of the canal. When using alloys that give less shrinkage, the root surface should be beveled towards the vestibular side. If the supragingival part of the tooth is preserved, it is prepared as for a solid crown, creating a cone angle of 5 degrees. The filled root canal opens to 1/2-1/3 of its length. A two-layer impression is obtained, with the corrective paste being injected into the root canals with a syringe. A working model is made from heavy-duty gypsum, covered with a layer of insulating varnish that compensates for the shrinkage of the alloy from which the casting will be made. The resulting wax composition of the pin tooth is converted into metal, fitted and fixed on the tooth with cement.
Fixation of stump inlays. Studies of the effect of the cementing method on the retention of stump pin inlays showed that when comparing three methods of cement injection (1 cement was applied to the inlay pin; 2 was introduced only into the tooth canal; 3 onto the pin and into the canal), the best retention of gold alloy inlays was with the second method .
Restoration of the destroyed crown of multi-rooted teeth with composite core pin inlays. Restoring a damaged crown of multi-rooted teeth is associated with some difficulties: the impossibility of using most known designs of pin teeth, lack of parallelism between root canals, etc. In such a situation, stump pin inlays are recognized as one of the best. In the traditional design, due to the often non-parallelism of root canals, a main pin is made into the most passable canal, immersed into it to the maximum possible depth, and auxiliary pins are made into the others, immersed to an insignificant depth. For a more rational restoration of the destroyed coronal part of multi-rooted teeth with non-parallel root canals, it is advisable to use a composite stump pin inlay, consisting of two or three parts, connected to each other like a “lock”, for example in the form of a “dovetail”.
V.N. Kopeikin proposes a stump crown consisting of two detachable parts: a partial stump with a pin fixed in one of the canals of a multi-rooted tooth and the crown itself with a pin fixed in another canal of the same tooth, having a recess that exactly matches the shape of the partial stump (Fig. 1) . It is made in two visits. At the first visit, root canals are developed to 1/2-1/3 of their length. For the pin of the crown itself, the palatal one is chosen - for the upper teeth, the distal one - for the lower teeth, for the partial stump pin - usually the medial buccal one, but canals can be used in any combination. Plastic pins made of polymerized plastic (colors from noracrylabasis, old removable dentures, etc.) are placed in the expanded channels. A partial stump is modeled from plastic dough on a pin fitted and inserted into the canal. After polymerization, the workpiece is given the desired shape, and it is necessary that the side of the partial stump adjacent to the crown pin or the channel selected for it be parallel to it, or the angle formed by a line perpendicular to the axis of the crown pin and lowered to a line drawn along the side of the partial stump adjacent to the crown pin was at least 90°. The remaining sides of the partial stump are slightly tapered. The partial stump, made in this way from quick-hardening plastic, is fixed in the tooth canal with any paste for temporary fixation (repin, dentin) and lubricated with a thin layer of petroleum jelly. Similarly, the crown itself is modeled from plastic dough. After specifying the boundaries of the partial stump and the crown itself with wax directly on the tooth, both parts are transferred to the laboratory, where they are converted into metal.
At the second visit, the partial stump pin and the crown itself with the pin are sequentially fitted and fixed in the tooth canals with cement. It is more convenient to produce composite stump inlays using the laboratory method. During the first visit to the clinic, the supragingival part of the tooth is prepared and the root canals are filled to the required depth. A two-layer impression is taken from the dentition, while the corrective paste is pumped into the root canals with a dispenser (an auxiliary impression is taken from the opposite jaw). A working model is cast from a double-layer cast of heavy-duty plaster, on which the wax composition of the stump inlay is modeled in an occluder. Before modeling, the model is coated with insulating varnish or lubricated with vegetable oil. A part of the stump tab is modeled from wax, and one should strive to ensure that the inner part of one half is parallel to the direction of the intra-root pin of the other half of the tab. This can be checked using an intradental parallelometer (Skryl A.V., Skryl V.I. rational proposal No. 922 of September 24, 1997), consisting of a welded rod inserted into the canal and an analyzing plate that allows you to determine the parallelism of the inner surface one part of the tab and the intra-root pin of the other part. For convenience, three types of intradental parallelometers are proposed, differing in the location of the rod in relation to the analyzing plate.
The modeling of part of the stump inlay is completed by forming a dovetail-shaped locking bed on its occlusal surface. The finished wax composition is converted into metal and fitted onto the model, then the second and, if necessary, the third part of the stump insert is modeled and replaced with metal in the usual way. Casting can be made from any casting alloys, but a silver-palladium alloy can be considered more convenient and practical due to its ease of processing and pronounced antibacterial effect. During the second visit, the stump tab is fitted and fixed on the tooth, following the sequence of insertion of its parts. Manufacturing a composite stump inlay in this way reduces the doctor’s time, is less tiring for the patient, and eliminates contact with the monomer of fast-hardening plastic, which helps prevent the development of allergic reactions to plastic.
A composite stump inlay, in contrast to a non-separable structure, allows you to restore the destroyed crown of multi-rooted teeth, using any non-parallel canals to the maximum possible depth, promotes uniform distribution of chewing pressure between the roots of the tooth, which allows you to relieve the area of bifurcation and trifurcation of teeth weakened by the carious process.
Zorkin V.V., Bragin E.A., Soykher M.G. proposed a method for manufacturing a pin inlay with an intra-stump canal for multi-rooted teeth (patent No. 2111719 dated May 31, 1996), carried out as follows.
Direct method. Preparation of tooth roots is carried out according to generally accepted methods. After expanding the canals in the area of the root mouths, a shock-absorbing cavity is created, and the tooth canals are filled to 1/3 of their length.
To avoid obliteration of the tubular blank by metal during casting, its edges must be compressed. The replacement of the wax composition with metal is carried out according to generally accepted methods. Having received the metal composition, the edges of the tubular blank must be cut to fit the inlay, and the resulting intra-stump canal must be checked for proportionality to the previously prepared additional metal pin. If necessary, the intra-stump canal is expanded to the required size using diamond burs of various diameters.
Before fixing the cast pin insert and additional metal pin, they are subjected to medical treatment, just like the root canals and the tooth cavity, according to generally accepted methods.
Sequence of stages for manufacturing a pin inlay with an additional intra-core channel for multi-rooted teeth using the indirect method:
1. Preparing the roots.
2. Taking an impression.
3. Making a fireproof model. 4. Fitting an additional metal pin. 5. Introduction of wax, modeling of the wax composition.
6. Creation of an intra-stump canal by introducing an additional metal pin into the wax composition.
7. Removing an additional metal pin from the wax composition and introducing a tubular blank into the intra-stump canal.
8. Replacement of the wax composition with metal.
9. Fitting and fixing the structure.
It should be noted that the design obtained in this way is the most accurate, because When casting on a refractory model, the least linear shrinkage of the metal occurs. Having a longer period of time required to complete the work makes it possible to accurately manufacture the structure and, while making the work easier for the dentist, is also more acceptable for patients. The design proposed by the authors is simple, easy to manufacture and operate. Meeting clinical requirements, it can be used as a support for a bridge. The high degree of stabilization of the pin insert with an additional intra-stump channel for an additional metal pin makes it very versatile in use for the treatment of multi-rooted teeth with a damaged coronal part. The parallelism or non-parallelism of the root canals of the tooth does not matter, since the design feature of the proposed pin inlay with an intra-stump canal for an additional metal pin makes it possible to achieve the desired result despite the non-parallelism of the root canals of multi-rooted teeth.
The design of a stump inlay for multi-rooted teeth with non-parallel canals is known (F.N. Tsukanova, 1986), when an artificial stump is modeled from wax in the oral cavity, the main pin is heated and inserted through the wax composition into the canal until it stops, additional pins are heated alternately and inserted into channels and removed until the wax hardens. To prevent the channels created by the pins from filling with molten metal during casting of the stump, graphite rods are inserted into them, and the insert is fitted in the oral cavity. During cementation, the tooth walls, canals, holes in the stump and its inner surface are lubricated with cement. Previously fitted additional pins with notches are inserted into the holes of the stump and into the canals until they stop. After the cement has hardened, the protruding ends of the pins are cut off.
Manufacturing methods
- Straight. It is characterized by its low cost, ease of implementation, and does not require the presence of fire-resistant models or impression materials. With the direct protocol, the core inlay is modeled in the oral cavity, and then the wax is replaced in the dental laboratory with the working restoration material. Disadvantages: insufficient visibility of the surgical field, risks of thermal injuries to the mucous membrane, large time expenditure for the dentist.
- Indirect (indirect). It is used for all types of defects; production takes place in two stages: obtaining an impression plus obtaining a model.
How to avoid complications after installation?
Installing an orthodontic appliance can lead to complications:
- pulpitis,
- secondary caries,
- sensation of pain and bleeding in the tissue surrounding the tooth.
The cause of complications is considered to be poor quality of preparation of the destroyed element. In order to protect yourself from such manifestations, you must strictly adhere to all the doctor’s recommendations for hygienic cleaning of the oral cavity and caring for the insert:
- brush your teeth daily 2 times a day,
- rinse your mouth after eating,
- a tooth with a core inlay and a crown can be additionally cleaned using a brush and dental floss, which help remove food grains from the interdental spaces,
- do not miss a preventive examination at the dentist – 1 rub. at 6 months,
- If the orthodontic structure is destroyed, consult a doctor.
If you performed all the steps correctly, you will need to consult a dentist. If necessary, he will issue a referral for an x-ray to find out the cause of the complications.
The cost of such products is quite high, especially when they are simultaneously installed on several units of the dentition. To ensure you don't waste your money, follow the rules for caring for your post stump and don't skip a dental checkup.
Indications for installation
- destruction of the coronal part;
- periodontal diseases (splinting);
- defects in the shape, position of the unit, supragingival area;
- There is no way to put a pin with a filling. For example, if the chewing units are destroyed.
Contraindications for installing a post-core restoration on a pin
: caries, cysts, damage or absence of roots, gum disease, periodontal disease, pathological mobility of the dentition, allergies to the alloys from which the structure is made.
We offer
:
- single crowns;
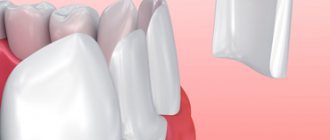
- veneers, lumineers;
- bridge-like devices;
- implant-supported restoration;
- systems with stump pin system.
Results and discussion
Laboratory results
An analysis of the results of a study of the physical and mechanical properties of the LuxaCore-Dual and LuxaCore Z-Dual materials showed that the diametric strength of samples from the LuxaCore Z-Dual nanocomposite was 64.40 ± 3.59 MPa. The corresponding values for LuxaCore-Dual were 20.37±5.35% less and amounted to 51.28±3.45 MPa ( p
<0.01).
The average flexural strength of LuxaCore Z-Dual samples was 107.92±8.71 MPa. This strength parameter for LuxaCore-Dual was 91.83±7.06 MPa, which is 14.97±6.53% less ( p
<0.01).
The results of laboratory studies to assess the influence of the degree of destruction of the coronal part of teeth restored with LuxaCore Z-Dual nanocomposite material on their resistance to compressive loads are reflected in Table. 3. Significant differences were revealed in the influence of the degree of destruction of the coronal part of the tooth restored with the LuxaCore Z-Dual nanocomposite material on the strength characteristics. Thus, the absence of one side wall of the coronal part of the tooth (class II according to Peroz, IROPZ 0.5-0.6) leads to a decrease in its strength by 9.5 ± 3.4%, compared with the strength of intact teeth ( p
<0.05).
Absence of two walls (Peroz class III, IROPV 0.6-0.7) - by 20.6±5.0% ( p
<0.05).
The absence of three lateral walls of the coronal part, which is typical for class IV defects according to Peroz (IROPD 0.7-0.8), leads to a decrease in the tooth strength index by 33.3±6.7%, compared with intact teeth ( p
< 0.05).
Table 3. Comparative assessment of the strength of test samples of teeth with varying degrees of destruction of the coronal part, restored with LuxaCore Z-Dual nanocomposite material (groups I-III), and restored with nanocomposite material supported by a fiberglass composite-reinforced pin (groups A, B, C) Note .
* — p<0.05. When using a fiberglass composite-reinforced pin when restoring a tooth with three preserved walls after endodontic treatment (group A, Peroz class II, IROPS 0.5-0.6), the tooth strength was on average 6.0±5.3% less ( p
<0.05), compared with the strength of intact teeth (Table 3).
When testing samples of teeth with two (group B, class III according to Peroz, IROPS 0.6–0.7) and one (group C, class IV according to Peroz, IROPS 0.7–0.8) intact walls, restored with nanocomposite restoration with support on a fiberglass composite-reinforced pin, the differences in the strength of teeth with intact teeth were 10.6 ± 4.7% and 17.2 ± 2.8%, respectively ( p
<0,05).
The results of a comparative laboratory study to study the degree of influence of a fiberglass composite-reinforced pin on the strength of non-vital teeth with varying degrees of destruction of the coronal part, restored using nanocomposite material and fiberglass composite-reinforced pins (groups A, B and C), with the strength of teeth restored only with double nanocomposite curing (groups I, II and III), are reflected in table. 4.
Table 4. Comparative assessment of the strength of teeth restored with nanocomposite material (groups I, II and III) and glass fiber composite-reinforced posts with nanocomposite material (groups A, B and C) Note. * — p>0.05; ** — p<0.05.
Thus, the destruction of dental samples after endodontic treatment with three intact walls (group A, class II according to Peroz, IROPS 0.5-0.6), where fiberglass composite-reinforced pins were used for restoration, occurred at a load of 402.73 ± 22. 40 N, which was 3.9±5.8% more than the strength of the tooth samples (group 1), where a similar defect was restored using only nanocomposite restoration ( p
>0,05).
Strength of non-vital teeth in the presence of two (group B, class III according to Peroz, IROPZ 0.6-0.7) and one (group C, class IV according to Peroz, IROPZ 0.7-0.8) retaining walls using fiberglass reinforced composite pin was significantly greater by 12.6±5.9% and 24.2±4.2%, respectively ( p
<0,05).
Strength of teeth with three preserved walls (Peroz class II, IROPS 0.5-0.6), when restored using fiberglass composite-reinforced pins (group A), compared with teeth whose crowns were restored only with nanocomposite material (1 -th group), had a statistically insignificant tendency to increase ( p
>0,05).
Thus, as the results of our laboratory study showed, only in case of significant loss of hard tooth tissues (classes III and IV according to Peroz, IROPS 0.6-0.8) the use of fiberglass composite-reinforced pins as a retention support for nanocomposite restoration significantly increases the strength of teeth samples restored after endodontic treatment by 18.4±8.2%, compared with samples where the above pins were not used ( p
<0,05).
Clinical trial results
The results of clinical studies based on assessing the quality of our restorations according to Ryge criteria, as well as data from x-ray examination and electrometry of the teeth, performed 24 months after completion of treatment, showed that among teeth with three intact walls (II class according to Peroz, IROPS 0.5 -0.6), where the restoration of the coronal part was carried out using fiberglass composite-reinforced pins, the number of restorations with good results was 87.5% ( n
=21).
The number of restorations rated as satisfactory was 12.5% ( n
= 3). No unsatisfactory results were identified (Fig. 1).
Rice.
1. Long-term results of treatment of teeth with three intact walls of the coronal part (%). Main group - the restoration is made with a nanocomposite material supported by a pin; comparison group - restoration was made with nanocomposite material. In the comparison group, in patients who underwent restoration only with dual-curing nanocomposite material, with three intact walls of the coronal part of the tooth (Peroz class II, IROPZ 0.5-0.6), the score “good” was 87.0%, “ satisfactory" - 13.0% of restorations in this subgroup; no unsatisfactory results were noted.
Thus, we did not find significant differences in the results of treatment of teeth with three intact walls (class II according to Peroz, IROPZ 0.5-0.6) depending on the method of restoring the coronal part ( p
>0,05).
In the subgroups of the main group and the comparison group, which included teeth with two intact coronal stacks (Peroz class III, IROPD 0.6–0.7), the following distribution of results was observed (Fig. 2). When restoring the coronal part of a tooth with two preserved walls using a dual-curing nanocomposite supported by a glass fiber composite-reinforced pin, good results were noted in 61.5% of cases ( n
=16), satisfactory - in 19.2% (
n
=5).
Unsatisfactory results were identified in 19.2% ( n
=5).
Rice.
2. Long-term results of treatment of teeth with two intact walls of the coronal part (%). Main group - the restoration is made with a nanocomposite material supported by a pin; comparison group - restoration was made with nanocomposite material. When restoring teeth with two intact walls (Peroz class III, IROPZ 0.6-0.7) with one dual-curing nanocomposite material (comparison group), good treatment results were noted in 52.0% of cases, satisfactory - in 16.0% cases. In 32.0% of cases, the quality of the treatment provided was considered unsatisfactory (Fig. 2).
Thus, when analyzing the results of treatment of teeth with two intact coronal walls (class III according to Peroz, IROPS 0.6-0.7), it was found that when restorations were carried out only with nanocomposite material, the number of good results in this subgroup decreased by 9.2% , and the number of complications increased by 12.8%. The differences were significant ( p
<0,05).
When restoring teeth with one preserved wall of the coronal part (class IV according to Peroz, IROPZ 0.7-0.8) using a fiberglass composite-reinforced pin (main group), the number of results assessed by us as good was 48.0%. At the same time, the number of satisfactory results was noted in 36.0% of cases, and unsatisfactory results in 16.0% of cases.
While good results in the subgroup of teeth with one intact wall (IV class according to Peroz, IROPD 0.7-0.8), restoration of which was performed with nanocomposite material (comparison group), were noted for 12 (52.2%) restorations, the quality of treatment was considered satisfactory in 1 (4.3%) case. The highest percentage of complications (43.5%) occurred in restorations of this subgroup, which indicates the inadequacy of the method of restoring the coronal part of teeth only with nanocomposite materials for this type of defect in the coronal part (Fig. 3).
Rice. 3. Long-term results of treatment of teeth with one intact wall of the coronal part (%). Main group - the restoration is made with a nanocomposite material supported by a pin; comparison group - restoration was made with nanocomposite material.
Thus, in teeth with one intact wall (class IV according to Peroz, IROPZ 0.7-0.8), we noted significant differences between the restoration of the coronal part only with nanocomposite material and a nanocomposite supported by a fiberglass composite-reinforced pin in the amount of “satisfactory” and “unsatisfactory” treatment results. The number of satisfactory results was 31.7% less when carrying out restorations with dual-curing nanocomposite material than when using fiberglass composite-reinforced posts and nanocomposite materials ( p
<0,05).
The results of an electrometric study of the marginal fit of restorations in all subgroups of the main group and the comparison group at the end of the observation period were on average identical and amounted to 1.8±0.3 μA. It is worth noting that we have not obtained reliable data on the influence of the restoration method, including the use of a pin retention support for restorations, when using the LuxaCore Z-Dual nanocomposite material on the quality of the marginal fit of fillings.
Thus, the long-term results of our study showed that the number of complications in non-vital teeth with defects of the coronal part III (IROPZ 0.6-0.7) and IV (IROPZ 0.7-0.8) classes according to Peroz was 12 less .8% and 27.5%, respectively ( p
<0.05), when using fiberglass composite-reinforced pins as a retentive support for direct restorations made of dual-curing nanocomposite material, than in the case of restoring the coronal part of the tooth only with dual-curing nanocomposite material.
In the presence of a defect in the coronal part of the tooth of class II according to Peroz (IROPD 0.5-0.6), when comparing the two above restoration methods, we did not find any significant differences ( p
> 0.05).
Advantages of stump inlays
Compared to other post systems, the stump post is much stronger. It distributes the load more evenly and fits tightly to dental remains, which prevents the formation of cracks and the development of caries.
Other advantages include the possibility
:
- regenerate destroyed/lost units;
- support teeth with bulk fillings;
- remove increased enamel abrasion;
- restore anatomical form/functionality;
- straighten the curvature;
- make prosthetics on implants.
Stump pin insert
A pin stump inlay is a cast dental structure that is installed by a dentist on a badly damaged element of the dentition. Its main functions are to preserve the damaged unit and ensure strong fastening of the installed prosthesis.
The design of the inlay looks like a tooth stump and fixing pins (pins), which is why it got its name. The latter ensure its reliable fastening in the root canal.
Comparison with classic pins
Standard pins - pros:
- gentle tissue preparation;
- the ability to conduct therapy in one session;
- low price.
Minuses:
- the coronal and intraradicular segments of the restoration may become separated because there is no chemical bond between them;
- in the case of active rods, there is a risk of a wedging effect during the screwing process;
- the absence of a base in the structure leads to a sharp increase in the propping load on the root during operation;
Pros:
- the stump and the pin are cast from identical material and connected, which 100% eliminates the possibility of their separation;
- slight wedging effect during cementation of the stump inlay;
- minimizing disjoining pressure, since the chewing load is transferred to the walls of the root, along its axis, to the rod.
Stump pin inlays can be used when the destruction index of the occlusal surface of a unit is more than 60-100%, (standard pins - 50-60%) guarantee the reliability and durability of the structure.
Our dentistry offers installation of several types of core microprostheses
:
- serve within 5-25 years;
- reliability of fixation;
- excellent strength;
- simplification of subsequent fastening of bridges;
- the ability to work with any degree of destruction, restoration of bite;
- lack of access for pathogens. No inflammatory processes;
- simple replacement of the prosthesis if necessary.
Advantages of a stump inlay
Most people know about the use of pins for damaged teeth to strengthen them. However, it is the shape of the core inlays that is more similar to the natural shape of the tooth. This type of denture has undeniable advantages for use:
- Protects sensitive enamel from abrasion.
- Preservation of chewing teeth from destruction.
- Large selection of crowns.
- It can be combined with other types of dentures to strengthen the dental crown or bridges.
- Rational distribution of food load (especially important for sick or damaged teeth).
- Long service life.
- Giving the tooth an ideal shape.
- Possibility of correcting the position of teeth (in some cases).
- Possibility of use for front teeth.
- Resistant to food staining.
- Possibility of replacing the crown with another one.
- Use for problem roots (periodontal pathology, curvatures, various degrees of obstruction, etc.)
- Use when restoring teeth after injury or caries.
- Reliability of prosthetics in the presence of significant dental cavities.
- Particular strength due to the technology of simultaneous casting of the inlay and pin.
- There is no need to replace the inlay in case of crown destruction.
- Guaranteed against fracture of the prosthesis thanks to the monolithic method of manufacturing the stump and pin.
- No access of microflora to the tooth and the occurrence of caries due to the maximum tightness of the fastening.
Classification of stump inlays
| View | Description | |
| By installation method | ||
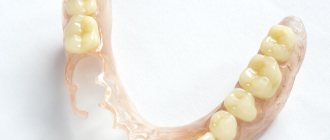
| Cast | Manufactured under high pressure and temperature. Consists of a main part and pins for fixation. Can be replaced over time | |
| Collapsible | Designed for two to four channels. Similar in design to cast ones, only some pins are made removable. This is due to the fact that channels do not always have a symmetrical structure. Comes with a lifetime warranty | |
| Based on base material | ||
| Metal | These can be cobalt-chrome, precious metals and their alloys. They are characterized by increased reliability. Disadvantages include an unaesthetic appearance, which is why they are most often placed behind the smile line | |
| All-ceramic | Made from zirconium dioxide or pressed ceramics. The first ones are as durable as their metal counterparts. The latter look natural, which is why they are used for the front teeth. All-ceramic ones are produced automatically. This ensures maximum compliance with the bite | |
| Metal-ceramic | They are distinguished by average quality and affordable price. Due to the difference in thermal expansion of metal and ceramics, there is a high risk of falling out | |
| Composites | Rarely used due to low durability | |
Important
: It is desirable that the materials of the pin and crown parts of the core structure coincide. For example, if the microprosthesis is metal and the crown is ceramic, then the metal will be translucent.
Price
The stump model of the prosthesis is not a cheap dental structure. Its cost may vary from one dental office to another. The most inexpensive is the metal model (on average from 2,000 to 3,000 rubles). A prosthesis made of pressed ceramics costs about 12,000 rubles. And most of all you have to pay for the zirconium dioxide inlay (about 15,000 rubles).
If your tooth is damaged, but its root is not damaged, do not worry! Modern designs in the form of a stump tab will help you preserve and strengthen a hopeless tooth.
Sources used:
- I. Yu. Lebedenko, Orthopedic dentistry, 2012
- Seifollahi M. Preparation of lateral teeth for all-ceramic inlays
- https://medicine.wustl.edu/
Multi-channel and single-channel tabs
When treating a multi-rooted tooth, the doctor has to decide whether to make a collapsible or solid-cast core microprosthesis. If the root canals run parallel, solid blanks are used. Before choosing an inlay option, the patient undergoes diagnostics - photographs and CT scans are taken. Computed tomography helps to visualize the condition of the root segment, the configuration of the canals, and the presence of bone and periodontal diseases that require treatment. A multi-root microprosthesis is a good option because it creates uniform pressure on the entire tooth while being held in several canals at the same time. A crown with such a base can be used to mount a bridge restoration without the risk of destruction or damage.
Requirements of orthopedic dentistry for the use of core inlays:
- the root canal must have good patency over a length identical to the length of the pin;
- absence of purulent-inflammatory processes in the root zone;
- the walls must be of sufficient thickness (2 mm or more) to resist the chewing load transmitted through the stump structure, the protruding area must not be affected by caries;
- the stump should not be covered by the gum, otherwise gingivectomy is indicated;
- apical tissues should not have manifestations of chronic/acute inflammation.
Stump pin insert
A pin stump inlay is a cast dental structure that is installed by a dentist on a badly damaged element of the dentition.
Its main functions are to preserve the damaged unit and ensure strong fastening of the installed prosthesis. The design of the inlay looks like a tooth stump and fixing pins (pins), which is why it got its name. The latter ensure its reliable fastening in the root canal.
Stages of production and installation of prostheses
We work in several stages
:
- Preparation. We remove the carious area, fill it, take an x-ray to check it, and form a cavity.
- We unseal the roots by half or one third, giving them a taper and width.
- We take an impression of both jaws and cast it from plaster in a dental laboratory. It is important that the microprosthesis corresponds to the antagonist organ.
- We scan the cavity and carry out modeling on a computer.
- We send the task to an automated milling machine, which produces the product.
- We burn the workpiece in a special oven.
- We treat the area with an antiseptic and fix the fat-free microprosthesis with cement.
- Selecting a crown, installing a stump inlay.
How it is made
What stages must be completed in order for a patient to have a high-quality stump prosthesis installed?
The specificity of the installation of stump inlays is the individuality of their production for each clinical case.
Before installing these structures, thorough sanitation of the mouth, filling of the canals and removal of the destroyed pulp in them is required.
Main stages of the process
- The orthopedist prepares the dental cavity for installation of the inlay.
- Then the specialist selects the optimal type of material, taking into account the basic parameters of the desired material (shrinkage, hardness, bioinertness, residual elasticity, thermal conductivity).
- The orthodontist makes impressions of the patient’s jaws to ideally “fit” the prosthesis into the dentition (with the obligatory consideration of antagonist teeth). The blank model is sent to the dental office.
- The variability in the manufacture of the prosthesis must be taken into account: single-root or multi-root (depending on the anatomy of the tooth being restored).
- The dentist makes a prosthetic model from the material selected by the orthodontist. Then a wax model is made from the plaster sample. Only after this do they proceed to the manufacture of a finished stump prosthesis from the selected material (metal, ceramics, composite).
- The structure is covered with a special corrective shell and sent to the doctor.
- In the dental office, the doctor processes the dental cavity and the finished inlay. After this, the prosthetic model is installed on the patient.
- Hiding the stump model of the prosthesis under a crown or bridge.
Complications and errors
Errors in the manufacture of core inlays are divided into two groups: those associated with the work of the dentist and the actions of the dental technician.
Clinical:
- unsealing of the canal to an unsatisfactory amount;
- root perforation during turning;
- giving an inadequate shape to the channel, which can lead to de-cementing of the structure;
- errors when taking impressions.
Laboratory:
- poor-quality casting when using the casting method;
- non-compliance with processing standards during the pressing method;
- violation of the firing regime when applying ceramic layers.
Quality criteria for core restoration: high aesthetic level, reliable fixation, long service life, uniform distribution of pressure when pressed.
How to create monolithic crowns using digital technologies (clinical case)
Despite the fact that monolithic dentures are easier to produce in the laboratory than multilayer ones, they are subject to more stringent requirements for the material from which they are made. And in cases where a monolithic crown is created without impressions, the material must be even better, since any error in the workflow can lead to failure.
The key to success is a combination of the following factors: reliable material, highly qualified dental technicians, excellent software and high-quality milling equipment. Let's look at this process using a clinical case example:
The patient had amalgam fillings installed on teeth No. 18 – 21, which had significant chips, cracks and recurrent caries. It was necessary to create monolithic zirconium crowns for an entire group of teeth using 3M™ ESPE™ Lava™ Plus High Translucency Zirconia. This material was chosen for its shade flexibility and overall aesthetic appeal. Lava Plus zirconium has high light transmittance. It comes with 18 coloring liquids, which allow you to create 16 classic VITA® shades and 2 whitening shades. In addition, the high strength of this material makes it possible to create prostheses that preserve the tooth structure, and according to 3M ESPE, zirconium does not wear off or become rough under occlusal load.
Step 1
A digital impression of the teeth was taken using the iTero digital intraoral scanner, which was then imported into the exocad software system to create the four crowns. Thanks to anatomical libraries, this program allows you to easily and effectively design crowns that look just like real teeth.
Step 2
Adjusting your bite and teeth contact
Step 3
The crowns are made from Lava Plus High Translucency Zirconia using a Lava milling machine. When unsintered, the crowns are approximately 20% larger than the final size, allowing fine detail to be achieved using small burs. At a 1:1 scale this would simply not be possible. After milling, the dentures were immersed in Lava™ Plus Dyeing Liquid. After the sintering process was completed, the crowns were etched using Vita Akzent Plus, which gave the finished products a natural appearance.
Step 4
The crowns were installed and no adjustments were required. The patient was very pleased with the result.
Posted by Bob Williams, CDT
Based on How to Create Monolithic Crowns Using an All-Digital Workflow
Share the material with friends and colleagues:
- VK
- by email
- Telegram
Hygienic oral care
After installing the microprosthesis, 10-14 days pass before fixing the bridge or crown. During this period, the prosthesis requires special care:
- chewing food with the opposite side of the jaw;
- exclude solid foods;
- teeth are brushed as standard;
- The oral cavity is rinsed with an antiseptic solution after each meal;
- the gums are treated with an anti-inflammatory agent.
Stump inlays do not require specific care. It is enough to regularly brush your teeth, undergo an examination by a doctor, and undergo a professional sanitation procedure. To clean crowns, it is recommended to use soft brushes, dental floss, and special brushes.
Design Features
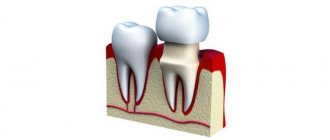
A stump inlay is a structure made from a patient’s dental impression for attaching a crown. This type of denture is a combination of cast material of different alloys. The prosthesis is installed into the dental canal from the inside to strengthen the damaged dental crown.
A stump tab is the only way to restore a maximally damaged tooth (more than 70%).
The upper part of such a prosthesis looks like the stump of a ground tooth, which is where the name “stump” comes from. For special strength, the prosthesis is made by casting from various metal alloys.
This prosthetic model is not a crown. This is a completely different structure. It is difficult to do without this extremely reliable type of prosthetics in modern dentistry.
Stump tab, pin and crown: which is better
It is impossible to compare core inlays and crowns. These are prostheses of fundamentally different purposes, properties and configurations. And only the dentist can decide which type of prosthetics is preferable for a particular patient.
However, a core inlay is not used for teeth with very thin walls. In this case, a crown can more effectively cope with the task of strengthening the crown of the tooth. The crown will be especially strong if it is attached to the stump tab. At the same time, it is possible to maximally strengthen even the most worn teeth and completely restore their natural chewing function.
Both the post and core support strengthen damaged teeth. However, this type of prosthesis guarantees super-strength dental fasteners, uniform chewing load and protection from further destruction.
A very important advantage of the inlay is its fastening using a cement composition. This guarantees a tight fit to the tooth of any degree of wear and prevents the formation of cracks.
Why us
- it doesn’t hurt: during installation we use different types of anesthesia, depending on the patient’s individual parameters;
- it’s fast: treatment will require 2-3 visits;
- it’s reliable: we provide a 3-year warranty;
- it’s convenient: we work with any materials – gold, zirconium dioxide, porcelain;
- it's safe: we have our own dental laboratory. We use equipment from European brands, which guarantees high accuracy and safety of products.
Restore a tooth that seemed hopeless - install a core tab at an attractive price at Dr. Razumenko’s dentistry in Moscow!
How to avoid complications after installation?
Installing an orthodontic appliance can lead to complications:
- pulpitis,
- secondary caries,
- sensation of pain and bleeding in the tissue surrounding the tooth.
The cause of complications is considered to be poor quality of preparation of the destroyed element. In order to protect yourself from such manifestations, you must strictly adhere to all the doctor’s recommendations for hygienic cleaning of the oral cavity and caring for the insert:
- brush your teeth daily 2 times a day,
- rinse your mouth after eating,
- a tooth with a core inlay and a crown can be additionally cleaned using a brush and dental floss, which help remove food grains from the interdental spaces,
- do not miss a preventive examination at the dentist – 1 rub. at 6 months,
- If the orthodontic structure is destroyed, consult a doctor.
If you performed all the steps correctly, you will need to consult a dentist. If necessary, he will issue a referral for an x-ray to find out the cause of the complications.
The cost of such products is quite high, especially when they are simultaneously installed on several units of the dentition. To ensure you don't waste your money, follow the rules for caring for your post stump and don't skip a dental checkup.
Prices for installing a stump tab
| Code no. | NAME OF PROCEDURES | Unit of measurement | Cost, rub. |
| 712 | Fixation of restoration with glass ionomer cement | 1 500,00 | |
| 735 | Single-root post-core inlay CAD/CAM | 7 000,00 | |
| 736 | Multi-root post stump inlay | 8 000,00 | |
| 737 | Single-root/multi-root post stump tab, collapsible | 9 000,00 | |
| 738 | Zirconium pin insert | 11 000,00 | |
| 739 | Cast pin insert with attachment | 12 000,00 |
* The prices indicated on the website are not a public offer. The exact cost of treatment can only be determined at an appointment with a doctor.
Prices for treatment in Moscow full price list
Share on social media networks:
Stump dental inlay on pins - installation methods, types
It is a prosthetic structure designed to restore the integrity of a severely damaged unit. In this case we are talking about a component that is fixed with a pin. We offer to evaluate the advantages of this restoration method, its features and options.
There are several groups of tabs:
– occlusal; – medio-occlusal; – medioocclusal-distal.
The main indication for the use of prosthetic systems is the destruction of the restored unit by more than 50-60 percent, which makes restorative operations using fillings, half-crowns or conventional inlays impossible. Modern systems of the type under consideration are stump pin structures belonging to the covering class.
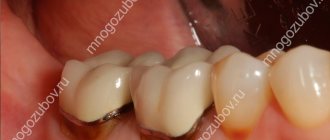
It is important to note that cast products can be used as a support for other prosthetic structures. For example, bridge systems, metal-ceramic and clasp prostheses are often created on their basis. In this case, the components are two separate elements: an inlay and a crown. This distinguishes them from pinned teeth, in which the components are monolithically combined, or can even be cast in one stage.
We recommend that you read
Clasp dentures
Metal-ceramic crowns
Nylon dentures
Veneers