1805
The contact point is a very important element in the structure of teeth. It is extremely important for a dentist to be able to restore it correctly.
Poorly performed work can cost the patient the health of not only the treated element, but also the entire oral cavity. What do you need to know to avoid problems?
High-quality restoration of contact chewing surfaces is the key to proper load on the teeth
When our teeth hurt or decay, all we want is to get rid of pain and discomfort, and also to protect them from removal. How the dentist will act in this case does not even matter to many patients. The main thing is that the work is done efficiently. But when it comes to the treatment and restoration of dental contact points, it is good to understand at least a little about the terminology and restoration methods that doctors use to carry out this incomprehensible procedure.
Reviews
Restoration of teeth, and in particular, the correct restoration of their contact points, is a very important topic in dentistry.
Are all professionals coping with such an urgent problem? You can share your experience of receiving or providing such treatment in the comments.
If you find an error, please select a piece of text and press Ctrl+Enter.
Tags: tooth extension, tooth decay
Did you like the article? stay tuned
Previous article
Basics of Root Canal Irrigation
Next article
Subtleties of specifying tooth color according to the Vita Scale to restore smile aesthetics
Let's understand the terminology: what is a tooth contact point?
For many people, it is a mystery what the contact point between the teeth is. Let's figure it out.
Our teeth are located in the mouth in such a way that their lateral surfaces touch each other and thereby create a continuous arch, which is a single whole and forms a beautiful smile. This is provided that the person does not have any pathologies of the maxillofacial system or there are no missing units.
On a note! The contact point is easy to detect if you pay attention to the interdental spaces - they have a triangular shape in the gingival region, and the tip or apex of the triangle is directly facing the point of contact of the teeth.
If you open your mouth and look at its contents in the mirror, you will see that each tooth has a vestibular, i.e. on the external, visible side, in addition to the most frontal coronal part, there is a cutting edge, a neck and two contact (they are also called “proximal”) surfaces on each side, i.e. these are vertical areas facing neighbors. In those places or points (as a rule, these are the convex parts of the lateral surfaces of the crowns) where the tooth comes into contact with neighboring units, a contact point is formed. Incisors, canines, premolars always have two adjacent contacts on both sides (medial and distal) and only the outer molars in the row have only one such contact point (we are talking about sevens or eights, i.e. wisdom teeth, if you have any There is).
It is important to understand that there are several contact surfaces - lateral (one or two), as well as chewing ones. But it is the contact point that is called the lateral surface in the area of the apex of the crown of a living tooth.
Types of contact points
Experts distinguish only two types, characterized by the peculiarities of the fit of the two proximal surfaces of neighboring units.
The first one is point. This type of contact is typical for children who have recently erupted teeth and for young adults. The crowns themselves in the area of contact have an almost ideal round or spherical shape, so they interact with each other only pointwise.
The second is planar. This type is typical for mature and elderly people, because... Over the course of life, the enamel gradually wears out and wears out, and the coronal part in the lateral areas gradually becomes flat as a result of friction and physiological mobility of the units. As a result, the lateral surfaces of neighboring teeth are no longer limited to point interaction, but have quite pronounced proximal areas or points.
Why are contact points needed?
The functions of dental contact points cannot be underestimated, because the health of the oral cavity as a whole, the condition of the maxillofacial system, and the aesthetics of a smile depend on their correct structure and location.
So, let's take a closer look at what having an anatomically correct contact point gives:
- the teeth are able to lean on each other and provide each other with support,
- each unit occupies its designated place in the row and is protected from loosening and displacement,
- in the presence of a contact point, a correct redistribution of the chewing load occurs: when a load is applied to the tooth during chewing, its coronal part is deformed due to a reduction in height and expansion in different directions. As the crown expands, the load is transferred throughout the row through the contact surfaces,
- The gingival papillae that fill the interdental spaces remain protected from food particles and injury.
If you have caries or, due to various circumstances, damage to the contact point occurs, then any irritant can cause the development of an inflammatory process on the gingival papillae. The same food debris that gets into the interdental spaces can injure the delicate mucous membrane and provoke a disease such as gingivitis. If the problem is not given attention, gum inflammation will be complicated by periodontitis, mobility, displacement, loosening and even tooth loss.
Also, if the anatomically correct contact of the lateral surfaces of the teeth is disrupted, one of them may eventually receive excessive occlusal load or pressure during chewing food and quickly begin to collapse. A characteristic sign indicating functional overload is vertical cracks in the enamel. The same traumatic occlusal load on the maxillofacial apparatus is characteristic of people who have had part of their teeth removed or lost, but are in no hurry to restore them, get prosthetics, or do implantation.
Why do contact surfaces fail?
Most often, the integrity of contact points and their anatomically correct location are violated due to the occurrence of a carious process in the adjacent areas and interdental spaces, which develops here due to inaccessibility and poor or insufficient oral hygiene. As mentioned above, the smallest pieces of food easily get into the spaces between teeth and get stuck; it is not always possible to clean them out on your own, and sometimes it is easy to notice. Moreover, the carious process in these areas can be difficult to identify independently, so it can remain unnoticed for a long time and progress, affecting several units at once. How to avoid this? Undergo preventive examinations in a timely manner. This should be done at least once every six months for adults, and 3-4 times a year for children.
Doctors, when faced with such defects, must not only take care of removing carious lesions and stopping the inflammatory process, but also begin restoring the contact point of the teeth during filling and prosthetics.
Basically, in their medical practice, dentists are faced with defects of class II and III caries according to the system developed back in 1986 by Black. The second class includes caries of the contact surfaces of molars and premolars, the third class includes the carious process on the lateral surfaces of the canines and incisors without disturbing the cutting edge. Class IV defects are also less common in practice, when not only the contact surface of the fangs and incisors is damaged, but also the cutting edge is destroyed.
What are the ways to restore contact cavities of teeth?
If previously, in the treatment of dental caries and its complications, it was enough only to replace the defect of hard tissues with the help of filling material (silicophosphate, silicate cements, amalgams), now the tasks facing the doctor have become more complicated. For example, during treatment, it is no longer enough to just replace the defect and restore the anatomical shape of the tooth. It is also necessary to prevent the development of complications (recurrent caries, etc.), restore and sometimes improve the aesthetic parameters of the tooth, restore the functional value of the tooth and its biomechanical characteristics.
Features of restoration of chewing teeth
When carrying out aesthetic restoration of lateral teeth, the most important task is to restore their anatomical shape. This is due to the fact that dental tissues and tissues surrounding the tooth constitute a very complex biomechanical structure that ensures the perception, distribution and absorption of cyclic chewing load. A tooth is a mobile, dynamic structural system that deforms when a load occurs and completely returns to its original state after the load is removed. The form of deformation of the tooth crown is a decrease in height and an increase in diameter. It is believed that it is through the expansion of the crown that the chewing load is distributed in the dentition to adjacent teeth.
Defects in dental tissues disrupt the integrity of the biomechanical structure, interrupting the paths for absorbing chewing load, and are stress concentrators. Subsequently, as a result of cyclically repeated loads, local fatigue of dental tissues occurs and microcracks are formed in places of excess stress, which, merging with each other, form fractures of the tooth structures.
Typically, patients with a fracture of the tooth wall or a chipped restoration say that the “breakage” occurred as a result of a slight chewing load. This is true, because the fatigue of dental tissues and restoration material formed in the area of excess stress over a long period, and a slight chewing load, which provoked the fracture or chip itself, was only the “last straw” (Radlinsky S.V., 2006).
Therefore, a restoration that is incorrectly performed from an anatomical point of view can lead to the development of various kinds of complications (chips of the restoration, chipping of the tooth crown, etc.).
Restoring a contact point
In his practical work when treating chewing teeth, the doctor most often encounters class II defects according to Black. The most difficult problem is the restoration of the contact point. Let us recall that it is necessary to recreate the following elements: 1) the contact slope of the marginal ridge; 2) the actual contact point; 3) a triangular-shaped hole in the gingival area, which is formed using wedges (wooden, plastic, etc.). The actual contact point is created by using matrices (metal, plastic, etc.) and various matrix systems. In this case, the thickness of the matrices used should be taken into account. It should be noted that if the width of the natural contact point is about 10 microns, then metal matrices have an average thickness of about 35-40 microns, and plastic ones - 50 microns. Therefore, it is important to select the right matrices depending on the specific clinical situation and be sure to wedge the teeth, especially when restoring mesio-occlusal-distal cavities, when it is necessary to use matrices on both sides of the tooth.
To facilitate the restoration of the contact point, proximal faces, and for deeper and more complete polymerization of the composite material, special devices and tools have been developed [2]:
1. Light-conducting cone - Light Tip (Denbur), which has 4 main sizes, is made of plastic and is placed on the light guide of the polymerization lamp. The use of a cone allows for deeper polymerization of the composite material in difficult-to-reach areas - the gingival wall, in places where the filling material adheres to the matrix. In addition, the light cone can be used to press the filling material against the inner surface of the matrix and thereby form the approximal surface of the tooth.
2. The Contact-Pro 2 tool (CEJ Dental) allows you to create interproximal contact points on the mesial and distal surfaces of molars and premolars. The tool is a handle with double-sided working structures made of light-conducting material. The working part is installed at the bottom of the tooth cavity. Ergonomically positioned light cones placed at the ends of the instrument provide light to the deepest areas of the cavity.
3. The Optra Contact tool (Ivoclar Vivadent) allows you to create a contact point from a composite material with a spacer on the inside of the matrix.
4. The LM-MultiHolder system (LMInstruments) consists of attachments of various shapes, which are made of transparent plastic and are light-conducting.
5. To restore the contact point, in our work we most often use the incrementation technique, aimed at reducing the polymerization shrinkage of the composite. Its essence is as follows. First, the matrix system is installed and the teeth are wedged. Then, after conditioning and application of the adhesive, a composite with increased fluidity is applied to the bottom and walls of the cavity and is photopolymerized. The second portion of the composite with increased fluidity is applied to the gingival wall and lateral edges of the cavity; photopolymerization of this portion is not carried out. At this time, a pea is formed from the composite material outside the oral cavity, which in size corresponds to the diameter of the cavity in the area of the contact surface. Polymerization of the pea is also carried out outside the cavity, for example on a sheet of notepad. Next, a finished pea made of the composite is introduced onto the contact surface, which is photopolymerized together with the composite of increased fluidity. Then the cavity around this pea is filled. In this case, a marginal ridge approximately 1.5-2 mm thick is formed. Thus, the class II cavity is transferred to the class I cavity.
As a result of filling using the incremental method, shrinkage of the composite on the contact surface occurs outside the tooth. Next, you can remove the fixing ring of the matrix system for better access to modeling the occlusal surface of the tooth. During restoration, opaque shades are used mainly, and enamel colors are used only at the final stage.
Clinical example
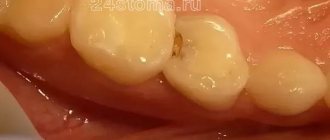
Patient T., 24 years old, came to the clinic for oral sanitation.
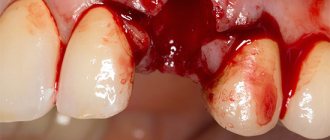
After the examination, a diagnosis was made: tooth 25 had chronic fibrous pulpitis, tooth 24 had caries (Fig. 1).
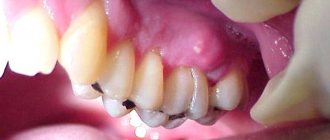
After infiltration anesthesia Ubistesini Forte 1.5 ml, cleansing the surface of the teeth from pellicles with Clint paste (VOCO), the color of future restorations was determined. First, a rubber dam was applied, the failed restoration of tooth 25 was removed, and endodontic treatment was performed (Fig. 2). After establishing the matrix system, a base lining made of glass ionomer cement “Ionofil Molyar” (VOCO, Germany) was applied, and the tooth crown was restored from the nanohybrid composite material “Grandio” (Fig. 3). We would like to note that the Grandio nanohybrid composite does not have a number of disadvantages inherent in most composite materials. The material adapts well to the cavity even without the use of a high-flow composite, and also does not stick to instruments, which ensures comfortable work. In addition, “Grandio” has good handling characteristics: it is easily introduced into the cavity, is perfectly modeled, is well polished, and has the highest color fastness, which is achieved due to the hydrophobic properties of the monomer: restorations from “Grandio” do not change color for a long time under the influence of food dyes (tea, coffee, red wine, etc.), as well as cigarette smoke.
But the most important advantage of Grandio, in our opinion, is that
such physical and mechanical characteristics as the modulus of elasticity and the coefficient of thermal expansion are close to those of hard dental tissues, unlike other nanocomposites. Consequently, the risk of developing complications associated with these physical and mechanical
properties of materials (chipping of part of the tooth wall in the long term after restoration) is much lower when using “Grandio”. After the restoration of the 25th tooth, the preparation of tooth 24 began. To assess the quality of the necrectomy stage, a caries marker (VOCO) was used (Fig. 4). After rinsing with water, it is clear that there are no areas of stained dentin (Fig. 5).
Next, the matrix system was installed, and the hard tissues of the tooth were conditioned with Vococid gel (Fig. 6). After applying the one-component adhesive “Solobond M”, the high-flow composite “Grandio flow” was introduced into the cavity on the gingival wall (Fig. 7). Then, peas from “Grandio” in shade A3 were prepared on a sheet of paper notebook and photopolymerized. These peas are introduced into the cavity and photopolymerized together with a composite of increased fluidity (Fig. 8). The A3 shade of the Grandio composite is adapted around the peas (Fig. 9).
The occlusal surface of tooth 24 was modeled. After removing the rubber dam, grinding and polishing of the restorations was carried out (Fig. 10).
Thus, thanks to the presence in the doctor’s arsenal of the Grandio nanocomposite, which provides excellent aesthetic and strength characteristics of the restoration, as well as the use of the incrementation technique, it is possible to optimally solve the problem of the marginal fit of the composite material in the gingival region, which is difficult for restoration, and, therefore, prevent the development of complications (recurrent caries , chipping off part of the tooth crown, etc.).
Signs of destruction of contact points
Visually, the destruction of the lateral surfaces of the teeth or the presence of a carious process on them may remain unnoticed until a large cavity or black “hole” forms on the side of the crown. However, it is better if the problem is identified much earlier. To avoid missing it, pay attention to the following signs:
- painful sensations when eating food, temperature changes,
- food easily penetrates the interdental spaces and gets firmly stuck there,
- discoloration on the lateral parts of the crown: this sign can be detected quite easily if the front incisors and canines are damaged. The enamel stops shining, may acquire a white chalky tint, turn yellow or brownish,
- gingival papillae are inflamed and swollen,
- Bleeding gums began to bother me.
Methods for diagnosing the problem
Diagnosing a carious lesion in the area of the lateral surface of two teeth in contact with each other can be quite difficult even for an experienced dentist, especially if the units are crowded or closely located. That is why doctors sometimes use not one, but several different methods for diagnosing pathology:
- X-ray: it is always done because... with its help you can determine the depth of the carious lesion and the condition of the tissues surrounding it. In the picture, the carious areas will be black, the tooth itself will be gray, that is, much lighter than the inflamed area,
- digital method: using a special high-resolution video system, the doctor can transfer the image to his computer monitor, where he then comprehensively assesses the situation,
- Electroodontometry or EDI for short: allows you to identify the pathological process at the earliest stages of development. To determine the condition of soft and hard tissues, the doctor uses a special Diagnodent device that produces light pulses, which are then returned or reflected back. Based on the length of the pulse waves, the specialist determines the state of the areas under study. And the wavelengths in healthy and affected areas are completely different,
- transillumination: a special apparatus is also used for this, which literally illuminates all the examined areas. In those areas where the enamel-dentin layer is damaged or demineralized, the light takes on a different shade,
- colorimetry: here the patient is given to rinse his mouth alternately with different liquids. First use a methylene red solution, then use a glucose solution. In damaged areas, the PH level is changed and the acid-base balance is disturbed, so they “give” themselves a bright range of shades (yellow-red),
- vital staining: this procedure can be carried out only immediately after professional oral hygiene, then it will be most effective. The doctor applies methylene blue dye to the patient's enamel. The composition is kept for about 5 minutes, after which it is washed off with plain water. The result is painting in bright colors the areas where the carious process takes place.
Important! Before dental treatment or during a preventative examination, an experienced doctor will advise you to undergo professional oral hygiene - do not refuse this useful procedure. The procedure will help remove soft bacterial and hard plaque, which can serve as an obstacle to the correct diagnosis of various dental diseases and especially the diagnosis of caries in the proximal areas.
It is mandatory for doctors to conduct a visual examination using modern instruments. For example, endoscopes with bright LED lighting that transmit the resulting image to a monitor screen. In this case, the lateral areas of the teeth should be subjected to a comprehensive assessment, not only from the vestibular side, but also from the lingual, buccal, and occlusal side. A study is also carried out using a probe - thus, hidden carious lesions are detected against the background of bleeding of periodontal tissue.
Tools used for restorations
Restoring a tooth that has a damaged contact point is not an easy task for a dentist from a technical point of view. Standard caries treatment and fillings are not enough here. In order to restore the complex anatomy of the contact surface, it is necessary to use a set of special tools and devices, the main of which are matrices and wedges. Let's look at them in more detail.
Matrices
What is a matrix? This is a device that performs a kind of protective or restrictive function and helps to apply filling material for restorations in the required quantity. Using a matrix, a specialist models the surface and contact point, avoiding excessive layering of material. This limiter also does not allow it to go beyond the anatomical contour of a particular tooth. The device also protects the gingival papilla during manipulations.
Modern matrices for modeling surfaces can be made of plastic, metal or metal-plastic, can have different lengths (short, medium, long) and shapes - straight, contour or conical, perforated (flat and curved) for molars and premolars, volumetric. There are separation, protective or contouring (for modeling) models.
To firmly fix the device, the doctor uses matrix holders designed for this purpose: rings and clamps, couplings and clamps.
Wedges
Wedges perfectly complement the matrices. They have several main goals:
- protect the gingival papilla and the adjacent tooth from damage during manipulations and contact with filling material,
- separate the unit being restored from its neighbor,
- increase interdental space for high-quality subsequent procedures,
- allow for a higher degree of fixation of the matrix,
- allows you to recreate a triangular hole in the gingival area during the restoration process.
Wedges are made of wood and plastic, just like the matrices have different lengths and widths. When installed, they adapt to the anatomical features of the tooth.
Experts consider the most optimal option to use wooden wedges made from maple, because They are hypoallergenic, do not injure the mucous membranes and, in addition, perfectly absorb excess moisture. However, plastic is more flexible and pliable than wood, so when the patient’s teeth are very closely spaced and crowded, doctors prefer to use plastic wedges.
To facilitate work with proximal surfaces and for reliable and complete polymerization of filling materials in such difficult-to-reach areas, doctors also use the latest generation equipment. For example, a light-conducting cone that helps ensure polymerization of the composite. Tools and light-conducting attachments with built-in light sensors - with their help you can easily see the deepest cavities.
Classification of matrices and fixation systems
Matrices and systems for their fixation are widely used for dental reconstruction.
In the manufacture of matrices, 2 types of materials are used: metal and plastic. When working with light-curing filling materials, it is more convenient to use plastic ones.
According to the shape of the matrix, they are produced in several types. They are made straight, they can be contoured or perforated.
Contour models are different for the outer and inner walls of the tooth. They vary in length and may have bulges and specialized shapes for different defects.
As for fixing systems, there are two main groups: matrix holders and wedges.
Matrix holders:
- For perforated matrices, a perforated holder is used;
- Sectional matrix system “3M” - fixes with spring rings;
- M. Tofflemeyer - a retainer for working with large defects, used both on the right and on the left. The matrix is put on the tooth and tightened with a coupling;
- Also for two- and three-channel teeth there are ready-made matrices equipped with a retainer; they are tightened with a clamp.
Wedges placed between the teeth can be of different sizes. They are made either from plastic or wood. They are needed to:
- create a triangular space between the teeth;
- wedge the teeth so that there is no gap left after removing the matrix;
- It is enough to secure the matrix tightly on the tooth.
A detailed review of the Glassix fiberglass pin set and quality characteristics of the products.
Come here to learn more about the features and purpose of gutta-percha points.
At this address https://www.vash-dentist.ru/krasota-i-uxod/narashhivanie/shtiftyi/parapulparnyie-kak-sposobov-vosstanovleniya.html we will consider the stages of placing parapulpar pins.
What types of matrices are better for modeling contact points?
It is impossible to answer this question unambiguously, because... the matrix must be selected based on many different factors. Depending on the clinical situation, the amount of work (macro- or micro-restoration is required), the stage of the procedure, the shape of the tooth and the anatomical features of the maxillofacial system, the doctor chooses one or another type of auxiliary instrument.
In the late eighties and nineties, doctors in their practice used cutout matrices to model contact points. But this device has shown its inconsistency over the years and is almost never used today, because such a matrix did not provide sufficient protection of the tooth neck and subgingival space from penetration of the composite there. And this situation often later became the cause of the development of chronic gingivitis. Today, this type of matrix is rarely used and only on the condition that the neck of the tooth is first coated with sealant.
In medical practice, there are also known methods according to which doctors completely refused to use auxiliary tools, namely, did not use wedges and matrices, or even rubber dams or rubber dams in their work. For example, the modeling method with sawing of contact surfaces implied the application of a composite material with a transition to the proximal surfaces. After this, the teeth in contact with each other were separated using an abrasive strip that resembled a hacksaw. This method also showed its inconsistency.
Today, some doctors prefer to use volumetric matrix modeling, because... they most accurately allow you to recreate the shape and anatomy of natural contact points.
Material and types of restoration
The following materials are most often used for restoration in dental practice:
- amalgam masses;
- chemically curing and photo-curing composite;
- combination of a composite with compomer or glass ionomer substances.
These are the main filling materials used when working with second class cavities. To reduce shrinkage within the filling, it is possible to fix ceramic inlays of different sizes. In this case, various techniques are used.
Sandwich technique
The filling is applied in two layers. The main part of the cavity is restored with glass ionomers. The contact point itself is made of composite or alloys.
The use of the open sandwich technique (involves the use of fluorine-releasing materials) is applicable in the following cases:
- the cavity damaged by caries is very deep;
- the patient neglects oral hygiene procedures;
- The patient’s resistance to caries is extremely low;
- disruptions in the patient's hormonal system.
Using a malleable composite
The filling is created in two ways:
- A passive technique in which pressure is not used. The flowable composite is applied in a layer of about a millimeter to all walls of the prepared tooth up to the very edge of the enamel, then it is light-cured.
The gingival wall is restored layer by layer. In this case, the supporting cusps (palatal or buccal) during restoration come out more powerful and rounded, and the guide cusps (buccal or lingual) are made sharper. - Active method used when the gap between the wall at the gum and the matrix is quite narrow. First, the viscous composite is applied, as in the previous case, and light-cured.
Next, another portion of the same substance, a little more than a millimeter thick, is applied to the gum wall. It is not polymerized; a little material is applied on top and distributed on all sides.The pressure forces the flowing polymer to fill the small void between the matrix and the tooth, then treatment proceeds according to the standard scheme.
Bertolotti technique
A chemically curing composite is placed into the restored area on two-thirds of the reconstructed surface, after photopolymerization of the material at the restoration site.
The shrinkage of this material goes to where the temperature is higher (pulp and gum area). The remaining void is filled with a photocurable substance.
Camus technology
Camus and colleagues suggest curing a little of the composite first. This piece is then inserted into the cavity filled with uncured filling material.
The doctor presses the already polymerized piece, directing it to the adjacent incisor or molar , and his assistant is engaged in the polymerization of the entire filling material.
What service life can you expect when placing an anchor pin in a tooth, and what factors can shorten the service life of the product.
In this publication, we will discuss the pros and cons of restoring a tooth with a fiberglass post.
Here https://www.vash-dentist.ru/krasota-i-uxod/narashhivanie/hudozhestvennoy-restavratsii-zubov.html you will find objective reviews about artistic dental restoration.
Preparation for the contact surface restoration procedure
First, the doctor carries out professional hygiene and antiseptic treatment of the oral cavity, puts the patient under anesthesia, and installs a rubber dam. Next, the specialist selects the necessary types of wedges and wedges two adjacent units. The wedge is always inserted from the tongue side, and the second end after installation should become noticeable from the vestibular side. After installing the wedge, you need to wait about 5-10 minutes so that the interdental space becomes clearly visible and nothing interferes with high-quality work.
Then the doctor opens and disinfects the carious cavity and removes the affected tissue. It is especially important to remove damaged tissue in the gingival area, because If this procedure is not carried out carefully enough, then there may subsequently be a risk of developing recurrent caries. Often in such cases, it is necessary to treat not just one, but several adjacent teeth, whose contact surfaces are in contact, for caries.
Next, depending on the clinical picture and indications, the doctor selects and fixes the matrix system, conditions the prepared cavity using special gels and applies an adhesive composition, after which he selects a technique for restoring or restoring both the tooth itself and its contact point with the neighboring unit.
Preparation
After diagnostic measures, the patient is given an allergy test for sensitivity to anesthesia, and, if everything is in order, a dose of the drug is administered. Next, you should wedge the teeth and check the occlusal contacts.
The wedge size is selected by correlating it with the parameters of the interdental triangle. Installation should not require any effort.
The best material for wedges is wood (maple), because it absorbs moisture and the wedges increase in size. Thus, in a short time, the required distance appears between the teeth.
There are several options for accessing the damaged area of the tooth. Let's look at the main methods.
From the chewing plane
When the dentist approaches the problem from the chewing plane, when removing the affected fragment, the entire protective layer, devoid of bone tissue, is removed. Then the enamel and edges are smoothed.
It is important that the enamel is in contact with the opposing tooth. An isthmus with the width of a quarter of the distance from one tubercle to another on the crown of the jaw arch element is required.
If the tubercle is severely damaged, you need to shorten it by 2 mm or more in order to further cover it with filling material. This will help reduce the risk of chipping in the future.
A cavity is formed; the side walls should not come into contact with the growing tooth next door.
It is very important to remove all areas of damaged enamel from the gum area. They can subsequently cause recurrence of caries.
Access for over-inflated clinical crown
If the patient has a high crown, or the problem area is located below the contact of the vestibular or palatolingual surface, in the presence of periodontitis, the technique described below should be used.
Tunnel preparation
This version of turning, performed from the chewing surface, is characterized by the lack of a full view of the cavity, and there is a high risk of injury when opening the pulp.
In addition, there are many possible complications and an increased likelihood of reoccurrence of caries.
Materials for restorations
To recreate contact surfaces, doctors use different materials: hybrids, nanocomposites and composites of increased fluidity, compomers, glass ionomers, amalgam. A combination of composite and GIC is often used.
Flowable composites are characterized by a high degree of wear resistance, are well suited for surface modeling and can be polished, are elastic, easy to mix and conveniently applied using special dispensers.
As for compomers, they contain fluorine, which helps strengthen and regenerate hard tissues. This material is very resistant to moisture and has a high degree of adhesion.
Checking the quality of restoration
To determine the quality of the reconstruction of the contact formation, the dentist carries out the following actions:
- excess filling material is removed;
- the correct occlusal contact is checked;
- the marginal fit is examined with a probe or floss (the thread is inserted with some force).
The contact is considered to be of poor quality if the interdental space is clearly visible or the dental floss easily fits between the teeth. The restoration needs to be redone if the patient complains of food getting stuck between the teeth, or the floss breaking during hygienic cleaning.
The video provides additional information on the topic of the article.