Treatment of agenesis of the upper lateral incisor using implant prosthetics
Tooth agenesis is one of the most common anomalies in the development of the dentofacial apparatus, and this form of pathology can be represented simply by the absence of one or more teeth in the anlage. In such situations, the most acceptable treatment option is dental implantation followed by the installation of an orthopedic crown.
According to the literature, agenesis in the area of the lateral incisors occurs in 2.2% of all clinical cases. With such a topography of the disorder, in addition to the functional one, an aesthetic problem is also important. To ensure adequate osseointegration, the presence of at least 2 mm of bone tissue around the implant is required; the same volume of bone is sufficient to restore an appropriate harmonious gum profile. But in real situations, it happens that the amount of residual bone tissue is deficient, which, therefore, provokes the need to install the implant at a specific angle, and this, in turn, significantly increases the risk of possible negative orthopedic consequences during complex rehabilitation.
Ridge splitting
In recent years, several surgical approaches have been proposed to provide adequate conditions for implant placement, optimizing the overall protocol for complex dental surgery. Among these, various techniques of directed bone regeneration play a significant role: the use of bone autografts formed from areas in the oral cavity or from extraoral donor areas provides excellent augmentation results, however, the procedure itself is somewhat aggressive and does not exclude the development of a number of postoperative complications. As an alternative, a ridge splitting technique can be used to achieve bone formation between the buccal and lingual cortices. The first original publication regarding the use of this approach was published by Osborn in 1985, in which he described a slightly modified augmentation technique for greenstick fracture formation. After him, this method was modified by Bruschi and Scipioni, who used partial flaps in the reconstruction process, the latter, in turn, helping to maintain the integrity of the blood supply to the bone, thereby increasing its regenerative potential. In recent years, a number of combined augmentation methods have been developed using both partial flaps and synthetic biomaterials, which have further expanded the regenerative capabilities of the periosteum.
Clinical case
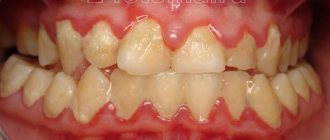
A 26-year-old patient presented for dental treatment with bilateral agenesis of the upper lateral incisors (Figure 1).
Photo 1: Clinical situation before treatment.
Agenesis of teeth 1.2 and 2.2 caused mesial displacement of teeth adjacent to the edentulous area.
Consequently, orthodontic treatment was performed to restore the necessary space for the installation of dental implants. After this, a Maryland bridge was fixed as a provisional structure, which helped maintain the occlusion formed after orthodontic intervention, as well as the functionality and aesthetics of the dentition until dental implantation. After a thorough analysis of the radiographs, it was found that the thickness of the bone tissue in the area of the future surgical intervention is insufficient both in the vestibulopalatine (3 mm) and mesial-distal directions (photos 2 (a) and 2 (b)).
Photo 2: X-ray before the intervention.
Given the deficiency of bone tissue, it was decided to split the bone ridge on both sides of the jaw.
The following procedures were performed at each surgical site:
- local anesthesia
- partial flap formation
- bone crest osteotomy 64 with Beaver blade
- distraction of the vestibular cortical plate
- preparation of the implantation site using surgical drills
- checking the parallelism of the formed implantation beds
- installation of implants
- suturing the flap with underlying periosteal support
Formation of flaps
After the anesthesia procedure, the creation of partial trapezoidal flaps was performed using a Beaver 64 blade, first making an incision along the bone crest, and then from the medial and distal sides to relieve tension (Figures 3 - 4).
Photo 3: Flap on the left side.
Photo 4: Right side flap.
Osteotomy and bone window formation
A Beaver 64 blade was secured to the top of the bone crest and driven with a surgical hammer to 4 mm into the bone tissue, thereby creating the required fracture line. A similar manipulation was performed on the other side of the jaw. The diameter of the formed bone window was smaller than the size of the flaps to ensure adequate healing of the intervention area.
Osteodistraction
Using a Bard Parker scalpel and a straight elevator, the bone fragments were displaced (photos 5 - 6). At this stage, care must be taken not to disturb the integrity and solidity of the bone tissue in the apical part of the ridge, which ensures the cohesion of the ridge even after partial splitting.
Figure 5: Osteotomy and bone window on the left side.
Figure 6: Osteotomy and bone window on the right side.
Preparation of the bone bed and installation of implants
After disposition of the bone fragment, we began preparing the bone bed for future intraosseous structures. In this case, such a manipulation should be carried out with great care so as not to compromise the integrity of the roots of the teeth adjacent to the implantation area. After installing the first guide bur, a targeted radiograph was taken to assess the inclination and position of the instrument in the bone tissue (photos 7 - 9). After installation of dental implants (3.4 × 10.0 mm, Intra-Lock International, Boca Raton, USA) (photos 10 - 11), additional verification of the adequacy of their installation was carried out using targeted radiography (photos 12 - 13). After this, the bone fragment was repositioned and the intervention area was sutured with single sutures.
Photo 7: Assessing the position and inclination of the guide bur in the bone tissue at the left implantation site.
Photo 8: Assessing the position and inclination of the guide bur in the bone tissue at the right implantation site.
Figure 9: Clinical evaluation of implant inclination.
Photo 10: Implant placement on the left.
Photo 11: Implant placement on the right.
Photo 12: Control of the position of the installed implant on the left using targeted radiography.
Photo 13: Control of the position of the installed implant on the right using targeted radiography.
Three months after the initial intervention, the abutments and crowns were fixed (photos 14 - 15). The patient was re-examined one year after fixation of the prosthetic elements (photos 16 - 17).
Photo 14: Clinical appearance after three months.
Photo 15: View with installed crowns.
Photo 16: Control of the implantation area on the left using targeted radiography one year after fixation of the crowns.
Photo 17: Control of the implantation area on the right using targeted radiography one year after fixation of the crowns.
Discussion
The choice of surgical approach in this clinical case was justified by the aesthetic criteria of the implantation area, the functional features of the installation of intraosseous titanium elements and the factor of the patient’s young age.
Thanks to orthodontic correction, it was possible to recreate the required volume of space for the installation of dental implants, and the use of an adhesive prosthesis in the period before surgery, in turn, ensured the stability of the adjusted parameters of occlusion and aesthetics.
A similar approach has been repeatedly described in the scientific literature. The main problem of treatment was the lack of bone necessary for adequate installation and long-term prognosis for the functioning of implants. According to generally accepted principles, the distance between the implant and the center of the adjacent tooth should be about 7-8 mm, and its adequate labiolingual position (at least 1 mm posterior to the vestibular bone plate) ensures the conditions for proper soft tissue restoration and the formation of an acceptable appearance of the dental papilla during complex rehabilitation.
Thanks to the correction of bone tissue parameters, it was possible to provide optimal conditions for subsequent implantation, which, in turn, has a beneficial effect on the functional and aesthetic prognosis of restoration of areas of adentia or total agenesis of teeth.
Authors: M. M. Figliuzzi, A. Giudice, S. Pileggi, D. Pacifico, M. Marrelli, M. Tatullo, L. Fortunato
Anatomical features of the upper teeth
- The central incisor (the largest of all eight) has a chisel-shaped crown with a convex surface and one cone-shaped root. The only root canal in 75% of cases is straight.
- The lateral incisor with the same chisel-shaped crown and the same convex surface has a characteristic depression in the enamel - a “blind fossa”. There is one root canal, but more often it is deviated to the side.
- The canines on the upper dentition are often larger than those on the bottom. They are characterized by a crown pointed on all sides and the longest cone-shaped root. Canines have a single root canal, which can be straight (45%), distally deviated (30%) or vestibular deviated (12%).
- The first premolar with a prism-like crown is characterized by a convex lingual surface. On the chewing side there are tubercles, and between them there is a fissure. In the upper dentition, these teeth are always larger than in the lower one. The root has extended longitudinal grooves, which divide it in 60% of cases into two parts - buccal and palatal. There are often also two root canals.
- The second premolar with the same prism-shaped crown has predominantly one straight cone-shaped root with expanded lateral surfaces. Sometimes the root bifurcates closer to the top. There are often two root canals.
- The first molar is the largest tooth in the dentition. The rectangular crown has a diamond-shaped chewing surface with four cusps and an H-shaped fissure between them. There are usually three root canals, but sometimes there are 4 (25%) or 5 (1%).
- The second molar with a classic cube-shaped crown has 4 cusps and an X-like fissure on the chewing side. The tooth has 3 roots and three (87%) or four (13%) canals.
Anatomical features of the lower teeth
- The central incisor is the smallest tooth in the “adult” bite and the smallest among the incisors. The root is quite short, in 65% of cases there is one root canal, less often - two.
- The chisel-shaped lateral incisor is always larger than the central one. One or less often two root canals – both narrow. “Adult” incisors on the lower jaw are less susceptible to damage than others, so dentists rarely turn to them for the treatment of caries in children and adults.
- Fang - similar in structure to the upper one, but is smaller in size. In 96% of cases it has a single root canal of normal structure.
- The first premolar has a rounded crown in cross-section and two characteristic tubercles on the chewing side. One root is slightly flattened.
- The second premolar is very similar in crown shape to the canine, and is always larger than the adjacent premolar. The surfaces of the single root are smooth and slightly shiny. Two roots occur in only 3% of cases or less.
- The first molar with a cubic crown has five cusps on top of the crown, separated by an F-like fissure. In 88% of cases, three root canals are formed.
- The second molar is smaller than the first, but completely replicates its anatomical features. Root canals are curved and have poor patency. In 85% of cases, the tooth has three canals, in 10% - four.
The anatomical characteristics of teeth are similar in all people, but each person may have individual characteristics, for example, the absence of wisdom teeth or an increased number of root canals in a particular tooth.