Indirect modeling steps
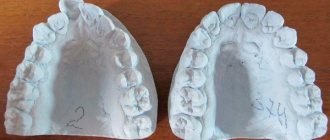
First, the dentist takes impressions of the upper and lower jaws. In this case, silicone is used, since it is very important that the material is of high quality. Then the doctor records the habitual closure of the jaws, preparing the bite ridges, and performs registration using a face bow.
The next stage is work in the articulator. This is the name of a special device that allows you to simulate the movement of the lower jaw and debug all chewing movements of the dental apparatus. If the bite decreases, then with the help of special studies, taking into account facial characteristics, they calculate how many millimeters it needs to be raised.
A silicone model of teeth is placed on a plaster base in an articulator and analyzed. At the same time, the dental technician takes into account the functional and aesthetic wishes of the patient and the dentist. He then makes a wax model and shows it to the patient. If necessary, correction is made.
If the patient is satisfied with everything, then a permanent prosthesis is made in the laboratory based on the Wax-up model.
How does forward modeling work?
Mock-up modeling is performed directly in the oral cavity. It allows you to determine the optimal shape of the prosthesis. Direct modeling can be figuratively compared to trying on a dress.
The doctor makes silicone impressions of the teeth. Great importance should be paid to modeling the palatal surface, without which it will not be possible to make a full-fledged cast.
Composite plastic is placed into the silicone impression (it is better to use a material that is different in color from the teeth) and placed on the patient’s teeth. The impression is then removed and excess materials are removed from it. If necessary, increase the size of the teeth and reduce the width of the spaces between them.
Next, the dentist, using special brushes and prophylactic paste, cleans the teeth of plaque. At the same time, no manipulations are performed with the teeth: they are not prepared or sawed, as with conventional prosthetics, which allows maintaining the integrity of the dental apparatus.
The base shade of enamel and layer-by-layer dentine are applied to the template. Next, the doctor restores the structure of the tooth, forming anatomical details on the surface of the model, including mamelons (the so-called protrusions and tubercles on the teeth). Restoration of the dental structure is carried out sequentially, starting from the oral surface and gradually moving to the vestibular surface. Finally, an enamel shade application is made.
Mechanical finishing is carried out after the surface of the model has dried. If the model is even a little wet, it will be difficult to visually control the quality of grinding. Polish the surface carefully using special silicone heads of different shapes. In this case, their rotation frequency should be low.
The teeth are treated with a special fixing glue and the prepared model is attached to them.
The patient can walk around with temporary teeth, which will allow him to observe his sensations and determine what exactly needs to be corrected. The doctor will also have the opportunity to study the reaction of the mandibular joint.
The technician can produce several models so that the client can make the best choice.
If the patient no longer has any complaints, then the resulting model is sent to the laboratory, where permanent dentures are made based on it.
It is especially recommended to use Mock-up models for patients who need to improve their bite, as well as for those whose teeth are severely worn out. The models are also irreplaceable when performing prosthetics on implants.
Flaws
Wax modeling and restoration of teeth is considered an ideal technique with no disadvantages. However, there is a minus that concerns the material itself. Wax, when compared with others, has a fairly high rate of thermal expansion. This is due to its polymerity. As a result, there are discrepancies in the size of the castings and insufficient fastening of the cast prosthesis. To prevent this from happening, a method is used to fill the dimensions by expanding the molding material and applying a compensation varnish.
Program “I want my own brand”
Program for creating a jewelry collection “I want my own brand!”
Do you want to change your occupation, but don’t know where to go and what to do? Do you want to create something beautiful and necessary with your own hands? Do you want your creativity to be in demand?
Or maybe you have long dreamed of creating your own brand of jewelry?
Even if you have never held a jewelry instrument in your hands and do not have an artistic education, but you have a dream, this program is for you!
A unique intensive practical course on creating your own jewelry brand from scratch!
We have collected all the most useful and valuable practical knowledge and skills for a novice jeweler.
In 5 months you will go all the way from working on a sketch to creating your own jewelry and promoting your brand.
During the existence of the program, our graduates have already created their own successfully growing jewelry brands. They did it - so can you!
The program is designed for absolute beginners in the jewelry business. We provide all materials and tools. Classes are held in small groups of no more than 5 people, which allows for almost individual work.
Our master mentors are experienced jewelers with many years of working and teaching experience. And the main thing is the amazing creative and cozy atmosphere of our workshop))
After completing the training, we provide 10 days of work in our camp for free - you will not need to think about where to continue doing what you love.
Who is this program for:
- For those who have always dreamed of creating jewelry, but didn't know where to start
- For those who have already tried it on their own and want to expand their capabilities and gain additional professional skills
- For those who simply love the world of jewelry and want to immerse themselves in it or add creativity to their life!
- For those who want their own brand of jewelry, but are not ready to spend a year or two on it.
- For those who want to become a jeweler, but do not want boring training “at a desk”, but are looking forward to really practical training at a workbench.
Program:
“I want my own brand!” is divided into two parts. In the first part , students master the jewelry kitchen, learn the basics of jewelry craftsmanship, design and marketing.
The first part consists of the following modules:
Module 1. Jewelry design.
From sketching techniques to techniques for creating your own collection.
8 lessons of 3 academic hours.
Module 2. Mastery:
- Making jewelry in metal
- Setting gemstones
- Modeling from jewelry wax and replicating jewelry
14 lessons of 9 academic hours
Module 3. 3 D modeling.
Prototyping jewelry models in 3D.
Skills in working with the Rhinoceros program.
6 lessons of 4 academic hours
Contraindications
Wax modeling of the shape of teeth is considered a completely safe and painless procedure for the patient. It does not cause any discomfort or unpleasant sensations and is performed without the use of painkillers. However, there are some contraindications for its implementation. These include:
- diseases of the jaw bone tissue;
- recovery period after radiation therapy;
- inflammatory processes of various nature;
- craving for drugs;
- acute form of oral cavity anomalies.
You also need to take into account the fact that natural raw materials, namely beeswax, are used to make the casts. Therefore, this technology should not be used in relation to people who are allergic to honey or bee products. If there is a reaction to the material, the patient must notify the doctor so that he can select a safe method of prosthetics and restoration.
Veneers and dental treatment
Is it necessary to treat caries before installing veneers? Many doctors install veneers on composite filling materials, but this material shrinks by several percent of its volume after just a few years. Consequently, the veneer may no longer be fixed so reliably. In addition, the number of layers of material in the case of “tooth + filling + veneer” is three, which is a lot. Conclusion:
the fewer layers, the higher the reliability of fastening the structure, therefore the ideal scheme for installing veneers is: only the tooth and only the veneer. No problem, if suddenly the patient asks “what if the filling needs to be removed and there is a depression in the tooth?”, my answer is absolutely nothing to worry about, the veneer will simply have additional volume in this place to fill the defect, and the patient will get it you will get only the tooth and only the veneer, without any shrinkage in the future and with one layer of attachment of the veneer to the tooth.
Is it possible to install a veneer if a tooth is damaged?
It is not necessary to have a healthy tooth to install a veneer. We need, at a minimum, only a healthy root, and the veneer will play the role of the missing module for the tooth; it will look like a monolithic crown with the root part: only the tooth and only the missing veneer module. Repeating the conclusions of the previous paragraph - 2 components, no more, this is the main rule.
Material requirements
To model teeth, wax of types 1 and 2 is used, the first being appropriate for the direct method, the second for the indirect method. This is due to their quality characteristics. The second type of material is of lower quality, but this property does not affect the result of the model at all. The first type of wax is perfect for making an impression directly in the patient’s mouth.
There are a number of rules regarding the selection, preservation and use of this material. One of them concerns the fact that in order to obtain greater contrast, it is recommended to use waxes of different colors. After cooling, the material should not crumble and must be rigid. The quality of the impression is negatively affected by the presence of crumbs in the wax mass during the heating process. If there are particles or flakes in it, then the surface will not be smooth, but embossed. It should also be borne in mind that when scraping the material should not form chips or fall off in pieces. Exceeding the permissible storage period has a negative effect on the quality of wax.
Accurate and high-quality anatomical modeling of teeth depends on the correct selection of material for a specific method.
Technique
The direct method is often used to create models. The algorithm of actions is as follows:
- The tooth that requires restoration is covered with cotton rolls, the bottom and walls are specially moistened with a swab.
- The wax heated to the required plastic consistency is pressed into the cavity requiring correction. The doctor who will perform this procedure must take into account the anatomical features of the tooth and its location between the other teeth.
- When the wax hardens, it is removed with metal wire from which the pins are made. They will serve as a kind of handle for removing the model.
- The ends of the pin are heated and clearly inserted into the model. To do this, the doctor leans on the adjacent teeth so that there is no unnecessary vibration.
- After complete hardening, the structure is removed.
If the entire procedure was performed correctly and from high-quality material, then it easily comes out of the tab area.
Watch the video for the procedure.
How to clean beeswax at home
Since the natural product contains many impurities in the form of honey residues and cocoon particles, a purification procedure is carried out to obtain a high-quality substance. At home, cleaning is carried out using a physical method, which involves successive filtration and sedimentation.
Note: Filtration is carried out during heating using nylon fabric, gauze or metal mesh. The hot liquid product is filtered through a filter, leaving large contaminant particles on it and small ones remaining.
Settling will help get rid of small contaminant particles. To do this, the wax is melted and placed in water for several days. To prevent it from cooling down and thickening, the container must be wrapped to retain heat. As a result of this event, small particles settle to the bottom or remain at the border with water. When the substance hardens, they can be easily removed from the surface using a regular knife.
From the video you will learn how to use wax at home.
General overview
This technique in dentistry is otherwise called Wax-up technology, which is a mandatory step in the orthopedic correction of oral defects.
Making a model in dentistry is necessary for the following purposes:
- Drawing up plans for the upcoming restoration by the orthopedic doctor and technician. The wax model is a test material, from which they clearly determine the method of restoring the damaged unit, consider the possible nuances and difficulties of prosthetics, and the scope of further work.
- Making it easier to explain to the patient all the features and aspects of the upcoming treatment , as well as agreeing on the final appearance of the teeth after their restoration.
- Elimination of all inaccuracies and inconsistencies of the future prosthesis at the initial stage of its manufacture.
To perform such work, wax is considered the most suitable material. When heated, it is quite plastic, amenable to any processing, and after cooling it easily and quickly takes the required shape.
In addition, this material is durable and dense. These properties help the technician to very accurately reproduce the required parameters of the tooth so that the manufactured prosthesis is as similar as possible to the original.
It should also be noted that not a single type of dental work can be done without aligning teeth with wax. This stage is necessary to work out the nuances of the upcoming work to restore the functionality and aesthetics of the dentition.
Preparation
The preparatory stage is of great importance in restoring the integrity and functionality of the dentition.
Important! You cannot begin orthopedic correction of oral cavity defects without conducting comprehensive preparation.
It includes a complete examination of the oral cavity, and if problems are found, their elimination. The specialist’s task at this stage is to create optimal conditions in the oral cavity for performing prosthetics.
Conventionally, the preparatory stage is divided into:
- therapeutic;
- surgical;
- orthodontic.
Therapeutic preparation includes sanitation and professional dental cleaning. Also at this stage, treatment of inflammation and caries identified in the mouth is performed.
If necessary, several more manipulations are expected during treatment:
- replacement of long-standing fillings;
- root canal filling;
- their preparation for securing prostheses;
- treatment of periodontal tissues;
- preparation of teeth (their turning and depulping).
During surgical preparation, “dead units” are amputated, i.e. those that cannot be treated. Their roots, exostoses, hypertrophied gum tissue and mucosal areas, and osteophytes are also removed.
Important! The next stage of preparation can be carried out only after complete recovery, and this takes approximately two months.
The orthodontic stage allows you to change the position and inclination of the teeth, which are supposed to be used as supports for removable or fixed structures.
The fan-shaped arrangement of the chewing elements are also , additional space is created in the dentition for placement of the prosthesis, and incorrect occlusion is corrected.
Indications
Based on the condition of the oral cavity, an orthodontist may prescribe artistic modeling of teeth in case of increased deterioration of the area above the gum, which manifests itself due to advanced caries. In this case, it is necessary to restore the dental walls by using microprosthetics or a crown. Also when worn due to abnormal features, for example, malocclusion. You can get rid of this defect using veneers or crowns.
The indications include a distinctive color. When installing an implant, it is possible to choose the desired color, but first you need to carry out a modeling procedure. When an entire row of teeth is destroyed, a wax impression is a mandatory step in their restoration. If only the root remains, modeling is indispensable. Complete absence of teeth - adentia - is one of the indications for performing this procedure. The same applies to the presence of multiple pathological defects. If you need to install several crowns or a bridge structure, then a wax impression will certainly be created. The Wax-up procedure allows you to take into account the individual characteristics and wishes of the client.
Reviews
How many negative sensations and experiences do deformed, missing or chipped teeth bring to a person?
To correct these defects, when turning to a dentist, he cannot always clearly explain his vision of the result in words. Wax modeling allows you to resolve this situation.
You can share your experience and impressions of Wax-up modeling by leaving a review in the comments to this article.
If you find an error, please select a piece of text and press Ctrl+Enter.
Tags wax modeling fixed dentures
Did you like the article? stay tuned
Previous article
Features of removing a dental cyst using cystotomy
Next article
What problems can be eliminated by relining a removable denture?
Price
Installation of certain types of orthopedic structures in the oral cavity using wax modeling is an expensive dental service. The high cost of the technology is explained by the price of the starting material, the use of special equipment and the high accuracy of the process.
The approximate cost of creating a wax model for 1 unit of dentition varies from 1200 rubles. up to 1500 rub.
The cost of the service may increase if several units need to be restored at once or the defect being corrected is very complex.
The final figure for the use of wax-up modeling is usually announced by the doctor after a visual examination of the oral cavity and examination of x-rays.
The video provides additional information on the topic of the article.
Preparatory process
Before doing wax modeling of teeth, you need to complete a number of appointments, one of the first is conducting diagnostics of the oral cavity. If necessary, an x-ray and computed tomography of the jaw should be performed. It is also noted that in case of oral diseases, it is necessary to undergo a course of treatment. Don’t forget to sanitize and follow hygiene rules.
Only after a full examination and treatment course has been carried out, the doctor begins to create impressions.
Advantages
Despite the fact that the use of the Wax-up technique for orthopedic correction of defects in the oral cavity requires a specialist to perform additional work that requires the expenditure of material resources and time, doctors advise not to refuse to perform it for a number of reasons:
- The procedure allows you to prevent inaccuracies in calculations during the production of implants, as well as eliminate identified errors at the first stage.
- Manifestations of unpleasant sensations and discomfort upon completion of prosthetics are excluded.
- The duration of adaptation to new artificial units is reduced to a minimum .
- A person can examine in detail the wax model of the future prosthesis , clarify some of the nuances that interest him, thereby eliminating misunderstandings between the patient and the specialist regarding the vision of the result.
- The simulation does not affect healthy neighboring units and does not damage them.
- The preparation of supporting teeth is performed in a gentle way , which also eliminates discomfort and unpleasant sensations.
An important advantage is the type of material used in modeling. Wax is an inert natural material that does not cause adverse reactions in the body.
