Description of the procedure
Tooth preparation is the removal of hard tissues that are damaged or interfere with the fixation of the crown.
Previously, turning under metal ceramics was long and painful. However, thanks to modern anesthesia drugs and the latest instruments, the duration and pain are significantly reduced.
During the procedure, the doctor strives to preserve healthy organs as much as possible. In this case, it is necessary to create natural forms, which is achieved through the formation of ledges.
For proper preparation, the following criteria must be met:
- the dental organ has retained its natural shape;
- the tooth stump is reduced and slightly tilted;
- the tooth is reduced in size by up to 2 mm;
- There are no unpleasant consequences near the dental organ.
Thanks to the preparation of teeth, the metal-ceramic crown receives the place it needs, so that it does not exceed the neighboring teeth in height and does not protrude outward or inward.
The crown should fit tightly under the gum, which is facilitated by a ledge under the gum.
To install a solid crown, up to 0.3 millimeters must be removed from the lateral surface without damaging adjacent teeth. To install a metal-ceramic prosthesis, the tooth is depulped and then 2 millimeters are removed from it. There should be a ledge on each side.
The doctor determines what size layer to remove based on the size of the tooth and the characteristics of its position in the dentition.
News
6 February 2021 10:16
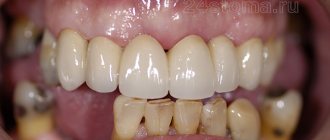
Metal-ceramics with and without shoulder
What is a metal-ceramic crown with and without a shoulder? This division is associated with the methods of tooth preparation for a crown. — When a tooth is prepared without a ledge, a conventional metal-ceramic crown is made. This is the simplest, fastest technology, where, with good cosmetics, it is possible to achieve significant savings. The doctor needs to remove as much tooth tissue as is necessary to place a metal-ceramic crown, without artificially increasing its volume. Therefore, this method of tooth preparation can be considered simplified only conditionally, since the removal of hard tooth tissues in the cervical area requires a clear idea of the task at hand. With a conventional metal-ceramic crown, the metal and ceramic end at the same level along the edge and a fairly thin layer of porcelain mass is created in the cervical area up to the metal frame. Among the disadvantages, we can note the likelihood of problems with the gums and a possible violation of aesthetics due to the appearance of a gray strip of metal between the gum and tooth in the future. — Metal-ceramics with a ledge implies the creation of a ledge along the perimeter of the entire tooth, the width of which is determined by the thickness of the future crown. Such tooth preparation requires high professional skill from the doctor. and maximum strain on individual abilities. Compared to turning without a shoulder, turning an even shoulder of the same width on a tooth is much more difficult and requires more time to prepare the tooth, additional materials and tools. When making such crowns, the ceramic mass covers the ledge and hides the metal edge, i.e., an all-ceramic edge is created. Shoulder masses can sometimes be used for the same purpose. Such crowns are the most aesthetic, the gray strip of metal is not visible even over time because it is completely hidden under the ceramic layer. The cost of metal-ceramic crowns with a ledge is higher than usual because their production requires additional materials and time. A metal-ceramic crown with a ledge is a highly aesthetic, durable design that does not injure the gums.
Regardless of what type of tooth preparation for a crown is chosen, it is recommended to make temporary plastic crowns on the ground teeth, which will protect them from infection and protect the gums from injury. This is especially true for teeth prepared with a ledge.
Rachenkov I. A., orthopedic dentist, Dentistry No. 4 LLC. 8.
All prices for metal ceramics:
Manufactured by casting from nickel-chrome (NiCr): Metal-ceramic crown (regular), DUCERAM ceramics (Germany) - 5700 rub.
Manufacturing by laser sintering from cobalt-chrome (CoCr), CAD/CAM technology: Metal-ceramic crown (cobalt-chrome CoCr), DUCERAM ceramics (Germany) -6900 rub. Metal-ceramic crown with a shoulder (cobalt-chrome CoCr), Noritake ceramics (Japan) - 8200 rub.
Manufactured by milling from cobalt-chrome (CoCr), CAD/CAM technology: Metal-ceramic crown with a shoulder (cobalt-chrome CoCr), VITA ceramics (Germany) -11,500 rub. Full anatomy crown, without ceramic lining (CoCr) -RUB 7,000.
The price includes the entire process of manufacturing a metal-ceramic crown, except for impressions and cementation. Prices for all services:
Any copying and placement in third-party sources of materials published on the site is possible only if you provide an ACTIVE link to the source. When copying this article, please include:
Peculiarities
Grinding teeth for metal ceramics has the following features:
- The need to remove a significant layer of enamel and dentin (up to 2 millimeters).
- The use of anesthesia so that the patient does not feel pain during grinding. The most common methods are infiltration and conduction anesthesia.
- The main goal of specialists is to preserve as much bone tissue as possible and remove all damaged areas.
- After removing the tissue, a truncated cone is obtained, the edges of which are then slightly rounded.
- Grinding should be done intermittently after every 2-3 seconds.
- The tool must be constantly cooled during grinding so as not to cause a burn to the pulp.
- The contact surfaces must be ground with the device at low speeds.
Why do you need a consultation?
When choosing a prosthetic technique, the patient needs to at least superficially know about the materials that will be used in the manufacture of teeth. Today the market offers a large selection - our specialists will definitely advise you on all issues and select the best option based on your characteristics.
The final cost of the product will be announced at the initial consultation. We guarantee the high quality of work of all specialists - experienced doctors will do the work to the highest standard, and you can be sure of the correctness of all manipulations.
Stages of the procedure
Let's take a step-by-step look at how teeth are ground for a metal-ceramic crown:
- Creating grooves. The doctor makes peculiar incisions that will show how much hard tissue needs to be removed. These grooves subsequently contribute to uniform grinding. Creation of notches can be done with a bur or a shaped head in the form of a wheel. They are carried out from the vestibular side to a depth of 1.5 millimeters. The ledges on the palatal and vestibular sides are removed.
- Removing tissue from the vestibular and oral sides. Maximum caution is important at this stage. Diamond burs directed parallel to the tooth remove the required layer. When working on the palatal side, the palatal tubercle is preserved.
- Preparation from the occlusal surface. This stage consists of preparing one and a half to two millimeters, while not disturbing the anatomy of the chewing surface. The living crown of the anterior dental units is thus shortened by 25%.
- Separation of the contact side. It is important to separate the medial surface from the distal one and then remove the tissue. A diamond bur with flame-shaped or needle heads is used. 0.5 millimeters are left above the gum. To prevent periodontal injury, a dental matrix and an interdental wedge are used.
- Gum retraction. If it is necessary to immerse the bur deeply, you need to protect the gums. Therefore, it is moved away with the help of special threads, rubber rings and a spatula. This stage is important for taking an impression so that a high-quality model can be easily made.
- Formation of the ledge. The width of the ledge can be 0.5-1.5 millimeters, depending on the anatomy of the dental organ. It is made with a face bur.
- The final stage of processing. The dental stump should be in the form of a uniform cone. At this stage, irregularities are cut off, protruding edges are removed, and the stump is rounded.
How is a crown installed on a tooth?
If you decide to put a crown on a tooth, then it will be useful for you to know what stages of this process you will have to deal with. In the process of placing a crown on a tooth in dental clinics, the following stages can be distinguished...
Initial consultation with an orthopedist (prosthetist) −
During the initial consultation, the doctor, assessing the condition of the teeth externally and using x-rays, must offer possible prosthetic options, and the patient, accordingly, must approve one of the options. Based on this, a treatment plan is drawn up, which may take into account -
removal of non-viable teeth,- preparing teeth for crowns (filling, depulping),
- choice of the type of crowns, for bridges - the number of supporting teeth, etc.
- The cost of making crowns and treatment in general is calculated, the deadline for prosthetics is determined, after which the patient must sign a treatment plan and a contract for the provision of services.
Important: at this stage the patient must choose one of the types of artificial crowns offered to him. Choosing the type of crown is not easy for the average patient, and there are a lot of pitfalls that the dentist will never tell you about. Articles to help you choose -
→ Pros and cons of metal-ceramic crowns → How to choose crowns for front teeth
Preparing teeth for prosthetics −
In some cases, crowns can be placed on living teeth. This is preferable because dead teeth are more fragile, and therefore, if the teeth are left alive, this has a positive effect on the service life of the crowns. In what cases can teeth be left alive? As a rule, we are talking about large chewing teeth. This is due to the fact that large teeth have a greater distance from the surface of the enamel to the pulp of the tooth (than single-rooted teeth) and, therefore, the risk of thermal burn of the pulp when grinding the tooth for a crown will be much lower.
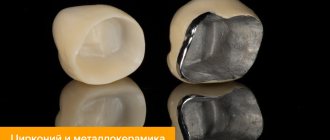
Moreover, under crowns made of metal-free ceramics, even the majority of single-rooted teeth can be left alive. This is due to the fact that under ceramics the tooth is ground down by 1.0 from the side surfaces, and under metal-ceramics – on the same surfaces by 2.0 mm. Therefore, metal-free ceramics also allows you to increase the service life of the tooth itself under the crown.
When using metal-ceramic prosthetics for single-rooted teeth, the nerve is almost always removed. If this is not done, then turning such a tooth can lead to a thermal burn of the dental pulp, i.e. neurovascular bundle. In this case, after some time, its inflammation will develop, and the crown will then have to be removed and the tooth re-treated. If the tooth under the crown is destroyed by a carious process (there is pulpitis or periodontitis), then planned depulpation of the tooth and treatment of inflammation at the apex of the root are required.
When depulping a tooth, it is carried out -
- removal of a nerve from a tooth,
- instrumental treatment and expansion of root canals (Fig. 2),
- the canals are filled with gutta-percha (Fig. 3),
- after which a filling is placed on the crown part of the tooth (Fig. 4).
Important: if the crown part of the tooth is destroyed by 1/2 or more, the tooth must be strengthened with a pin fixed in the root canal (otherwise the crown can easily fall out along with the filling). There are 2 main methods for restoring severely damaged teeth.
What is the best way to restore a badly damaged tooth? –
The first option (Fig. 5) – patients also call it a crown with a pin or a crown on a pin. This is when a pin is screwed into an already filled root canal, and then, based on it, the crown part of the tooth is restored using filling material. Only after such restoration is the tooth ground down for a crown.
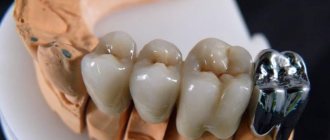
- The second option (Fig. 6-8) – the crown part of the tooth is restored using a stump inlay.
Such an inlay is cast from metal in a dental laboratory and consists of a root part (which is fixed in the canal) and a crown part, which has the shape of a tooth that has already been ground for a crown. This method provides greater reliability, strength and longer service life of the crown. Making a core inlay for a crown –
Preparation of teeth for crowns −
In common parlance - grinding teeth. The preparation process is carried out by an orthopedic surgeon, who (using a drill and a set of diamond burs) gives the tooth a certain shape. Preparation is a painful process if living teeth are ground down. In this case, local anesthesia is required. When dead teeth are ground down, anesthesia is given only if the doctor needs to strongly press the gum away from the tooth during preparation.
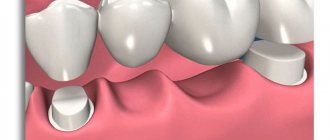
The tooth tissue is ground down by the doctor to the thickness of the future crown (Fig. 9-11). Crowns made of metal-free ceramics (for example, zirconium dioxide or E.max glass ceramics) require less grinding of the tooth tissue - approximately 1.0 to 1.5 mm on different tooth surfaces. But under metal-ceramics, the teeth are ground down on all sides by 1.5-2.5 mm - as a result of which almost nothing remains of the tooth. As a result of preparation, the tooth crown takes on the appearance of a “stump”.
Tooth preparation for metal ceramics –
Important: high-quality tooth preparation for a crown is a very complex and time-consuming process. The most difficult thing here is to create a ledge in the gingival part of the tooth crown. The reliability and service life of your crown largely depends on the correct formation of the ledge. It must be admitted that most doctors make a lot of mistakes at this stage. How the ledge is formed is clearly shown in the video below.
Grinding front teeth for crowns: video
Taking impressions, making plaster models of teeth –
Impressions are taken from the ground teeth using special impression compounds (Fig. 12). Subsequently, based on these casts, plaster copies of your teeth are created in a dental laboratory (Fig. 13). Such plaster models depict the patient’s teeth with very high accuracy, including those ground for crowns, and it is from such models that they are manufactured.
A very important question here is what kind of impression material you will use to take impressions. Good impression compounds are “A-silicone” or, better yet, “polyester compound”. But usually, in order to save money, alginate masses or C-silicone can be used, which will affect the quality/accuracy of crowns for the worse. As a result, crowns may not fit the ground teeth, may not fit well around the neck of the tooth, and the latter will inevitably lead to rotting of the tooth under the crown.
Taking an impression of your teeth is usually a tolerable procedure that is not accompanied by pain. However, sometimes the doctor needs to insert a retraction thread deep into the gingival sulcus in order to move the gum away from the ground tooth and thereby obtain a better impression of the teeth at the gingival margin. Gum retraction is quite painful and is best performed under anesthesia. Gum retraction also has a disadvantage - very often gum avulsion can lead to the appearance of a periodontal pocket.
But there is also a group of patients for whom taking impressions is a very big problem. For example, if you have an increased gag reflex. Of course, before the actual impression is taken, you may be sprayed on the root of your tongue with Lidocaine spray (an anesthetic), but this still does not help much. In this group of patients, it is advisable to additionally use sedatives before the procedure itself.
How dental impressions are taken in dentistry: video
Making crowns in a dental laboratory –
So the casts were taken, plaster models were made. The dental technician begins to make your future crowns based on these models. Because While the manufacture of metal-ceramics and ceramics may take several weeks, while permanent crowns are being made, temporary crowns are usually made of plastic. They will not only restore aesthetics, but also protect sharpened teeth from destruction by the aggressive environment of the oral cavity.
The most important thing at this stage is that we recommend getting dentures only in those clinics that have their own dental laboratory (located directly in the clinic itself). This is necessary so that the orthopedic dentist has direct contact with the dental technician at the stages of making crowns, and the dental technician can always come to the office when trying on crowns.
The latter is very important if you want to get good aesthetics of the crowns, well-formed contact points with neighboring teeth, etc. Of course, none of this will help if your prosthetist's hands are growing out of a bad place, but at least it will improve your chances of receiving quality service.
Trying on crowns –
Before the dental technician finishes his work, it will be necessary to try on the unfinished work.
For the first time, the frame of the crowns is usually tried on, which can be either metal or made of metal-free ceramics. The second time they try on an almost finished crown, on the surface of the frame of which (after the first fitting) layers of ceramic mass, as well as dyes, were applied. It is at this stage that you can still say that you don’t like something (color, shape), and it can be corrected. Those. It is at this stage that the color is finally agreed upon, and if you have agreed on it and, moreover, signed the medical record that everything suits you, then it will be too late to make a claim. Therefore, our advice: if you are not satisfied with anything and you are ashamed to point it out to the doctor, be sure to say so, and do not sign anything until you are really satisfied with the results of the work.
After the final fitting, your crown is sent back to the laboratory where it goes through the glazing process to achieve its final look and shine. At your next visit, you will have ready-made crowns fixed with permanent or temporary “cement.”
Video of fitting of E.max ceramic crowns –
Temporary / permanent fixation of crowns –
In principle, there is no need for temporary fixation as such. It is necessary, and you should insist on it only if for some reason you are not sure of the quality of the work or something confuses you (the color/shape of the crowns, their visibility against the background of neighboring teeth). If the crowns are placed on permanent cement, they can only be removed by sawing.
If you insist on temporary fixation, and the dentist refuses you, this is also a signal to think about the quality of the work. Such cases and conflicts on this matter between the doctor and the patient are not uncommon, and here you must remember that it is you who pay the money and decide how everything should be - you too. Usually 1-2 days is enough to get used to the new crowns, determine how well the color matches the desired one, and after that come back to the clinic and have the crowns placed on permanent cement.
Laser processing
Thanks to laser pulses, a thermal effect occurs on the fluids contained in the teeth. In this case, the structure of the material is microscopically destroyed. Unnecessary tissue is then cooled with an aqueous solution or air, and then removed without hindrance.
Laser preparation has the following advantages:
- no noise when the tool operates;
- safety of the procedure due to the absence of tips in the device that rotate at high speed;
- the frame for the future crown is obtained quickly and without pain;
- infection during the procedure is excluded, since the instrument does not touch the tissues.
Tunnel preparation
Tunnel turning is carried out using turbine units with diamond or metal tips. At the same time, it is important that the equipment is new, since a worn-out instrument can cause overheating of the tissues and their destruction.
Note: With this method, it is possible to save as much material as possible for future crown installation. The result of removal can be predicted in advance, and during the procedure it is easy to control the volume of the removed layer.
This type of preparation is used today more often than other methods.
Preparation with abrasives
An alternative to a drill with its rotating drills is also the supply under pressure of air mixtures containing an abrasive powdery substance. By acting on the enamel, this mixture gradually removes hard tooth tissue.
Features of preparation with abrasives are as follows:
- speed of the procedure;
- absence of tissue overheating and painful sensations;
- gentle effect on the dental shell;
- careful grinding, which allows you to obtain the necessary stump while preserving a significant amount of healthy tissue.
Is dissection painful?
Removing hard tissue is a painful procedure. But with high-quality anesthesia, the patient does not feel pain at all. However, there are situations when, after the anesthesia wears off, the tooth or gums around it begin to hurt.
The main cause of pain in this case is the removal of a large amount of tissue from the vital dental organ. In this case, the tooth, the pulp of which is located under the remaining thin layer of hard tissue, hurts when touched, as well as when exposed to cold or sour food. In such a situation, it is better to consult a doctor so that he can install a temporary crown to protect the ground tooth or cement the thinned area.
Pain may also be a consequence of pushing back the gums with a special thread in order to see the working area when grinding. The floss puts pressure on the soft tissue between the tooth and gum, creating swelling and pain. This pain should go away within two days. If it occurs after a longer period of time, it is better to consult a doctor, as this may be a signal of nerve inflammation or the development of periodontitis.
Purpose of installing temporary crowns
After grinding down the tooth, a temporary crown made of plastic is placed on it, which will remain in the oral cavity for two or three weeks while the permanent prosthesis is made.
For some patients, the fact that a doctor makes and places a temporary crown is incomprehensible and even seems meaningless.
But this procedure is simply necessary. Since temporary crowns protect teeth from external influences, and also correctly distribute the load when chewing.
The advantages of using temporary crowns are as follows:
- Teeth ground for a crown are not protected from the harmful effects of pathogenic bacteria, which can cause inflammation of the teeth under a permanent crown, and temporary products protect them from infection.
- When biting, a ground tooth can be displaced by the opposite dental organ, which can lead to unwanted errors during prosthetics.
- Temporary dentures give the oral cavity an aesthetic appearance, and with it the patient’s self-confidence. They operate in the same way as permanent ones, only they are made from budget material.
Metal-ceramic crown: advantages
Differences between a metal-ceramic tooth crown and other crown materials:
- strength due to the metal base - withstands high loads;
- period of use, subject to operating rules, is at least 15 years;
- aesthetics – natural-colored dentures are difficult to distinguish from real teeth, since each model is created individually;
- functionality – complete restoration of chewing functions without compromising comfort;
- protection of tooth remains - the space under the crown is sealed, food or dirt cannot get there, so inflammation is excluded;
- low cost.
A metal-ceramic crown is the optimal choice if the quality of workmanship and care of the product is proper.