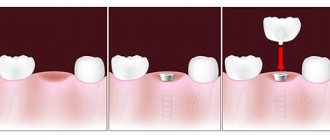
The production of a surgical template is necessary to ensure a guaranteed successful dental implantation. The design looks like a dental mouthguard with special holes through which the implants are installed. Surgical templates completely eliminate the risk of incorrect implant installation due to clear planning of the treatment process even at the preparatory stage. In this way, it is possible to predict the result as accurately as possible.
What are surgical templates for dental implantation and what are they for?
The intensive development of progressive technologies has contributed to the fact that patients are no longer afraid, as before, to decide to radically restore their teeth using implantation. This process has long been considered safe, but only if two conditions are met: the work is performed by a competent specialist, the clinic is equipped with modern equipment, which can also be used to produce surgical templates for dental implantation.
In this article, we will analyze in detail what working with a template is in implantology and find out what are the advantages of using innovative devices for carrying out treatment at the highest level.
This is interesting! Today, techniques using templates are also called “template implantation.” This word itself is of English origin and is translated precisely as “template”.
Implantology yesterday and today?
Implant surgeons, having only X-rays and plaster casts on hand, could only work according to the Open-Look-Make scheme. This led to the fact that the height of the bone and its thickness were only approximately estimated. Today this practice has not gone away. Many clinics are not ready for innovation.
Computed tomography improved the situation somewhat. But even this technology does not exclude medical error, because the surgeon does not have the ability to control the direction of bone drilling. If the bone is too thin, perforations of the side wall are likely.
Guide templates have radically intervened in the “Opened-Looked-Made” scheme. Now the doctor first analyzes the results of the tomogram and 3D planning of the position of the implants. Only after this, guide templates are made and the operation is carried out.
Templates specify the depth, location and direction of implant installation, due to which error is practically eliminated, and with it the risk of possible complications: damage to the roots of adjacent teeth, nerves, maxillary sinuses, etc.
Read how implantation using templates is carried out.
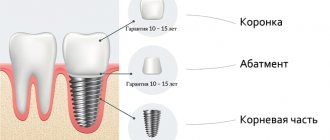
What is a surgical guide?
At first glance, it will seem to the average person that this is an ordinary transparent mouthguard, like the one used to protect teeth in high-risk sports or to correct a bite. The only external difference is that this mouthguard contains holes that have the same diameter.
But for a specialist implant surgeon planning an implant procedure, a surgical template is much more than just a mouth guard. This is an auxiliary tool or guide for precise positioning of implants, created according to the individual data of each individual patient.
Using this device, the doctor can install implants into the jaw bone tissue with millimeter precision. Moreover, this can be done quickly and minimally invasively, even in complex clinical cases, for example, with acute bone tissue atrophy.
Important! Using such a template in practice allows you to protect not only the doctor himself, but also the patient. Precise installation of implants eliminates any risks associated with injury to the sinuses and nerves, as well as complications. This means that the result obtained will not bring disappointment.
Indications for use
- Absence of three or more teeth in one jaw row.
- The need to replace the front teeth with implants.
- Identified clinical anomalies in the structure of the jaw, which imply the need to drill at a large angle.
- The need for a flapless, minimally invasive surgical solution.
- Installation of a fixed or conditionally removable beam structure.
- Immediately after the implant is placed, a temporary crown will be placed on it.
- The patient has bone atrophy, and the implants need to be directed into the processes of the jaw that go to other bones.
Manufacturing process
The production of templates for implantation can only be carried out using high-precision equipment (CAD/CAM technologies or 3D printers) and using the most modern computer software, which involves a preliminary 3D modeling process. Most often, this can be done in a dental laboratory, which is attached to dentistry.
How to make a template taking into account all the individual anatomical features of the patient’s jaw? To achieve this, the implant surgeon does not work alone. This requires coordinated work of a team of professionals. In addition to the implantologist, an orthopedist is also involved in the work. Together they make preliminary preparations for dental implantation. The patient is required to undergo a computed tomography scan of the jaw and undergo the procedure of taking impressions.
Next, the resulting casts undergo scanning and volumetric modeling. At this stage, specialists work out a treatment plan directly in a computer program, select implant models and determine the location of their installation. When all the data obtained as a result of diagnostics is taken into account and processed, the template itself is created on their basis.
“Experienced specialists must clearly understand that each manufactured surgical template for dental implantation is subject to fairly strict requirements. This is primarily the necessary rigidity and strength. The product must be securely fixed in the oral cavity, fitting as tightly as possible to the gums or teeth. It must accurately repeat the anatomical features and natural curves of the alveolar ridge. And naturally, the guides must indicate the location for positioning the implant with millimeter accuracy. Achieving such indicators is not easy, only professionals can do it, but without these conditions the success of implantation is already called into question, especially in very difficult cases,” says Put V.A., an implant surgeon with more than 20 years of experience.
Materials and types
The design principles of templates for dental implantation are based on safety, hypoallergenicity for the patient and simplicity, ease of manufacture and ease of sterilization for doctors. During the manufacturing process, products must be easy to process and influence, so they are created from materials such as acrylic, transparent plastic, and medical polymers (plastic).
As for the types and options 1 for using templates, they can also be different for each individual clinical case: they can rest on the bone tissue of the patient’s jaw in difficult situations when fixing them (when it is necessary to perform a patch operation during the installation of implants) or on the mucous membrane in case of multiple , completely edentulous. There is also a separate type of templates based on preserved teeth.
Important! Doctors also identify types of guides (these are holes in the templates), which are created for a special tool with which the surgeon will work during the implantation process. Those. The diameters of the holes in the templates can also vary depending on the type of drills and keys, as well as on the technique used by the specialist.
There are also standard templates. More precisely, guides. They look like plates with marked marks - these are most often used for standard protocols, for example, all-on-4 (all on 4 implants) or Trefoil, when the placement of implants is known in advance (that is, if the patient has an ordinary case).
When you can’t do without a template for implantation
Let's consider situations in which making a guide template for implantation is simply necessary:
- the patient is missing a large number of teeth or is completely edentulous: when complex dental restoration and installation of several implants are planned. In this case, the specialist needs special guidelines for installing implants, without which it is very easy to make a mistake,
- if teeth are restored using one-stage implantation methods with immediate loading of the prosthesis. In this case, installation of implants and prosthetics are carried out in an extremely short time, i.e. The patient gets the smile of his dreams within a few days. Therefore, the doctor simply cannot have the right to make a mistake, and navigation templates that are created at the stage of careful treatment planning help eliminate risks,
- atrophic processes in bone tissue: surgical templates allow dental implantation without additional bone augmentation operations. Through the guides, the doctor avoids “weak” areas in which the bone is thin and will not withstand the subsequent load from the prostheses, as well as the maxillary sinuses in the upper jaw and the ternary nerve in the lower jaw,
- It is necessary to restore teeth located in the frontal zone of the smile: increased aesthetic requirements are imposed on dental implantation and prosthetics in this area, and in order for the smile to look beautiful and natural, it is simply impossible to do without precise positioning of artificial roots.
On a note! Experienced surgeons have long appreciated the advantages of template designs in dental implantation. But there are situations when their use is not possible. In particular, they cannot be fixed in the mouth with anomalies of the maxillofacial apparatus, with macroglossia, when a person cannot open his mouth wide.
3D technology for making guide templates
3D technologies have become firmly established in dentistry today.
This was manifested in the development of computer navigation in implantology. In the West, not a single dental implantation operation takes place without navigational surgical templates. In Russia this service is rare. Clinic "Doctor Smile"
one of the first to introduce the use of navigation templates into its practice. It was necessary to master this promising direction. All the largest corporations involved in the manufacture of implants abroad have begun producing special kits for navigational implantology. They are echoed by manufacturers of tomographs for dental needs, who have begun to equip their devices with special software modules.
Almost no clinic in our country, or even in the capital, has yet acquired this new product. Why, if you can install implants in the correct position the old fashioned way? But it will only be relatively correct. Even computed tomography data does not allow perfectly accurate placement of the implant. That is why orthopedic doctors and dental technicians often face difficulties in finding the most constructive solutions. And incorrect placement of the implant makes prosthetics difficult.
In case of bone deficiency, which is quite common, additional surgery is required to increase the volume of the bone. Guide templates eliminate this need and also allow for express implantation without incisions or sutures, with minimal risk of complications.
What are the benefits of template designs?
Creating an individual surgical template for dental implantation allows the patient to be confident in a good treatment result, and, as mentioned above, to protect himself - the likelihood of errors during treatment is reduced to zero. In addition, the guides significantly facilitate the procedure for installing implants, and their use provides many more advantages:
- quick implementation of the surgical stage: the doctor tightly fixes the template on the patient’s jaw and performs his work through the guides. This approach saves significant time,
- bloodless implantation: implantation today in most cases is minimally invasive. This means that the doctor will not perform exfoliation of the mucous membrane and large-scale intervention, even if it is necessary to restore a large number of teeth. The specialist will make a puncture through the holes in the template. As a result, such a puncture heals more easily later, making the rehabilitation period easier for the patient. There are no unnecessary stitches, bleeding, pain, traumatic damage to soft tissues,
- After installing the implants, you can immediately install a prosthesis: with the help of guides, the doctor can immediately attach a temporary and even permanent crown or prosthesis, which will be ideally positioned on the artificial roots.
What are the disadvantages
There are several nuances here that need to be mentioned.
The first is that it may take several days to carefully study the treatment process and make a template. But in modern realities, given that a patient can receive new teeth using one-stage treatment protocols today literally in a short period of time, this is mere nonsense. In addition, the presence of a template reduces any risks from implantation procedures to a minimum. So it's worth waiting a little for this.
Secondly, you can entrust the work of creating a template only to a specialist who is fluent not only in innovative implantation techniques, but also in perfect knowledge of the anatomy of the maxillofacial apparatus. Also, the doctor must be able to use computer programs, but not only at the user level. He must constantly improve his skills (and confirm this with official documents and certificates) in order to keep up with the times. But unfortunately, there are still quite a few such specialists even in the capital of our homeland.
In any case, the use of surgical guides in implantology is a big breakthrough and progress. Many specialists see such auxiliary devices as a successful future, good long-term results, beautiful smiles and an increased level of trust on the part of their patients.
Video testimonial from a patient three years after dental implantation Smile-at-Once
1 Ryakhovsky, A. N. Options for using guide templates at the surgical stage of dental implantation. Panorama of prosthetic dentistry, 2007. i
Implantation technique without using a surgical template
D. V. Korotkikh
chief physician of the clinic "DENT and K"
Undoubtedly, at present, any implantation operation must be strictly planned. At the same time, along with everyday orthopantomography, computed tomography is becoming more widespread, which allows one to assess the conditions for implantation in all planes, identify anatomical features and construct surgical templates using the CAD/CAM system. While advances in diagnostic technology have certainly increased the possibilities for detailed planning, the process itself has become more complex. As a result, the time from patient consultation to implantation increases significantly, in addition, the cost of treatment increases.
At the same time, as clinical experience with implantation increases, we realize that in most cases surgical guides are simply necessary. As they are widely used, nuances arise that affect the results.
Every dental surgeon practicing implantation using surgical templates has encountered the following phenomena:
1. Precise positioning of the template on the alveolar ridge is difficult even with preserved teeth. Especially when using the free mucoperiosteal flap technique, one may often encounter inaccurate fit of the surgical template, which affects the accuracy of the pilot drilling. With Flap-less techniques, the positioning accuracy of the surgical template is much higher, but without direct visualization of the bone, it is possible to deviate from the middle of the alveolar ridge. And any deviation from the middle of the ridge increases the risk of perforation of the cortical plate in the sagittal plane, which is undesirable. Of course, if the ridge is sufficiently wide, deviation from its middle is not a risky manipulation, but if the thickness of the alveolar ridge is insufficient, the risks of perforation of the cortical plate increase significantly. The principle of planning implants “from top to bottom” allows you to see in advance the possible problem of lack of ridge thickness, when when the axis of the implant is displaced orally or vestibularly, the occlusal load is not optimal and it is necessary to plan in advance the augmentation of the alveolar ridge in the sagittal direction. But any additional augmentation (especially using bone blocks) increases the risk of implantation failure. It is also quite difficult to motivate the patient to undergo additional augmentation. All of the above allows us to conclude that deviation of the drilling from the middle of the ridge is not always desirable and the use of a surgical template does not always guarantee the correct direction.
2. When using a surgical template, the exact location of the drilling axis (2mm pilot drill) is difficult. Yes, of course, pilot drilling with a surgical template sets the direction of the implant axis, but inaccuracies are possible. Let's look at why this phenomenon occurs using a specific example. In most cases, the pilot drill has a spiral cross-section, and the guide sleeve has a cylindrical hole (Fig. 1).
Rice. 1. Pilot drill.
Accordingly, the pilot drill may have play when rotating in the guide sleeve cylinder. Possible angle of deviation from a given axis is 5 - 10 °. The error is quite large and during subsequent drilling it can increase with geometric consistency (Fig. 2). From all of the above, we can conclude that when using a surgical template, an error is possible. Sometimes this can negatively affect the result of implantation.
Rice. 2. Angle of deviation from a given axis.
3. After pilot drilling according to the template, the surgeon is forced to prepare for bone preparation for finishing drilling, which does not exclude deviation from the direction of drilling. It is difficult to disagree with this phenomenon, since sometimes it is necessary to adjust the drilling of the operating bed after pilot drilling. With each subsequent drill, you can adjust the axis of the implant within 0.5-1 mm, as well as the tilt of the implant. Typically, the possibilities of such correction strongly depend on the type of bone: the denser the bone, the more accurately the direction is maintained after pilot drilling, and vice versa. From the analysis of practical experience, it can be seen that when using a surgical template, unplanned deviations of the implant axis occur, as a rule, in the upper jaw. SH Shreder in his research compares this phenomenon with oil drilling. In oil drilling, pilot drilling is also used, the direction of which is set by a computer. However, if the soil is loose and heterogeneous in composition, during further drilling with drills of larger diameter, deviations from the planned location of the mine sometimes occur. The same phenomenon can be encountered during implantation. In some cases, if you deviate from the direction of pilot drilling, there may be risks of perforation of the cortical layer, exposure of the implant coils, perforation of the adjacent root or anatomical structures. These risks can be minimized by being aware of the potential for drill deviation after the pilot and by monitoring subsequent drilling.
4. If during surgery due to unforeseen problems (for example, abnormalities, etc.) it becomes necessary to change the positions of the implant, the drilling template becomes completely useless. In some cases, after lifting the mucoperiosteal flap, bone defects are revealed, usually on the vestibular side. In such cases, you can choose two ways: augmentation and, as a rule, delayed implantation or implantation with a certain distance from the bone defect. In the case of unplanned augmentation, according to statistics, the risks of failure are higher than with implantation under normal conditions. From this we can conclude that using a pre-made surgical template is useless, since the drilling direction will need to be changed.
5. The use of a drilling template always complicates and prolongs the surgical procedure, which, in turn, increases its traumatism. Some surgical templates made using the CAD/CAM system use additional fixation elements for stabilization on the surgical field, the use of which causes additional trauma. Although these templates made on the basis of computed tomography are quite accurate, without the use of additional fixation methods their error increases significantly. When using templates made in a laboratory using conventional methods, inaccuracies are also possible. Namely, during the preliminary setting of teeth, as a rule, the proportions of future crowns are not strictly maintained, and differences arise between the preliminary crowns, according to which the implant axis was selected, and the permanent orthopedic design. It follows that the axis of the tooth crown may not coincide with the axis of the implant. And this violates the concept of “top-down” implantation planning, when the crown on the implant is first planned, and not vice versa. As a result, the final result of implantation is imperfect.
6. Treatment costs increase, especially with the use of computed tomography. Currently, not every clinic is equipped with a CT scanner, and when referring a patient, planning time is usually lost. The total time from consultation to surgery increases, and this is not always convenient for the patient and the doctor.
Now directly about the implantation technique without using a surgical template. It emerged as a result of ongoing analysis of the clinical success of implantation both with and without the use of surgical guides. The author of the method is Professor Manfred Liang (Nuremberg, Germany). Its main postulate is “the maximum possible simplification and predictable success.”
The essence of the technique is training on phantom models of the patient for each specific case. Neurophysiologists have long noticed the fact that human brain reactions manifest themselves in the same way under similar conditions. That is, if the same person installs implants on the model, then he will also install them in the patient’s mouth. If errors occurred on the model and were not consciously corrected, then the same errors will occur in the oral cavity.
Manfred Liang, who noticed this phenomenon, decided to simplify the entire planning and implantation procedure as much as possible. The basis for planning is a high-quality panoramic image with a distortion factor of 1.1. The image shows particularly important anatomical structures: the bottom of the maxillary sinus, the mandibular nerve, and the angle of inclination of the adjacent teeth is also taken into account. If necessary, the width of the alveolar ridge can be measured using an osteometer. Therefore, as a rule, patients can do without a CT scan.
In order to accurately determine the position in the corresponding area when pilot drilling, without using a drilling template, it is important to know the natural distances of the teeth in the upper and lower jaws and at the same time take into account that the pilot drilling takes place in the middle of the alveolar ridge.
As a basic rule, to obtain sufficient width of gums and bone between implants or natural teeth, the pilot drilling should never be less than a minimum distance of 7 mm. Using a special caliper or periodontal probe, it can be easily measured during planning on models and directly during surgery.
It is important
to note that the minimum pilot drilling distance to a natural tooth is a minimum of 4 mm and a maximum of 5 mm.
On
average, pilot drillings (the distance between the centers of the implants) in the area of the anterior teeth of the upper jaw are carried out at a distance of 7 mm from each other.
On the lateral parts of the jaw for premolars of the upper and lower jaws, the distance is 8 mm for men and 7 mm for women, and for molars - 10 mm for men and 9 mm for women. The only exception is the area of the frontal teeth of the lower jaw. Here, to replace four incisors, 2 implants in place of the 32nd, 42nd are enough. Clinical case No. 1
The patient came to the clinic with a complaint of pain in the area of the 38th tooth (Fig. 3). After removal of the 38th, a treatment plan was drawn up. The surgical stage included the removal of the 47th, 37th, 17th, 16th and 27th teeth.
Rice. 3. Initial X-ray picture.
After 3 months, implantation was planned in the lower jaw (Fig. 4).
Rice. 4. X-ray picture after 3 months.
Drilling was done on diagnostic models. Namely, having retreated 5 mm from the 35th tooth, we drilled taking into account the inclination of the root of the 35th tooth. Next, stepping back from the center of the pilot hole of the 36th implant by 10 mm (a periodontal probe can be used), the 37th tooth was drilled strictly in the middle of the ridge. For orientation, guides are inserted into the holes. In the area of the 46th and 47th teeth, similar actions were carried out (Fig. 5-7).
Attention should be paid to possible difficulties, namely the narrow ridge in the area of the 46th tooth (we are planning to install an implant with a diameter of 3.3 mm) and the inclination of the roots of the 35th and 45th teeth (it will be necessary to choose a similar inclination of drillings in the area of the 36th and 46th teeth). Also among the possible difficulties, the proximity of the mandibular nerve, especially on the left, should be noted. Photo after implantation (Fig. 8): in the area of the 37th, an implant with a diameter of 4.2 mm and a length of 8 mm was placed; in the area of the 36th, an implant with a length of 10 mm and a diameter of 3.75 mm was placed. In the area of the 46th, an implant with a diameter of 3.3 and a length of 11.5 mm was installed, in the area of the 47th an implant with a length of 8 mm and a diameter of 4.2 mm was installed.
Rice. 8. X-ray after implantation.
Clinical case No. 2
The patient complained of missing teeth 14, 15. After drawing up a treatment plan, we began planning for implantation (Fig. 9). The diagnostic models were drilled according to the method described above (Fig. 10, 11). Photo after implantation (Fig. 12): in the area of the 14th, an implant with a length of 13 mm and a diameter of 3.75 mm was installed, in the area of the 15th an implant with a length of 10 mm and a diameter of 3.75 mm was installed.
Navigated surgery and surgical templates
Accuracy of implant installation as a guarantee of longevity of the orthopedic structure
The actual service life of the prostheses depends on how accurately the implants are installed in the patient.
Errors lead to incorrect positioning, incorrect load, and gradual destruction of the bone tissue around the implant, which causes its subsequent rejection. Modern technologies make it possible, based on the results of CT scanning and scanning of the jaw cast (or intraoral scanning), to create a three-dimensional computer model that takes into account the structural features of the patient’s jaws, which displays the optimal position of future implants.
Using this model, a surgical template is created by printing it on a 3D printer.
What is navigation surgery?
Navigated surgery is the process of creating an optimal treatment plan (digital protocol) for patients who have lost teeth using an innovative virtual planning approach.
Combining the orthopedic and surgical stages of treatment with a digital approach not only speeds up the process of creating artificial teeth, but also makes it as perfect as possible.
Thanks to the combination of several complex technological processes, technical means and the professionalism of doctors, dental restoration can be carried out in a shorter time with a predictable result.
Stages of navigation surgery
The treatment is carried out in several stages, and all of them - depending on the technical equipment - can be performed in one clinic.
- Computed tomography (CT) is necessary to study the thickness of soft and bone tissue, determine root canals and other structural features of the jaws.
- Thanks to the results of CT and scanning, the next stage is the development of a computer model of the surgical template. For this procedure, a dental clinic only needs a computer with specialized software installed. For example, the DENTIQ Guide software, part of the SIMPLE GUIDE PLUS system of the South Korean company DENTIS. With its help, you can develop not only a template, but also predict the entire prosthetic procedure, that is, create a protocol for the patient’s individual clinical case.
- Printing a surgical template is a step prior to the actual operation. If a 3D printer is available, it is carried out in the clinic for 45-60 minutes. The ZENITH D 3D printer from the South Korean company DENTIS with DLP printing technology - LED projection technology allows you to print faster and more accurately than other 3D printers. Read more about the ZENITH D 3D printer here
.
Benefits of Navigated Surgery
Navigation surgery is considered the most promising and modern direction of modern implantology due to the fact that it simplifies and speeds up the implantation procedure, and also allows you to select a treatment method for each clinical case with maximum accuracy. The combination of the doctor’s experience and high technology gives the best results from the procedure, minimizes errors when installing implants, and therefore extends their service life.
The DENTIS company develops in step with technical progress, creating advanced solutions for dentistry based on innovative developments. One such solution is the Simple Guide Plus system, which includes an ultra-precise and fast 3D printer ZENITH D, a set for guided surgery Simple Guide Plus, DentiQ Guide software and coupons for downloading models for printing.
This system has a number of advantages:
- ECONOMICAL.
There is no need to buy a full planning program - you only pay for uploading surgical templates. The Simple Guide Plus navigation set with all the necessary cutters is more affordable than sets of other systems.
- EASY TO USE.
Planning a surgical template from 15 to 40 minutes (depending on the number of implants to be installed). User-friendly and intuitive software. Possibility of using a template with a titanium sleeve or without a sleeve
- ACCURACY.
Double system for combining 3D radiographs and model scans. Drills of different diameters allow you to form the bone bed to the level of the diameter of the implant.
- INSTALLATION SPEED.
Speeds up work with the patient and minimizes errors. Precision in one installation! Modeling of a temporary structure and printing on a printer BEFORE surgery - the patient leaves with the tooth!
- VERSATILITY.
The Simple Guide Plus system can be used with implants from all manufacturers! You can learn more about the system on our website here.
all products for navigational surgery
What is a surgical guide?
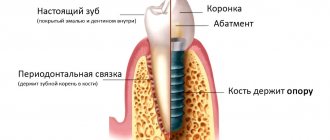
A surgical template is a jaw-shaped shell with holes to simplify the dental implant procedure. Visually, the surgical template resembles a boxing mouthguard, only with holes into which metal bushings (sleeves) are inserted. These bushings are necessary for the most accurate installation of implants - they do not allow the drill to go to the side or deviate from the given direction.
A surgical template is a product that makes the doctor’s work and the patient’s life easier. The dental surgeon will install the implants faster and more accurately, and the implantation procedure is made easier for the patient by reducing the operation time and significantly reducing the risk of possible rejection, because the implants will be installed taking into account all individual parameters. Surgical templates provide confidence in the success of the implantation procedure in the shortest possible time. Templates are made both in dental clinics with special software and a 3D printer, and in dental laboratories.
When is a surgical template needed?
- If necessary, replace the front teeth with implants: that is, one-stage implantation with immediate loading is used. Displacement of the drill and incorrect installation can lead to the impossibility of re-implantation and loss of the aesthetic appearance of the teeth.
- For clinical jaw anomalies, when drilling must be done at a large angle.
- If necessary, perform a seamless operation with minimal tissue trauma.
- For atrophic changes in bone tissue, when it is necessary to avoid bone tissue augmentation and additional operations. The positioning of implants is carried out in places where the bone tissue is thicker and denser, bypassing areas where there is thinning, as well as the maxillary sinuses and the ternary nerve.
In fact, a surgical template is needed for any implantation procedure, since the goal of modern implantology treatment is to achieve long-term, predictable results! The digital treatment protocol allows not only correct 3D positioning of the implant, planned from the future orthopedic design, but also visualization and calculation of the amount of bone regeneration and soft tissue management. Complex volume treatment protocols such as All-on-4 or All-on-6 become predictable and affordable! And fixation of a high-quality temporary orthopedic structure made before surgery is an excellent completion of the surgical stage! The use of the Simple Guide Plus navigation system, fully adapted to One-Q DENTIS implants, is a quick and affordable start in digital dentistry!
Types of Surgical Guides
The types of surgical guides used depend on the specific clinical cases:
- Based on bone tissue - as a rule, it is created on the basis of multislice computed tomography (MSCT), in particularly complex cases requiring significant surgical intervention and flap surgery. The method is used extremely rarely these days and is considered outdated.
- Based on mucous tissue - in patients with complete edentia (absence of teeth), or when there are practically no natural teeth left. In such cases, a radiopaque template is also created, which makes it possible to determine the relief of the mucosa on CT for optimal placement of implants.
- Relying on remaining teeth is one of the most common methods. To create these surgical templates, a cone-facial computed tomography (CBCT) scan is performed and a plaster cast of the jaw is made. By combining the results of scanning the plaster model and CT, an accurate three-dimensional computer image of the patient’s jaw and future dentures is obtained.
Templates are made from polymer materials, acrylic and medical plastic, and can be equipped with titanium inserts (bushings) as additional guides and stops for drills.
Surgical templates are also divided according to their purpose:
- A pilot drill is the most economical option, but the probability of error is quite high. Such templates are made only for the pilot drill of a standard surgical kit of any implantation system (diameter 2 mm).
- For each drill or a set of keys is the most expensive option, since in this case either many templates are made for each drill, or a set of keys for different bur diameters is purchased.
- Under the full protocol is the most profitable option, since, despite the need to purchase a special surgical set for operations, all manipulations will be carried out as quickly as possible, turnkey, with the implantation system chosen by the surgeon. It is also the most modern and reliable option.
One of the advantages of the SIMPLE GUIDE PLUS navigation kit from DENTIS is its versatility - compatibility with any implant system.
Features of installing surgical templates
When using surgical guides, errors in implant placement may also occur. This happens, for example, because each drilling key increases the error in the correct insertion of the drill, as it changes the diameter (albeit slightly, only by 0.1-0.5 mm) of the hole, and, consequently, the positioning of the implant. Moreover, if you choose a template with metal bushings that make the direction of the drill more accurate, there is a risk of the drill overheating due to friction.
The DENTIS Simple Guide Plus navigation surgery system minimizes all risks and errors during the implantation procedure. It includes the most simple and convenient for the doctor, and at the same time very modern and universal software and a special navigation kit for performing an operation using a surgical template. The computer system allows you to develop a surgical template in 15-40 minutes (depending on the number of implants in the template) and provide for all the structural features of the patient’s jaw to select the correct treatment protocol.
Limits for the size of holes and bushings in surgical templates on all reamers, perforators, drills and implant drivers of the Simple Guide Plus set allow you to carry out the prosthetic operation as accurately as possible, without displacements and errors. The instruments are designed to minimize bone loss and tissue trauma during implant installation, are compatible with various implant systems, and make the procedure less expensive for the patient. The doctor already has everything necessary for prosthetics even in complex clinical cases; there is no need to order instruments for an individual situation.
The ZENITH D 3D printer with the DLP printing method produced by the Korean company DENTIS provides quick (within 50 minutes) creation of a surgical template for any implantation system. Such surgical templates are distinguished by their strength, special precision in the location of holes, and strict compliance of the edges and surface with the specified parameters.
The special properties of DLP ultraviolet printing make it possible to create surgical templates, dental models, temporary crowns, bridges and injection molding models from photopolymers in a dental office. The dental surgeon has at hand everything necessary to quickly and accurately install implants and return a person to a full life.
When should you not use a surgical guide?
The use of surgical templates is not always justified, for example:
- when installing implants at an angle, including large basal implants;
- with macroglossia (abnormally enlarged tongue), inability to open the mouth wide and an increased gag reflex;
- if there are compactions and neoplasms on the mucous tissues;
- save as much as possible if necessary. The use of a surgical template increases the cost of the dental implantation procedure. However, it must be taken into account that it allows you to avoid operations on directed bone regeneration by installing implants in denser areas of the bone that have not undergone atrophy and can withstand the load. And considering that even the most experienced dental surgeon can make a mistake in his work, it is better to minimize these risks with the help of a template.
Sign up for a webinar with Peter Kozhevnikov
Independentpro regularly conducts training courses on navigation surgery and 3D printing.
The training is conducted by a candidate of medical sciences, an expert in the field of digital technologies in implantation, Dr. Khegai Igor Grigorievich.
Sign up for a course with I.G. Hey!
Template for dental implantation
The described surgical template has some similarities with a mouthguard, which is used in sports to protect athletes’ teeth from possible injury.
Surgical templates for implantation are used in the absence of a number of teeth or teeth in the frontal zone
Where it is planned to implant implants, sleeve holes are made on the stencil. At the beginning of the procedure, the implantologist places a template in the surgical area. This makes it possible to position the structure being implemented with the greatest accuracy (in accordance with computer calculations) to the desired depth and at a given angle.
Using a template for dental implantation
The described template is not always used and is necessary when performing dental implantation. For example, if you need to install one or two roots, and not in the smile area, then you can do without it. But if the case is complex, and several implants need to be installed at once, then this problem is much easier to solve with it. It is especially difficult to determine the exact location of the structure without a surgical template if there is no landmark in the form of neighboring teeth.
The use of such a stencil sometimes helps an experienced dentist avoid building up bone tissue in case of bone atrophy. The template allows you to insert the implant into the area of the bone that will withstand the required load. It also helps well, if necessary, in the future to install beam structures of prostheses, where the correct geometry is very important.
Indications for use
- If more than three teeth are missing in the dentition
- Restoration of teeth in the smile area using implants
- Anomalies in the structure of the dental system, making it necessary to drill at a significant angle
- In circumstances where only minimally invasive, flapless surgery is necessary or possible
- Installation of a temporary crown immediately after implantation
- In the presence of bone atrophy and the need for deep implantation into the bone processes leading to other dental units
General overview
Experts note that the use of surgical templates is a serious step in the development of implantation. The device, which is similar in appearance to a sports mouthguard, follows the shape of the jaw row, but at the same time a number of holes with the same diameter are placed in its surface, allowing the dentist to determine the area of integration of the artificial base. Tight fixation eliminates displacement during the formation of channels for implant placement, increasing the accuracy of prosthetics.
Templates, made taking into account the anatomical features of the structure of the jaw apparatus, ensure precise fitting of artificial crowns after installation. Thus, as a result of the restoration, a complete dentition is created that corresponds to the patient’s occlusion and bite, and does not require getting used to the implants.
Manufacturing of surgical templates
CAD/CAM technology allows you to model and produce the most accurate templates for implantation
For example, an acrylic template looks like a removable denture, has a gum base and holes for installing implants. They are made in a dental laboratory based on an impression taken from the patient’s jaw. In a vacuum former, templates are created from polymer plastic mass. They are elastic and transparent, but durable. The most accurate surgical templates for dental implantation are made using CAD/CAM technology; they are digitally modeled.
Implantation without surgery using a surgical template - Advantages:
- the operation is comfortable and painless – a puncture is actually made, not an incision in the gum;
- installation of implants takes less time;
- swelling of the gums is less pronounced;
- accelerated healing process;
- implantation becomes completely planned: the position of the implant is determined in advance, taking into account all the characteristics of the patient.
The method of implantation without surgery is unique in that it reduces the list of contraindications. It is suitable for installing implants even in patients with diabetes mellitus and endocrine diseases (in remission).
However, there are contraindications - this is an insufficient volume of hard tissue (bone) in the implantation area.
Advantages and disadvantages of templates for dental implantation
The advantages include:
- High probability of a favorable outcome of implantation, thanks to computer precision of manipulation
- Thanks to the precise designation of the locations of the rods, the operation time is significantly reduced
- There is no need to cut the gum, punctures for implants are made by the dentist through holes in the template, tissue trauma is minimal
- Due to the absence of a wound, healing occurs faster, there is no inflammation and swelling, the risk of their occurrence is minimal
Pros and cons of using surgical guides
The useful functions of the template during dental implantation can hardly be overestimated.
- High precision of the operation.
- Better implant survival rate.
- Significant reduction in operation time.
- Reducing the degree of invasiveness during implantation - there is no need for gum preparation.
- Accelerating the patient's rehabilitation process.
- Minimizing postoperative swelling, inflammation, minimizing the risk of perforation of the maxillary sinuses.
- Possibility of simultaneous installation of several implants at once.
The only drawback of the method is the increase in cost of the entire implantation procedure.