After your tooth was removed, the doctor gave you clear instructions and recommendations on what to do and what not to do. But you came home and in the confusion forgot what the doctor said?
We will try to help you and answer the most common questions that a patient has after tooth extraction.
- How quickly does a wound heal after tooth extraction?
- What complications can occur after tooth extraction?
- How long should you keep the tampon in after tooth extraction?
- How to rinse your mouth after tooth extraction?
- What recommendations should be followed after tooth extraction?
- In what case should you urgently consult a doctor after tooth extraction?
Preservation of the hole - a necessity or a new trend?
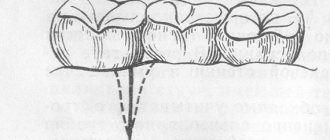
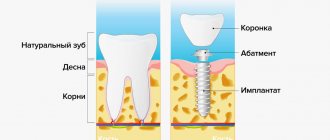
Preservation of the socket - filling the cavity formed after tooth extraction with osteogenic material - is a very important component of dental treatment after tooth extraction.
This technique completely prevents bone resorption, which is known to be 25% already in the first year, which means that within 3 years the loss of bone volume can be 60%.
Preservation of the socket not only stops this process, but also preserves the gingival contour without gaps and prepares the gingival bone for future unhindered implant installation.
It is important that conservation ensures the correct load on the bone tissue, which means that at the time of implantation the condition of the bone will be exactly what is necessary for installing the implant without prior bone grafting.
Thus, preserving the socket after tooth extraction will not only save the patient from additional bone-building surgery, but will also save a considerable amount, because bone grafting is not the cheapest dental operation.
What recommendations should be followed after tooth extraction?
- Do not eat food for two hours after surgery.
- Do not spit out blood clots during the day, as their absence can lead to exposure of the wound, which will negatively affect the healing process. Experts recommend swallowing saliva, even if it contains a small percentage of blood.
- To make the swelling go away faster, the patient can apply cold compresses to the site of the extracted tooth, but with caution so as not to get frostbite. The use of any warming compresses and scarves is prohibited!
- Refuse hot food and give preference to warm food, including drinks. You should also avoid spicy, sour and fatty foods for 1 week.
- Under no circumstances should you chew food at the site of the extracted tooth .
- Avoid drinking alcohol and smoking for the first two days.
- Do not apply medications to the wound or rinse the mouth with tinctures containing alcohol.
- Avoid any physical activity for two weeks.
- Do not touch the hole with your hands or foreign objects!
- Do not visit saunas and steam baths for a week.
If implantation is not planned, is socket preservation necessary?
If implantation is not planned, preservation of the hole will still be the right decision. This simple procedure will, at a minimum, speed up the healing process of the hole and completely prevent all sorts of risks of complications and infection, and at most - taking into account the fact that you should never say “never” - it will be very useful when you need to install an implant. In other words, this is a real opportunity to give the patient choice.
Preservation of the socket after tooth extraction is recommended for anyone who needs to install an implant in place of a missing tooth. This procedure will help preserve the volume of jaw bone and the natural contours of the alveolar process, and subsequently avoid alveolar bone augmentation for implantation.
There are practically no contraindications
except for acute pain. But even in this case, everything is individual, taking into account medical indications corresponding to the specific clinical situation.
Advantages of socket preservation after tooth extraction
- Minimum healing time for a socket after tooth extraction.
- Preventing infection from entering the socket.
- Preservation of bone tissue.
- The aesthetic appearance of the gingival contour is a guarantee of aesthetic prosthetics.
- Possibility to install an implant 1 month after tooth extraction.
- No need for augmentation.
The advantages of the procedure are obvious, which is why preservation of the socket after tooth extraction is very popular in dental dentistry.
100% guarantee of successful surgery - high-quality osteoplastic materials.
Materials for hole preservation Genoss (South Korea)
— the best bone replacement materials for socket preservation today.
Instructions for use of iodoform turunda. Reviews
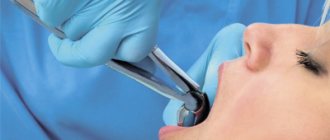
If the issue of tooth extraction is urgent, the client will be interested in what the dentist is doing and whether everything is going as it should. It is uncomfortable to clarify such moments with your mouth open, and it will not be possible to predict the doctor’s actions in advance. Many professionals do not consider it important to initiate the client into the nuances of the activity.
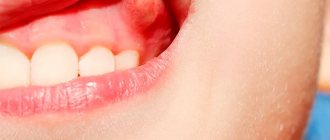
Not everyone knows about the installation of iodoform turundas - for what purpose, for what period. We will talk in more detail about this topic in our article. General idea. The gums bleed after the doctor finishes removing the tooth. This is natural, after a few minutes the bleeding stops. The opposite also happens - the blood does not clot.
Then the use of iodoform turunda is relevant. The result of its use to stop blood is achievable due to its density and blocking the possible outflow of blood. In addition to the function of stopping blood, turunda disinfects the wound due to iodoform; Suitable for drainage of the periapical zone with targeting the outflow of inflammatory products.
Making the product
Iodoform turunda is prepared from sterile gauze and soaked in a specialized solution.
In this case, knowledge of the proportional ratio of the ingredients is important, since the substance looks like crystals in structure. Iodoform is not compatible with plain water; 100% dissolution is impossible. Medical ether is used to fill wounds after dental extraction.
The main thing is to maintain the proportions - for one part of iodoform there should be ten parts of ether. Storage of the finished solution is not recommended due to the loss of its own properties.
It makes sense to produce an exact volume of soluble iodoform for one or more turundas.
Composition ingredients:
- - iodoform - fifty parts;
- - ether - seventy parts;
- - ethyl alcohol - thirty parts;
- - glycerin - fifteen parts.
A piece of sterile gauze a centimeter to one and a half wide is dipped into a pre-prepared solution. Then it is taken out and left to dry. After the ether evaporates, the gauze acquires a bright yellow tint and is ready for use.
Undoubtedly, iodoform bandage is sold freely in any pharmacy chain. For convenient storage, it is sold in containers: two to two and a half centimeters wide and up to five meters long.
Genoss bone replacement materials
Genoss are bone substitutes of the highest quality, which have been successfully used in dentistry for a very long time.
When are Genoss osteoplastic materials used?
Genoss have proven themselves to be excellent in filling sockets at the site of an extracted tooth, dental implantation, bone ridge plastic surgery, filling cystic hilar cavities, in the case of post-osteotomy techniques, in restoring periodontal tissues, and filling cavities during sinus lifting.
Benefits of Genoss
- One hundred percent biocompatibility with tissues of the human body.
- High resorbability.
- Rapid tissue healing.
- Improvement of hemostasis.
- Easy to use.
Contraindications
There are no absolute contraindications for use, but it is important to know whether the patient has an allergic reaction to iodoform.
To check, just apply a small amount of the diluted composition to the skin of your elbow or wrist. If no redness, itching or rash occurs after application, then using iodoform is completely safe.
If the patient is allergic to this substance, then it needs to be replaced, or simply use a sterile bandage.
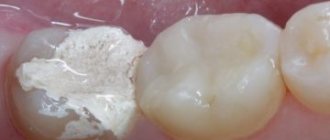
In what cases is a lining used for caries?
Caries is a slowly progressive pathological process that goes through several stages. At an early stage, a carious lesion looks like a light spot on the enamel, while there is still no hole or pain in the tooth. As the disease progresses, the spot turns into a carious cavity. At the stage of superficial caries, this cavity is located within the tooth enamel; with medium and deep caries, it affects dentin tissue.
For caries in the spot stage and the superficial form of the disease, pads with a therapeutic effect are not needed; for average caries, they can be used according to indications. Most often, medicinal dental pads are used for deep caries. The peculiarity of deep caries is that the carious cavity is located as close as possible to the pulp - the neurovascular bundle, or dental nerve. At this stage, treatment is quite painful and there is a high risk of complications in the form of pulpitis and periodontitis.
Dental linings help increase the effectiveness of treatment of deep caries.
How is a therapeutic napkin installed for deep caries?
Depending on the form and complexity of the disease, as well as the chosen method of caries treatment, the dentist can install the lining by direct or indirect application. The first option assumes that it is applied directly to the pulp area, ensuring direct contact between the gasket and the dental nerve. The method is used for tooth injuries with exposure of the nerve, for fibrous pulpitis. The second method is to apply a lining using dentinal tubules without direct contact with the pulp. It is often chosen for the treatment of deep stage caries and acute pulpitis.
Features and shelf life
Store ready-made cotton balls or gauze strips in an extremely sterile environment. They can be stored along with bandages and napkins. The ideal storage place would be a sterile container, but it is still not entirely reliable, as it often opens.
For convenience, dentists pack tampons and turundas in separate paper bags, which must be sterilized in an autoclave.
It is appropriate to sterilize immediately before using the material, since over time, bacteria can get on cotton wool, bandages or gauze. The shelf life of sterilized turunda is on average 7 days.
The video provides additional information on the topic of the article.
How do combined pastes work?
The composition of combined pastes includes oils, fillers (zinc oxide or white clay), as well as medications. The therapeutic effect of a particular pad directly depends on the latter:
- Stimulating dentin growth and promoting enamel remineralization. These drugs are called odontotropic, they are based on fluorides, collagen, calcium glycerophosphate and other substances. They are used when it is necessary to increase the layer of bone tissue between the pulp and a deep carious cavity.
- Possessing anti-edematous and anti-inflammatory effects. They help stop the inflammatory process in the dental pulp; they are based on prednisolone and hydrocortisone. Typically, such preparations are temporarily placed at the bottom of the cavity and covered with a bandage on top. If the dentin layer next to the neurovascular bundle grows too slowly, then a spacer with an odontotropic effect is applied.
- Pads with an antiseptic effect based on metronidazole or chlorhexidine disinfect and prevent the growth of bacteria.
- Proteolytic enzymes contained in the drug are needed in the treatment of acute focal pulpitis, as well as in the treatment of deep caries.
Most combined pastes harden poorly and have low strength, so they are used as a temporary therapeutic material. After their removal, a different type of therapeutic pad is usually used.
Turunda in the ear made of cotton wool. How to properly make turundas in the ear
Turundas can be made at home from available materials.
The main rule is simple - the materials must be sterile and made of soft tissue, for example, bandage or cotton wool.
These flagella do not have an expiration date, so you can make several pieces at once and store them in a dry and clean place.
Having determined what turunda in the ear is, the photos below will illustrate the types.
Turunda made of cotton wool
Take a small piece of sterile cotton wool. Fluff and stretch thoroughly. Next, starting from the center, roll it into a narrow roller. The length should be about 12 centimeters and the diameter 2 millimeters.
After you have completed the procedure, bend the resulting roller in half and twist its halves.
As a result, you will get a soft flagellum that will not cause discomfort in the ear and will not harm the skin.
However, its characteristics include dense material, so it will not bend.
Remember that the thickness of materials intended for insertion into children’s ears should not be larger than the ear opening, that is, it should not exceed 5 millimeters.
Once you've finished rolling, take a toothpick. Twist the resulting result onto one end. You should form a thin rope. After this, the flagellum is removed and twisted again.
Turunda from a cotton pad
This type has a denser composition, which makes it much easier to use.
Let's look at the question of how to make ear caps from a bandage.
Interestingly, it is easier to make flagella from a cotton swab than from cotton wool due to the composition of the disc. It fluffs less and rolls into a finer material. Due to the short distance of the child's ear canal, a thin turunda is a big plus. Since this makes it much easier to insert into the baby’s nose or ears.
You can make two types of turundas from a cotton swab:
- In the form of a tourniquet.
- In the shape of a bag.
For formation in the form of a rope, the rules are identical to the method of making it from cotton wool, but have their own characteristics. Divide one disk into two parts. Then roll each part into a rope of the required size.
Scheme for making turundas from cotton pads.
To form a turunda in the shape of a bag, you need two cotton swabs. Cut each piece into two parts. Then each part must be rolled into a strong bag.
Turundas made of gauze or bandage
To create a tourniquet from a bandage, cut a piece equal to one centimeter in width and about 15 centimeters in length.
Fold the edges inward, avoiding any loose ropes or threads.
They must either be cut off with scissors or carefully wrapped in a turunda.
Take the resulting flat strip by the different ends and begin to twist. To do this, you need to fold the resulting result in half and compress it until the end.
The length of the finished product is about six centimeters.
Turunda should be inserted using medical tweezers. Make sure to keep the tip visible.