Greetings friends! With you is orthodontist Alexander Spesivtsev.
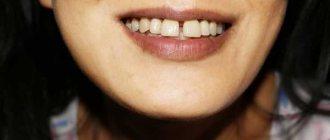
And today we will look at a clinical case where a patient consults an orthodontist in order to correct the position of the two central incisors on the upper jaw.
Let's look at the original picture, in which we clearly see the changed position of one upper incisor (quite strong) - the incisor is rotated along the axis, and let's say, deflected forward by the edge. That is, from a cosmetic point of view, we understand perfectly well that this is not a very beautiful position of the central teeth and, naturally, we want to correct it.
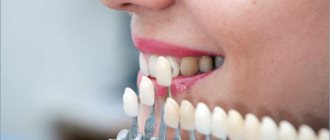
ALINERS – aesthetic and invisible correction of central incisors
I want to consult about central incisors!
Crown on an implant in the area of tooth No. 5
In addition, the patient asked about a missing tooth on the upper jaw on the right side, tooth number 5 has been missing for quite a long time, and the gap in the area of this tooth, let’s say, has already been changed - it has decreased.
Accordingly, in response to the patient’s question “Is it possible to put a crown on an implant there?”, after calculating the distance, we realized that, unfortunately, it is impossible to make a good, beautiful, regular crown, since the distance is smaller.
What patients say about direct restoration
Positive reviews about the restoration of anterior teeth with composites are closely related to the properties of these materials:
- they are installed simply, easily and in one go;
- compared to other materials, they are inexpensive;
- they are easy to repair;
- During installation, the dentist does not remove healthy dental tissue.
Patients note the following disadvantages:
- the likelihood of composites being stained with food dyes and losing their shine over time;
- low strength of composites (lasts a maximum of seven years);
- the difference between a restored tooth and a natural one (even the best composites do not provide one hundred percent naturalness).
How the upper central incisors were corrected
Therefore, the patient and I planned a correction of this space, that is, an increase in the space between the 4th and 6th teeth. Well, as you can see, we decided to implement all these plans using the Star Smile aligner system. We took impressions, sent them to the laboratory and received this virtual setup:
The virtual setup clearly shows us in 3D
- how the position of the front teeth changes, that is, the cosmetic defect is directly eliminated and the upper incisor tooth becomes straight and correct,
— and also the gap between the 4th and 6th teeth of the upper jaw on the right is corrected! It increases and thereby we prepare the patient for further implantation and prosthetics with a crown on the implant of this area.
The total time to correct incisors with aligners is 6 months!
The time the patient spent correcting the upper central incisors with aligners was about 6 months. That is, according to the virtual setup, eleven steps, 11 aligners, and 11 aligners were calculated. Accordingly, as you can see from the photographs that were taken after the orthodontic correction, everything turned out great for us.
Upper central incisors - front view
And this is what the central upper incisors looked like from the side
And finally - the happy smile of the owner of straight teeth
Direct composite restoration in the incisal area of the tooth
L. A. Lobovkina
Ph.D., doctor of the highest category, head of the treatment and prophylactic department of Branch No. 6 of the Federal State Institution “GVKG im. Burdenko" of the Ministry of Defense of the Russian Federation
Nowadays, it has become common practice for a dentist to restore teeth using composite materials at a dental appointment. Direct aesthetic restoration in such cases is often the ideal method to quickly solve the aesthetic problem and create a reliable, inexpensive restoration [1].
The range and quality of materials are constantly improving, and original restoration methods are increasingly appearing in the literature. Despite this, selecting the color and transparency of materials for restoration is still a difficult task for many doctors.
Difficulties usually arise when modeling zones of transparency, since the dark background of the oral cavity will be visible through them, especially in the frontal region. This can negatively manifest itself when restoring a chipped corner of the coronal part of a tooth, during filling through cavities, etc. Therefore, when working with composites, it is necessary to master techniques for combining materials with different levels of transparency.
In recent years, when restoring class IV defects, the technique of layer-by-layer application of a composite has been used, for which there are a large number of terms: “anatomical superstructure”, “three-layer concept” or “natural layer concept” [2]. The essence of this technique is to imitate natural enamel and dentin [3]. However, not all composite materials available on the dental market can perfectly imitate tooth tissue.
The main problem with traditional composite materials is the dependence of the light transmission of transparent composite materials on the layer thickness. Therefore, the doctor has to very carefully calculate the thickness of the applied dentin and enamel shades of the material to obtain a satisfactory aesthetic result. However, clinically it is very difficult to determine and limit the thickness of the layer with an accuracy of tenths of a millimeter, therefore, as a rule, a thicker layer of mass is applied, which is then ground off. The slightest fluctuations in layer thickness can significantly affect the final appearance of the restoration [4].
Clinical case
The main problem of traditional composite materials is the dependence of the light transmission of transparent composite materials on the thickness of the layer. Patient V., 56 years old, applied to a therapeutic dentistry clinic with complaints of an aesthetic defect in teeth 1.1 and 2.1 (Fig. 1). Before starting treatment, the initial situation was recorded using photographs, as well as a comprehensive clinical and x-ray examination of the patient, and situational models were made. Preliminary stages included professional, individual oral hygiene; discussion with the patient of the features of the restoration and mutual responsibility for the results of the work.
Rice. 1. Teeth 1.1 and 2.1: initial situation.
After anesthesia, the tooth surface is cleaned of organic food debris and pellicles using a brush and fluoride-free paste. The stage of cleansing the tooth surface from organic food debris and pellicles is not yet carried out by all dentists, despite its importance. The pellicle has an organic basis; it is not dissolved by phosphoric acid. Consequently, its presence on the tooth surface will reduce the adhesion of the filling material to the enamel surface. And this, in turn, will lead to unsatisfactory long-term results. Therefore, this stage must be carried out even if the patient has good oral hygiene and in the absence of visible dental plaque.
The next stage was the selection of material for future restoration.
For greater color consistency, it is recommended to also moisten the color template of the filling material with water.
It should be noted that the cutting edge has three components:
- general outline:
in middle-aged and older patients, the configuration of the cutting edges is flattened or even transformed into a concave curve;
- interincisal angles
(embrasures): the smallest spaces between the corners are located in the area of the cutting edge of the central incisors, then they increase;
- thickness:
should be 1-1.5 mm. Thin, delicate cutting edges leave a pleasant aesthetic impression. A thick cutting edge ages the tooth and makes it look artificial.
Next, minimally invasive tooth preparation was performed (Fig. 2). The final stage of preparation is finishing the edges of the enamel with an ultra-fine-grain diamond bur (with a yellow or red stripe).
Rice. 2. Teeth 1.1 and 2.1 after preparation.
To date, many developers and manufacturers of dental materials have announced the creation of composite materials that are focused on reproducing the structure of enamel and dentin of teeth, as close as possible to the natural one [4]. One of them is “Amaris” (VOCO, Germany), which was used for dental restoration in our case. This is a composite with a new shade system, specially developed for the creation of esthetic restorations, with which the dentist can quickly and accurately select the desired shades.
Before starting treatment, the initial situation was recorded using photographs, as well as a comprehensive clinical and x-ray examination. “Amaris” is a highly filled composite material, as it contains 80% microhybrid filler. The uniform distribution of filler particles and their fine dispersion determine the special smoothness of the surface, thanks to which the material is perfectly polished. Over time, the high-quality structure of the material fully justifies itself - the surface of the restoration remains smooth and has a “dry” shine [5]. To convey individual characteristics, there are two special shades: 1) a high-opaque shade (HO), which acts as a masking agent, which is used when necessary to hide highly pigmented dentin, mask a pin, or “revive” the color of a pulpless tooth; 2) highly transparent (HT), designed to restore the cutting edge and simulate zones of transparency.
After applying the rubber dam, the enamel and dentin were conditioned with 35% orthophosphoric acid (Vokocid gel) and the 5th generation one-component adhesive system Solobond M (VOCO, Germany) was applied; the high-flow composite Amaris Flow was used as a super-adaptive layer " First, dentin shade O3 was applied (Fig. 3).
Rice. 3. Adding dentin shade “Amaris”.
To obtain a good aesthetic result, the enamel shade on the vestibular surface is applied in one layer 0.5 mm thick and distributed using a brush moistened with adhesive (Fig. 4). Considering the fact that the patient had no zones of transparency (in most cases they disappear by the age of 25-30), a transparent shade was not used during the restoration.
Rice. 4. Teeth 1.1 and 2.1: application of TD enamel shade.
For greater identity of color rendering when determining the color, it is recommended to also moisten the color template of the filling material with water. After this, macro- and microcontouring of the restoration is performed using discs of various grain sizes, diamond burs of low and ultra-low abrasiveness, as well as the Safe End (SSWHITE) system, which includes carbide 10- and 20-sided burs. The 10-blade bur is used to remove excess material and contour the restoration. The 20-blade bur provides a smooth surface ready for polishing. Both types of burs effectively remove composite material while preserving as much hard tooth tissue as possible. The restoration was then polished using universal polishing heads. In our work we use universal polishing heads JAZZ Supreme Polishers (SS WHITE) ,
which consist of diamond microparticles of various sizes enclosed in a synthetic rubber matrix.
This one-step system produces superior shine faster and without the need for polishing paste. The Jazz Supreme Polishers set contains four different polishing head shapes (flame, cup, disc and small flame) in an autoclavable container.
The final appearance of the restoration of teeth 1.1 and 2.1 is shown in Figure 5.
Rice. 5. Teeth 1.1 and 2.1 after restoration with the Amaris composite material.
Conclusion
The use of the Amaris composite material allows you to achieve very good optical results in just one visit. The advantages of this composite are excellent fluorescence, which differs little from natural tooth tissue under ultraviolet light, and resistance to external illumination (the material does not harden under the influence of light sources within 8 minutes!). Therefore, we recommend the widespread use of Amaris during a therapeutic appointment. With little effort, highly aesthetic restorations can be achieved.
Literature
- Goldstein R. Aesthetic dentistry. - Canada, 2003. - T. 1. - 493 p.
- Dishy Didier. Clinical application of the “concept of natural layer-by-layer restoration” // Densply News. - 2006. - No. 12/March. - pp. 10-15.
- Lutskaya I.K., Novak N.V. Modeling of the area of the incisal edge of the restoration depending on the shape of the mamelons // New in dentistry. - 2010. - No. 2. - P. 1-8.
- Hajto J. Advantages and disadvantages of direct composite restorations. Part 2 // New in dentistry. - 2007. - No. 2. - P. 1-18.
- Amaris: 5 years of success in creating aesthetic restorations // Dental Times, 2013. - Issue 16. - pp. 16-18.
ALINERS – aesthetic and invisible correction of central incisors
Why can you say this?
Aligners have a huge number of advantages over braces when correcting the front incisors. There are only a few rare dental pathologies that only braces can treat. But the central upper and lower incisors are already easily and successfully corrected with aligners. Star Smile is the Russian leader in the production of aligners. We cooperate with orthodontists in more than 70 (!) cities of Russia. And we can provide you with high-quality consultation and diagnostics in any of the cities where you live. And it is important that you can see your future smile on the doctor’s computer BEFORE treatment begins. And after that, decide how to treat the incisors. So, are you ready to take your first step towards a beautiful smile?
Method of layer-by-layer application of composite
In recent years, when restoring class IV defects, the technique of layer-by-layer application of a composite has been used, for which there are a large number of terms: “anatomical superstructure”, “three-layer concept” or “natural layer concept” [2]. The essence of this technique is to imitate natural enamel and dentin [3]. However, not all composite materials available on the dental market can perfectly imitate tooth tissue.
The main problem with traditional composite materials is the dependence of the light transmission of transparent composite materials on the layer thickness. Therefore, the doctor has to very carefully calculate the thickness of the applied dentin and enamel shades of the material to obtain a satisfactory aesthetic result.
However, clinically it is very difficult to determine and limit the thickness of the layer with an accuracy of tenths of a millimeter, therefore, as a rule, a thicker layer of mass is applied, which is then ground off. The slightest fluctuations in layer thickness can significantly affect the final appearance of the restoration [4].
The main problem of traditional composite materials is the dependence of the light transmittance of transparent composite masses on the layer thickness
Proportions of a natural smile
Aesthetic restoration can correct the proportions of the dentition and restore them. To do this, several principles are followed:
- symmetry. The midline of the dentition (at least the upper one) should be in the center of the face. The central incisors and canines must correspond to the line of the gingival margin and have a symmetrical arrangement, the same size and shape (in pairs). In some cases, to achieve this, it is necessary to create a “straightened” line of the cutting edges of the upper dentition relative to the bend of the lower lip;
- Asymmetry between the lateral incisors or canines is allowed, but it should not be too pronounced or noticeable. For them, during restoration, the gingival edge and chewing tubercles are aligned, but the final level may not coincide with the cutting edge of the incisors;
- During restoration, the natural depth and width of the spaces between the incisors are preserved. To do this, the side surfaces can be slightly ground.
DentoSpas dental clinic performs direct aesthetic restoration of teeth using high-quality materials, with individual selection of shades according to the VITA scale, with the formation of a natural crown shape that will ensure optimal occlusion.