Training Photo processing How to whiten teeth in a photo
Author: Mikhail Novozhilov
|
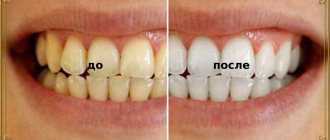
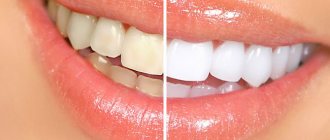
Who doesn't want to flash a Hollywood smile in a photo? Unfortunately, in reality it is not always possible to boast of white teeth. This can be easily fixed without visiting a dentist. PhotoDiva has a handy tool that can easily remove yellowness and add shine. Read the article and you will learn how to whiten your teeth in a photo using this editor in just a couple of mouse clicks.
Before after
Download PhotoDiva editor and make your teeth white and shining!
Works great on Windows 10, 8, 7, Vista, XP
What is photo teeth whitening?
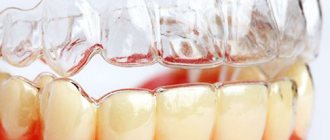
For your information! Photo whitening, or as it is also called “light whitening,” is a fast and safe dental procedure that can whiten tooth enamel by 10-12 shades at a time.
During photo-whitening, a special composition is distributed onto the teeth , the main active ingredients of which are hydrogen peroxide and carmabide.
Activated under the influence of lamp light and penetrating into the deep layers of dentin, they destroy unwanted color pigments.
The type of lamp is selected depending on the condition of the dental bone, soft tissues and natural enamel pigment.
When photobleaching, lamps with the following variations of light radiation are used:
- Ultraviolet lamps - lamps of this type are considered somewhat outdated, since during operation they emit heat and heat tooth enamel.
- Halogen - the light from these lamps is cold, which minimizes tissue trauma.
- LEDs are currently the safest cold-glow lamps.
It is worth noting! The entire lightening procedure takes an average of 1 hour and is carried out in several stages:
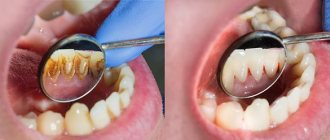
- Dental examination. The doctor examines the patient’s teeth and mucous tissues for contraindications. For example, if there is tartar or caries, they will need to be eliminated first and only then proceed to whitening.
- Modeling the desired result . The patient indicates what effect he would like to get from whitening using a special sign. In some clinics, the patient is shown the “before and after” result using computer modeling.
- Protecting fabrics from lamp light . The patient's gums and inner cheeks are covered with a special protective plate. This step is necessary to minimize the likelihood of light or chemical burns.
- Distribution of gel over tooth enamel. As a rule, only the “smile zone” is treated, that is, 10 teeth of the upper and lower jaw that are visible when smiling, laughing and during communication.
- Protect your eyes from lamp light . Both the doctor and the patient wear special protective glasses to prevent retinal burns.
- Applying gel to teeth and whitening . The doctor distributes the gel over the patient’s tooth enamel and turns on the lamp. Exposure time is 10-20 minutes. After this period, the gel is removed with a napkin, and its remnants are removed during rinsing. There can be up to 6 applications in 1 session.
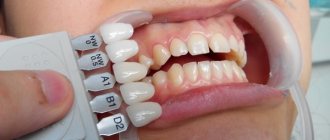
- Checking the result using the Vita scale . After all manipulations with the teeth are completed, the doctor gives the client a mirror and a Vita scale (a strip on which all possible shades of tooth enamel are depicted). This is done so that he can clearly see what results were achieved.
- Consultation on further oral care.
Some tips
Before you make a white background in a photo, you need to capture the frame correctly. Our simple tips will help you make it perfect:
- Look for more white surfaces: wall, table top, carpet, refrigerator, cabinet door, window and more.
- Try to stick to minimalism. The fewer objects there are, the more aesthetically pleasing the photo will look.
- Take a close look at the details that will be shown in the photo. They should successfully resonate with each other.
What types are there?
Stay up to date! Most dental clinics in the CIS countries offer the following photo-whitening techniques:
- Beyond Polus is a symbiosis of halogen and LED radiation, which makes the procedure safer for enamel. One whitening session usually consists of three cycles of 10 minutes each. The effect lasts up to a year, after which the procedure can be repeated.
- Luma Cool - this technique uses exclusively cold-light LED lamps. This makes it absolutely safe for both teeth and soft tissues. One session consists of three cycles of 8 minutes each. The result lasts for several years.
- Zoom is perhaps the most famous photo-bleaching technique, which is performed using a UV lamp. Ultraviolet radiation produces heat, which is quite detrimental to enamel. But, nevertheless, Zoom gives the most pronounced effect among all the above procedures. Whitened teeth retain their newfound color for up to one and a half years.
After a photo-whitening session, tooth enamel becomes more sensitive, which is why drinking hot and cold drinks is accompanied by unpleasant sensations.
Note! This is a temporary phenomenon that completely disappears in 3-5 days.
Method 1. Express processing
Go to the "Automatic retouching"
.
Here are ready-made styles for facial enhancement. In addition to general processing options, there are presets for specific tasks, for example, smoothing the skin, eliminating shine, giving expressiveness to the look
.
The “Teeth Whitening” and “Perfect Smile” styles are suitable for us.
. The first one treats only the teeth, and the second one additionally makes the lips brighter and more expressive.
“Teeth whitening” will instantly remove yellow discoloration
Apply the selected preset, and the photo will instantly transform! Try it now:
Works great on Windows 10, 8, 7, Vista, XP
Indications and contraindications
Many things can affect the color of enamel - genetic predisposition, abuse of cigarettes and coloring products, and even treatment with antibiotic drugs.
Indications
You should know! The desire to make your smile more aesthetic is the main indication for the procedure.
Photo whitening will help you if your teeth:
- They have uniform pigmentation without light and dark stripes and other inclusions.
- Well formed and have naturally strong enamel without grooves, chips or cracks.
Contraindications
You will have to refuse the photobleaching procedure if you are limited by one of the following factors:
- Pregnancy and lactation period.
- Age under 18 years.
- Thin and sensitive enamel.
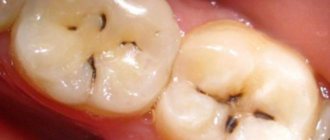
- Caries.
Indications for teeth whitening
In some situations, professional lightening becomes the optimal and most affordable solution to problems related to smile aesthetics. Among the indications for the use of the technique, experts identify the following phenomena and conditions:
- change in enamel shade due to age-related changes,
- the appearance of spots and pigmentation,
- natural yellowness,
- change in color under the influence of fluoride-containing drugs, as well as antibiotics of the tetracycline group,
- darkening of the enamel due to constant smoking and consumption of coloring drinks - strong tea and coffee.
Teeth darkened by various factors are an indication for using the method.
This is an excellent opportunity to improve the appearance of a smile for those whose professional activities involve speaking in public or constant communication with people. But the concept is not suitable for everyone, so before you decide to use it, you should make sure that you have no contraindications.
Advantages and disadvantages
The procedure has gained worldwide fame precisely thanks to its extensive list of advantages :
- Quick results - just one hour-long session and teeth become 10-12 shades lighter.
- Durability – the result lasts from 1 to 3 years.
- safety – compared to older enamel lightening methods.
Keep in mind! But it was not without its drawbacks:
- Temporarily makes teeth more sensitive - this causes discomfort during meals.
- Does not lighten fillings, veneers, dentures and crowns - they will need to be changed after whitening.
- It is quite expensive - which for many is a decisive factor for refusal.
Painter-plasterer
The third editor that will help you make a white background in a photo is called Snapseed . The application is free and available in the official AppStore and Google Play .
Instructions on how to make a white background in a photo:
- Open the photo in the program.
- Next follow: Tools - Brush - Saturation .
- Set Saturation to -5 or -10. Swipe your finger across the screen to whiten areas of the photo.
- Next follow: Tools - Brush - Exposure .
- Set Exposure to -0.3 and also slide your finger across the screen.
- Play around with the values until the picture is perfect.
The result of background whitening in Snapseed .
How to maintain the result after photobleaching?
After the tooth enamel whitening the doctor conducts a consultation with the patient and gives him a list of recommendations for maintaining a new snow-white smile in its original form.
You should know! To maintain tooth enamel in a clean form, the patient should adhere to the following tips:
- For the first 1-2 weeks, refrain from eating coloring foods and drinks (red and blue berries, tea, coffee, lemonade).
- In the first 3 days, avoid eating excessively hot and cold foods, in order to once again cause yourself discomfort.
- Replace your usual toothbrush with a softer one.
- Buy toothpaste with a high content of fluoride and calcium.
- Buy floss (dental floss) and carry it with you everywhere to get rid of food debris if you are away from home.c
If you cannot deny yourself the pleasure of drinking coffee, juice or lemonade, drink drinks through a straw.
average price
Need to know! The price for the photobleaching service is determined depending on the following factors:
- City – in Moscow and St. Petersburg prices are significantly higher than in the regions.
- The reputation of the clinic - the more highly qualified doctors and better equipment the clinic has, the higher the price tag. This is exactly the case when the price justifies the quality.
- Methodology used. For photo whitening Zoom the price tag varies from 15,000 to 25,000 rubles, for Beyon Polus - from 10,000 to 20,000 rubles, and for Luma Cool - from 6,000 to 14,000 rubles.
Reviews about the procedure
Below are some reviews. If you have something to say, leave your feedback in the comments below the article, it will be useful to our readers.
Marina, Moscow.
Teeth are my sore subject. They are naturally yellowish, plus I simply cannot imagine myself without coffee. I was thinking about getting veneers or whitening my teeth. In the end, I chose the second one and did not regret it. It’s been 3 months since I became the owner of a Hollywood smile! Despite my enormous fear of dentists, I endured the procedure calmly - I just lay there while the lamp did its job.
Rinata, Novosibirsk.
My daughter had her teeth photobleached - she wanted to look 100% at her prom. My teeth certainly became whiter, but terrible sensitivity of the enamel appeared. For the first week after going to the clinic, my daughter could not eat or drink anything without wincing in pain. She said that she liked the effect, but she was no longer ready to make such sacrifices for the sake of beauty. Now maintains the result with professional cleaning.
Method 2: Manual setup
The program recognizes all parts of the face, so each of them can be corrected separately. In the same automatic retouching section, go to the “Manual settings”
.
At the very bottom there is a “Teeth”
with the
“Whiteness”
. Move the slider to the right until you are satisfied with the result.
Adjust the whiteness value
You should not try to whiten your teeth completely in a photograph by turning the settings to the maximum. Too white teeth look unnatural. When viewing a portrait, people will immediately see that processing has been done, and not of the highest quality. Moderate whitening, on the contrary, will look beautiful and organic.
In female portraits, you can additionally adjust the lips. The corresponding block has settings for clarity, contrast, saturation and others. With their help you can make your lips more expressive and bright. Against their background, the person’s teeth in the photo will look even more snow-white and beautiful.
Make your lips brighter and more expressive