Dental inlays for a crown: when to install
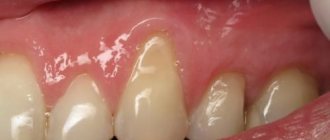
Why do dentists rarely resort to installing stump inlays? After treatment, the dentist-therapist sends the patient to a prosthetist for installation of artificial crowns. In order not to force you to undergo the treatment procedure again, the prosthetist, for a number of reasons, prepares the tooth for grinding for a crown. If the remaining part of the tooth is extremely small (only the side walls or even the root remain), then installing pins does not make sense: the tooth will become loose from the load and the root may crack. You will have to see your dentist again.
You can correct the situation with a cracked tooth: one of the specialists glues the fallen crowns to cement, and after a while the tooth begins to rot and will need to be removed entirely. But the best option in such situations would be to immediately contact an orthopedic dentist for advice on installing a denture.
Types of dental inlays for a crown
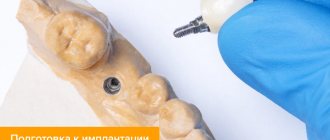
After consultation with a prosthetist, you will be sent to a general dentist for root canal filling and nerve removal. Next, the prosthetist drills recesses to place the inlay and makes impressions of both jaws to make a crown of a suitable shape and size. The impression is sent to the technical laboratory.
According to the appearance of the root part of the tabs, there are three types:
- Single channel;
- 2-channel;
- 3-channel.
Due to the technical complexity of installing the two- and three-channel version, the tab is made collapsible, and its cost is much higher than the single-channel one.
Tabs are divided into metal and ceramic according to the type of material they are made of. The first ones are made for metal-ceramic crowns or all-metal crowns. The metal used is cobalt-chromium alloy.
The ceramic core inlay is made of zirconium dioxide, and is necessary for the aesthetic appearance of real teeth - due to the transparency of the ceramic and the absence of dark color near the gums. With this type of inlay, prosthetists place ceramic crowns.
Prosthetics on implants: how to restore the smile of toothless patients?
Rehabilitation of edentulous patients can be achieved through several clinical approaches, each of which is suitable for specific individual treatment conditions.
Removable dentures supported by dental implants provide optimal levels of functional and aesthetic rehabilitation for patients, even in conditions of limited possibilities for installing a certain number of intraosseous infrastructures. Since this treatment option is more convenient for both the doctor and the patient, it is becoming increasingly popular in daily clinical practice. At the same time, most patients hope to achieve the same type of smile as, for example, with the installation of ceramic veneers, without fully realizing the clinical complexity of treating complete edentia.
But the modern capabilities of CAD / CAM technologies and the constant improvement of dental materials help doctors cope even with such high aesthetic demands of edentulous patients. The use of dentures supported by dental implants provides a number of advantages compared to conventional removable dentures, including: increased stability, functionality, comfort, patient self-confidence during social communication, a relatively simple manufacturing procedure and ease of home care of the structure. Such dentures can significantly improve the quality of life of an edentulous patient.
In this clinical case, a 58-year-old patient sought dental care due to discomfort caused by the action of a complete removable upper denture. When analyzing the anamnesis, it was discovered that in the lower jaw the patient has a complete removable denture fixed on six supporting implants, while in the upper jaw he uses a conventional complete denture, which does not meet either aesthetic or functional criteria (photo 1) .
Photo 1. Assessing the aesthetic interface before starting treatment: a complete removable denture on the upper jaw.
During the initial aesthetic analysis, it was discovered that the shape and color of the teeth did not meet adequate parameters: the midline of the upper and lower jaws did not coincide, and the convexity of the upper jaw deviated from the physiological one. The poor stability of the maxillary denture was caused by poor retention of the structure and the inaccuracy of the method by which the denture was made. Taking into account the patient’s financial capabilities and the initial clinical situation, a clinical approach with an implantation procedure and further fixation of the orthopedic superstructure was chosen as an acceptable treatment option. The treatment included the installation of four implants to support the prosthesis through telescopic crowns. This approach is optimal for total rehabilitation of the jaw or in cases where it is necessary to completely correct the previous results of orthopedic prosthetics. According to the algorithm, the primary telescopic crowns were milled from zirconium with a 2-degree wall angle, and the secondary copings were obtained by electroplating: this laboratory fabrication protocol combines the advantages of zirconium oxide (primary telescopes) with hydraulic retention (plated copings). After complete osseointegration of the implants, the surfaces of their bases were opened to obtain an impression and cast the model.
In order to move on to the next stage of treatment, we obtained functional impressions that recorded the exact position of the implants. For this purpose, impression copings were used, splinted together with a composite material (photos 2 and 3).
Photos 2 and 3. Splinting transfers and taking impressions.
After casting the working models (Fig. 4), the patient's vertical height of occlusion and gingival smile line were determined using a bite block. In the maxillary region, the occlusal curve was formed in such a way that 2 mm of the tooth edges remained visible even when the maxilla was at rest. The lower edge of the bite ridge was shaped parallel to the pupillary line so that it smoothly conformed to the curve of the lower lip in the smiling state. In the upper jaw area, the midline, smile line and canine line were also determined and recorded. A facebow was used to accurately record the position of the maxilla relative to the skull base.
Photo 4. Model with analogues for manufacturing a superstructure.
After all the basic jaw relationships were recorded, the models were fixed in the articulator (photo 5). The complexity of this clinical situation was that the parameters of the removable structure on the upper jaw had to be adjusted to the lower jaw prosthesis already fixed on implants, while the axis of the implants relative to the existing superstructure was not ideal, therefore, taking into account and correcting individual parameters was mandatory to achieve the most successful treatment result. The choice of the shade of the piece teeth was justified by the shade of the teeth in the structure of the lower jaw prosthesis. The shape of future teeth was dictated by the patient’s desire to imitate the appearance of his own teeth at a younger age. In order to achieve the predicted treatment result, at the preparatory stage a wax reproduction was made with ready-made factory teeth (SR Phonares II, Ivoclar Vivadent), the correction of which helped the doctor and the patient jointly agree on the aesthetic appearance of the future prosthesis.
Photo 5. Model fixed in the articulator.
Primary structure
Trying on the wax reproduction helped determine the required parameters of phonetics, aesthetics and occlusion (photo 6), after which a silicone key was made to record the intermaxillary relationships. To fabricate the primary structure, four custom titanium abutments were used (Figure 7), which were scanned along with the resulting model. The resulting digital data was imported into specialized software. The CAD program automatically suggested an adequate shape, height and angle of inclination of the telescopic crowns, which the technician slightly adjusted as a result of the analysis (photo 8). The primary telescopes were milled from zirconium, sintered to final density at a temperature of 1500 ° C. After checking the accuracy of the fit, the zirconium crowns were fixed on titanium abutments (Multilink Hybrid Abutment, Ivoclar Vivadent), and adjusted with a laboratory turbine using a parallelometer. The telescopic crowns were inclined at two degrees, and their surfaces were polished using a diamond polisher and copious amounts of water (photos 9 and 10).
Photo 6. Trying on a wax reproduction to determine aesthetic parameters.
Photo 7. Custom titanium abutments.
Photo 8. Reconstruction of the suprastructure using software after scanning the model.
Photos 9 and 10. Grinding of zirconium primary superstructures manufactured using CAD/CAM technologies.
Secondary structure
Through the algorithm described above, the primary crowns were prepared for the production of secondary substructures by electroplating. Using the airgraft method, zirconia crown surfaces were coated with a thin layer of conductive silver. After completing the technical process, the electroplated gold crowns were detached from the telescopes, and the wired silver coating was removed with a solution of nitric acid. As a result of the above manipulations, an accurate secondary substructure was obtained.
Tertiary structure
All components of the superstructures were fixed on the working model, and a layer of wax was applied to the surface of the secondary telescopic crowns to compensate for the space of the future cement. The tertiary structure was cast from a cobalt-chromium alloy, polished and fixed in the oral cavity to the structure of telescopes obtained by electroplating (Multilink Hybrid Abutment and Monobond, Ivoclar Vivadent). This procedure was performed intraorally to avoid possible tensions between substructures that could arise when fixing the elements on the working model (photo 11).
Photo 11. Connection of secondary suprastructures with tertiary ones.
Aesthetic design
The structure obtained during laboratory production was covered with an opaque layer of light-curing composite (SR NEXCO, Ivoclar Vivadent) in pink and white shades. A silicone key was reused to record intermaxillary relationships. The SR Phonares II piece teeth were transferred from the wax reproduction to the formed base. The occlusal relationships were rechecked before further procedures. To simulate the pink part of the gum, the IvoBase injection system (Ivoclar Vivadent) was used: first, the prosthesis was fixed in the halves of a specially designed cuvette using gypsum types 3 and 4; After removing the wax and sealing the plaster surfaces, the IvoBase capsule and cuvette were placed in the polymerization chamber. Injection and polymerization of IvoBase is a fully automatic process that takes 60 minutes. Users can choose between two polymerization program options: the standard program takes approximately 40 minutes; activating RMR mode increases total operating time but minimizes monomer concentration to less than one percent. The latter approach is more suitable because it virtually eliminates the risk of an allergy or irritant reaction to the presence of the monomer. After polymerization is complete, the cuvette is opened, the prosthesis is removed from the gypsum core, and can be processed and polished. In order for the future restoration to best meet the patient’s expectations, we decided to correct the visible areas of the partial dentition by additionally applying the SR NEXCO material. To do this, the labial surfaces of the anterior teeth and the corresponding pink parts of the gums were sandblasted, after which SR Connect (Ivoclar Vivadent) was applied to the treated surface. Thus, it was possible to achieve the shape of the teeth that best met the patient’s expectations, the final polishing of which was carried out using biaxial brushes and silicone pads. Thanks to a multi-stage approach, it was possible to obtain a final prosthetic design that maximally imitates the appearance of natural teeth and corresponds to the parameters of the aesthetic harmony of a smile (Photos 12-15).
Photos 12 and 13. View of a customized prosthesis for the upper jaw.
Photo 14. The macrotexture and shade of the artificial teeth were imitated as closely as possible to resemble natural teeth.
Photo 15. View of the fixed prosthesis on implants.
conclusions
Many patients are quite skeptical about removable dentures, considering these designs to be not entirely complete. But the use of dental implants as a support and a telescopic substructure as a fixation element significantly improves the capabilities of such orthopedic prosthetics, helping to achieve the most effective rehabilitation results. Completely edentulous patients, in some cases, may have rather high aesthetic demands for future restoration, the implementation of which becomes significantly more complicated, given the need for partial restoration of the soft tissue area of the gums. In addition, it is important to maintain a certain harmony between the parameters of pink and white aesthetics. Considering patients' expectations regarding the aesthetic and functional parameters of a future prosthetic design, dentists should be well trained and informed regarding which materials and technologies can help achieve the most successful rehabilitation outcome, regardless of the complexity and individual conditions of each individual clinical case.
Author: Christian Petri
Dental inlays in dentistry: pros and cons
The advantages here are obvious:
- The design is reliable and durable - it can withstand heavy loads, sits tightly in the gum, does not wear out externally, and the restoration of such a tooth will last more than 12 years;
- Suitable for severely damaged, chipped teeth.
Of the minuses:
- The cost is higher than treatment with structures made of pins and fillings;
- If necessary, a 2- and 3-channel disassembled insert must be installed by a professional who still needs to be found.
What is Orthosis?
An orthosis (splint) is a sleeve fixation device for a limb, which ensures immobility in a given joint in the required position. The splint is made from a cast, a block, directly from the patient’s body. Has additional fastening devices (zippers, lacing, Velcro tapes).
The orthosis (splint) has the form of a sleeve for a certain part of the body (arm, leg) with fastenings.
Orthoses are divided into fixing, correcting, functional-corrective, unloading.
They are prescribed for fixation, correction, unloading of individual body segments (arms, legs, torso), to restore function.
Orthoses can be for the upper limb (brace for the shoulder and forearm, elbow and wrist joints, splint for the hand with thumb abduction) and the lower limb (brace for the knee and ankle joints).
Dental inlay for a crown: price
The cost of such treatment for the current 2021 is:
- A single-channel metal tab starts from 4,000 rubles;
- 3-channel metal inlay per tooth from 4,500 rubles;
- A stump inlay made of zirconium dioxide will cost from 8,000 rubles.
The cost does not include filling of canals and making crowns. Typically, a fully treated and “formed” tooth costs 25-40 thousand rubles, depending on the clinic.
Indications for the use of orthoses (splints):
— after surgical interventions on the musculoskeletal system — inflammatory diseases of the joints — for the prevention and treatment of deformation/contracture — consolidation of the results of rehabilitation treatment — correction of pathological position of the limb — development of movement in the joints — improvement of walking — unloading of the damaged segment Orthoses (sponts) with specified goals can be used for the following diseases:
— cerebral palsy (cerebral palsy) — flaccid and spastic paralysis, paresis — conditions after injuries, operations — drop hand — drop foot — diabetic foot — contractures and deformities of the upper and lower extremities — pathological alignment of the feet — increased muscle tone, spastic syndrome
Who is indicated for orthotics?
Wearing orthoses (corsets, bandages, special shoes or orthopedic bodies) is indicated in the following situations:
- problems with ligaments (congenital instability, weakness, damage);
- post-traumatic conditions (after sports injuries);
- arthrosis and arthritis of the joints;
- recovery period after surgical interventions.
The main purpose of using orthotics is to provide the damaged organ with a state of rest. Orthoses help reduce the load on a damaged joint or limb, fix it, correct movements and increase activity. However, the effectiveness of the orthosis depends on its correct selection.
Tab
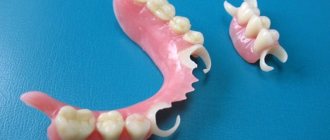
An inlay is a microprosthesis used to replace tooth defects and restore the anatomical shape of crowns. It can serve as a support for a short bridge (the so-called Maryland bridge), a splinting structure.
Dental inlays
Indications for production:
- Pathologies of hard dental tissues that cannot be replaced by filling: caries , increased abrasion, wedge-shaped (abfraction) defects , crown fractures, enamel hypoplasia, fluorosis;
- Defects in the dentition of 1–2 teeth (as a fixing element in temporary structures with an extended service life);
- Pathological mobility of teeth (splinting elements during orthopedic treatment of periodontitis - inflammation of periodontal tissues).
Advantages of inlays over direct restorations (“fillings”):
- Elimination of incorrect cavity formation (on the model and in the tooth it will have tight, precise contact with the walls and a single direction of insertion due to steep walls and a flat bottom);
- The possibility of more accurate and correct restoration of the correct anatomical shape and individual characteristics of the crown, the functional component (chewing);
- High-quality restoration of the contact point - the part of the crown in contact with adjacent teeth (optimal shape and position, smoothness) - this is important for the healthy condition of the gums;
- Possibility of additional correction before fixation (visually, radiologically, instrumentally);
- High color stability and durability.
Restrictions and contraindications:
- Very deep and hard-to-reach cavities (submerged under the gum);
- Low natural crown.
Classification:
- Inlay – completely surrounded by hard tooth tissues;
- Onlay – cover the internal slopes of the tubercles (protective overlay);
- Overlay – covers all surfaces except one (usually the outside);
- Pinlay – reinforced into tissue using pin(s).
For the manufacture of inlays, the following are used: metal alloys (cobalt-chromium, silver-palladium, gold), composite materials, ceramic masses, zirconium oxide.
Clinical and laboratory stages of making an inlay (indirect method):
- Creation of a cavity within the enamel and dentin with preventive expansion to avoid secondary caries ;
- Obtaining impressions and models;
- Making a wax reproduction of the future design;
- Conversion into a permanent material (casting, firing, milling, pressing);
- Checking the accuracy of manufacturing on the model and in the clinic, fixation.
With the direct manufacturing method, the formation from wax occurs directly in the cavity prepared in the tooth. The indirect method is most often used.